CEREAL KILLL3R'S - Halo 3 Master Chief (WIP with Videos)

re: CEREAL KILLL3R'S - Halo 3 MK VI Comprehensive wip

UPDATE!! (WITH VIDEO)


On the menu today, we have Neck Seals and Battle Damage!


I've been waiting all day for my latest video to upload (Took about 6 hrs) before I made this update. It's up so here we go!


Started working on the neck seal. First thing I did was re-enforce the back of the area that I was to lower. Then I went straight to getting rid of that god awful pep line in the middle of the neck.

DSC_0086.jpg


After some grinding down, a coat of filler and lots of sanding, we end up with this:

DSC_0088.jpg


A thin coat of glaze to bevel all the sharp inside corners and get rid of all the pin holes and imperfections. If I had waited until later to do this, it would have been much harder when all the small details were in.

DSC_0092.jpg


While I was waiting for the glaze coat to cure up, I started on the main battle damage of the front chest piece. Accurate as per Halo 3. Being that the damage itself was caused by an energy weapon, the by-product would have been head damage. Therefore, I went with a smoother, more "liquified metal" look to make it look like the piece was melted and then re-solidified. It looks very stark and off because of the extreme contrast difference between the white and the dark grey primer, but will balance out once painted up. :) For a more complete explanation and walk-through, check out video # 7.

DSC_0098.jpg


Made my measurements and taped off the area which will be the rim of the neck seal:

DSC_0100.jpg


Bondo coated, sanded and smoothed:

DSC_0103.jpg


Lather, rinse, repeat for the two pieces that sit on the collar of the neck seal:

DSC_0117.jpg


And again for the center...

DSC_0121.jpg


It should be noted that this is indeed a great deal of work! This is not really a novice task. A much easier approach to the neck seal would be foam or rubber, I went the solid route due to the fact that I will be molding the chest and did not want the possibility of it being damaged by the process.

And one last time for the two main details on the neck. (Pain in my *****!)

DSC_0124.jpg


Once the details were in, I put on a glaze coat just to finalize everything. That's about where I left off. Today having been father's day left me busy with the day's events and no time to work. But... there's always tomorrow! ;)


************************************************** *****

Making Master Chief: Episode 07 - Making A Neck Seal & Creating Battle Damage.


************************************************** *****


As per normal, any questions/comments/critiques... Always welcome!!
Take care everyone,
Dave/Cereal.
 

Attachments

  • DSC_0086.jpg
    DSC_0086.jpg
    306.4 KB · Views: 95
  • DSC_0088.jpg
    DSC_0088.jpg
    260.1 KB · Views: 95
  • DSC_0092.jpg
    DSC_0092.jpg
    316.6 KB · Views: 106
  • DSC_0098.jpg
    DSC_0098.jpg
    242 KB · Views: 97
  • DSC_0100.jpg
    DSC_0100.jpg
    318.6 KB · Views: 88
  • DSC_0103.jpg
    DSC_0103.jpg
    234.2 KB · Views: 94
  • DSC_0117.jpg
    DSC_0117.jpg
    252.9 KB · Views: 112
  • DSC_0121.jpg
    DSC_0121.jpg
    275.4 KB · Views: 98
  • DSC_0124.jpg
    DSC_0124.jpg
    333.3 KB · Views: 99
Last edited by a moderator:
Happy Time Update!!


Tomorrow is an exciting day for me!!!
It is the day that I will finally be ordering my Mold/Cast materials :)
Happy and nervous at the same time!
Will keep you all posted :thumbsup


Dave/Cereal
 
Alright, molding materials.... ordered!
Will be working on the armor this Saturday, so there should be an update on the weekend at some point!

Till then,

Dave/Cereal.
 
UPDATE!!!


Alright, here we go again!


After looking and looking.... and looking....
Something wasn't right! And here's my problem:

When you look at the center of the back, it doesn't look right!!! The boarder isn't the right size (when compared to H3 game footage) so after some scratching my head and sighing... I've decided to change it and make it right! So I taped off the new dimensions and went to work.

DSC_0130.jpg


DSC_0137.jpg


Sanding, sanding and sanding...

DSC_0142.jpg


Then some glazing, as usual...

DSC_0149.jpg


Which bring us to my next issue... The lower center back, once again... I keep coming back to it, not being happy with it. So after some debate (due to the work involved) I finally decided to go for it!

First, I took all my measurements and drew in the rough design:

DSC_0150.jpg


Then went to town with some sculpting expxy.

DSC_0167.jpg


24 hours later it was nice and cured, sanding and sanding... and shaping and sanding... (sigh) ...

DSC_0183-1.jpg


I then glazed it, while waiting for the glaze to cure I did all the finishing touches on the top center of the back. Then I completed the left side boarder for the lower center back. Then sanded down the center detail.

DSC_0189.jpg


Once everything was nice and dry, I hit the center and right side with a coat of primer (have been dying to do this!)

DSC_0194.jpg


DSC_0197.jpg


DSC_0201.jpg


DSC_0203.jpg


This side is now considered to be "Rough Finished" which means that it will sit like this until the other side is done. Once the other side catches up to this, I will go over the whole piece and do all of the fine detail work and clean up all of the imperfections and inconsistencies.


So for now... Done and done!
Next, will be the left side of the back which will have the key points covered in the upcoming video installment!


Well, that's about it for now!
As usual, questions/comments/critiques.... always welcome!

Dave/Cereal.
 
Such a detailed and informative build thread full of pro tips. Thank you so much for taking the time to create the videos and going step by step so us beginners in prop/costume building can learn.

You are awesome. Can't wait for the next episode. :D
 
This is an absolutely amazing post and a fantastic looking costume. I hope you don't mind if I ask you a couple of questions?

I'm new to this and starting to make a helmet of my own in a few days. I only hope it's half as good as yours!
 
UPDATE!! MOLD... DONE!


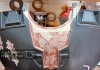
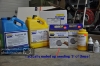
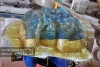
Alright, haven't posted much as I've been quite busy. So did a little shopping and here's what I came home with:
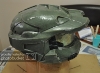
DSC_0217.jpg


Let's celebrate by molding my helmet! :)

First things first, here is a list of the materials I used:
  • Dragon Skin 10 Fast x3 pint kits
  • Silicone Thinner
  • Thi-vex
  • Silc-Pig
  • Smooth Cast 300
  • So-Strong 'Black'
  • A countless amount of cups
  • Even more brushes
  • Tongue Depressors
  • A deck of playing cards
  • Hot Glue
  • Cardboard
  • Coarse Fiberglass Matt
  • Liquid Polyester Resin
  • Wing nuts, Bolts & Washers
  • Aluminum Foil
  • Most importantly.... TIME!

Let's get started!

*** It should be known *** This is not a tutorial... This is just what "I" did to mold my helmet. Nothing shown here should be regarded as "The Way" it is done. As this was my first go at molding.
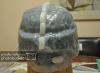
Step 1.

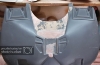
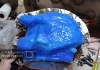
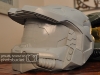
First layer of Dragon Skin:
- The first layer is thin, very thin! The point of this layer is solely to capture all the detail of the piece to be molded. The layer is kept thin to avoid air entrapment, this is very important when using Dragon Skin as Smooth-On Does strongly recommend the requirement of De-gassing prior to use! Unlike Rebound 25/40 which does not and is more forgiving a material to work with. I mixed a small amount with Silicone Thinner to bring the viscosity of the Dragon Skin down to a more easily 'brushable' consistency. This first layer, is the only time where Thinner was used.

DSC_0232.jpg


Step 2.
The Second layer o Dragon Skin:
- The second layer is applied with no additives (thinners/thickeners) and it's purpose it to give the first very thin layer some more substance.

DSC_0239.jpg


Step 3.
Undercut fill 1 of 2 and Key placement:
- This is not considered to be a 'layer', but is meant only to begin to fill all of the undercuts on the piece. (under the brim, cheeks, nose, etc...) A batch of Dragon Skin is mixed with Thi-vex to bring the viscosity up, it is then applied to the above stated areas. Material is also placed in a thin coat where the keys will be placed. Once curing of this batch has reached a nice and sticky state, the keys are applied to their ore-determined positions.

DSC_0245.jpg


Step 4.
The third layer of Dragon Skin:
- The third layer is generously applied to further bulk up the overall thickness of the mold and is applied with no additives. (thinners/thickeners)
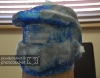
DSC_0247.jpg


Step 5.
Undercut fill 2 of 2:
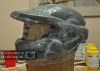
- The second undercut fill is to further back-fill all of the areas which have any remaining undercuts. Undercuts are a no-no, as if they are left unfilled they will cause the mother mold to not separate and can become weak spots when De-molding the silicone. I added pigment to this and all further batches of Dragon Skin with the sole purpose of being able to see where I am going, versus where I've already been.

DSC_0252.jpg


Step 6.
The forth layer of Dragon Skin:
- The forth layer is to once again add further thickness and bulk to the mold. It also helps to further smooth out the previous undercut fill layer.
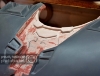
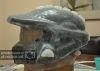

Step 7.
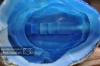
The fifth and final layer of Dragon Skin:
- This layer was a personal choice. I just looked at it as 'added insurance' and rigidity. The final thickness of the mold was just shy of 1/4" and heavier than I had anticipated!

... Love the color though!
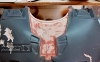
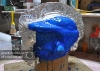
DSC_0267.jpg


Step 8.
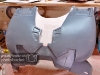
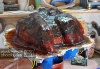
Building the Mother Mold:
- First things first... the all too familiar Mohawk, this was build with playing cars and hot glue. I then covered it with a layer of aluminum foil. (Good luck to those who may try to mold... Nothing sticks to silicone!!!! Nothing!!! )

DSC_0274.jpg


- I propped the helmet on one side using a coffee tin and started away with the glassing (]B]Respirator warn at all times![/B])

DSC_0286.jpg


- Once cured, I did the second layer of fiberglass. This layer was tinted, once again so I can be sure that no areas are missed. Taking you're time when glassing will give you a nice smooth finish that requires little to no 'after-work' to knock down and or cover sharp or jagged areas. It's all in the application!!

DSC_0287.jpg


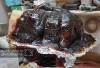
- Lather, rinse, repeat for side 2:

DSC_0293.jpg


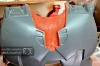
- After a couple of hours of curing the piece is rock solid, I drilled the holed for the fasteners, then with a couple of flat screwdrivers and a hammer the pieces were gently separated.

DSC_0300.jpg


DSC_0299.jpg


- The de-molding of the silicone inner mold went like a dream! No cut seam needed, just rolled it up and off!

DSC_0302.jpg


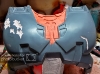
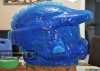
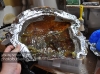
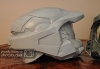
All that was left to do was make my first casting! :)
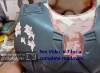
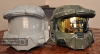
Here are the results!


DSC_0306.jpg


DSC_0309.jpg


DSC_0310.jpg


DSC_0312.jpg


I find it quite amazing to look at it once again with no paint.... It looks rather dull and incomplete next to it's mama! ;)
For my first go... I couldn't be happier with the outcome! (for both the mold and the casting)


Below is a link to the video I made throughout the mold making process...
It is not a tutorial... I just decided to share what I have done.
Enjoy!


**** Smooth On Dragon Skin - First Time Making A Mold ****


Well that's about it for now, it's been a busy and expensive week! ;) As per normal... An questions/comments/critiques... Always welcome!

Cheers all,
Dave.
 

Attachments

  • DSC_0232.jpg
    DSC_0232.jpg
    288.9 KB · Views: 95
  • DSC_0217.jpg
    DSC_0217.jpg
    423.1 KB · Views: 88
  • DSC_0239.jpg
    DSC_0239.jpg
    282.9 KB · Views: 99
  • DSC_0245.jpg
    DSC_0245.jpg
    268.4 KB · Views: 102
  • DSC_0247.jpg
    DSC_0247.jpg
    258.1 KB · Views: 91
  • DSC_0252.jpg
    DSC_0252.jpg
    285.8 KB · Views: 104
  • DSC_0267.jpg
    DSC_0267.jpg
    353.6 KB · Views: 97
  • DSC_0274.jpg
    DSC_0274.jpg
    419.5 KB · Views: 93
  • DSC_0286.jpg
    DSC_0286.jpg
    478.1 KB · Views: 91
  • DSC_0287.jpg
    DSC_0287.jpg
    461.5 KB · Views: 91
  • DSC_0293.jpg
    DSC_0293.jpg
    538.8 KB · Views: 97
  • DSC_0300.jpg
    DSC_0300.jpg
    433.5 KB · Views: 93
  • DSC_0299.jpg
    DSC_0299.jpg
    352.1 KB · Views: 97
  • DSC_0302.jpg
    DSC_0302.jpg
    286.1 KB · Views: 91
  • DSC_0306.jpg
    DSC_0306.jpg
    262.4 KB · Views: 87
  • DSC_0309.jpg
    DSC_0309.jpg
    237 KB · Views: 82
  • DSC_0310.jpg
    DSC_0310.jpg
    285.8 KB · Views: 83
  • DSC_0312.jpg
    DSC_0312.jpg
    219.3 KB · Views: 89
Last edited by a moderator:
Amazing build!
If you don't mind sharing, what are your registration keys made of or where did you get them?

Thanks, and once agian pure awesome!
 
Amazing build!
If you don't mind sharing, what are your registration keys made of or where did you get them?

Thanks, and once agian pure awesome!
Looks like silicon that's been poured into ice cube trays and left to set. I know a lot of the guys that do molding/casting make theirs that way.
 
Your attention to detail is amazing. I am an impatient person in regards to fine tuning and I have to say your a lot less impatient than I am ;)
 
Amazing build!
If you don't mind sharing, what are your registration keys made of or where did you get them?

Thanks, and once agian pure awesome!

Hey Dericrw,
Check you're PM, I'v sent you a message.
Just to state again, I make my keys using ice cube trays. For the larger keys on the cheeks, I just used a red Solo cup and filled it about 3/4", once the piece was set, I just cut it in half into 2 half circles. Nothing too fancy here! ;)


This build just keeps getting better! Don't downplay your molding skills man, it looks great!

Thanks a lot!
I wasn't trying to downplay the mold. The whole time I was making it I was quite nervous, worrying that something would go wrong (that's just what I do! ;) ). I am actually very happy with how the mold came out for my first go at it! It has given me a lot of confidence for the next time around.

Looks like silicon that's been poured into ice cube trays and left to set. I know a lot of the guys that do molding/casting make theirs that way.

That would be correct! As stated above ^.


Thanks all for the comments!
Much appreciated! :thumbsup

Dave/Cereal
.
 
Last edited:
Your attention to detail is amazing. I am an impatient person in regards to fine tuning and I have to say your a lot less impatient than I am ;)


Thank you sir!
I try my best to reproduce as accuratly as possible. Any other way just wouldn't feel right.

Cheers,
Dave/Cereal.
 
Back
Top