Cassian Andor (Andor Series) Blaster (MW-20 Bryar Pistol)

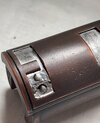
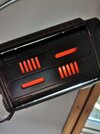
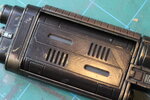
I think you’re right, that’s likely what they are. In fact, before I conceded and made that area silver, I actually entertained doing it in a Pearl white or maybe even a GITD nail polish or something as it absolutely didn’t look silver. This is probably why. These sensors wouldn’t be totally opaque, so I’m seeing a luminescent….something. Makes sense in any event, so I’m going with It.


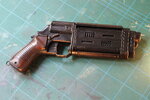
By the way, If anyone is using the screencaps from the show and/or the prop video from SW.com there are at least 3 different versions, so don’t stress on trying to get accurate to a single one.
 
This part of the gun bothers me. First off, all the 3D prints got it wrong. The shape is off, but that’s not my issue. What I don’t get is, and I realize this is not a real gun, what exactly is this part supposed to be? Why would a solid copper piece even have a silver area on it. It’s not decorative, so it’s confusing. It looks like there’s some scoring in there on the round sections, so that’s how I’m painting it. I guess. I may get something to create those ridges, but I HATE sculpting compounds! HATE! lol
I've added that and a handful of other little details to the model(s) I've bought before printing. I love details like that cos contrasting paint finishes add so much to any prop.

I figure it's some sort of exposed and serviceable part to maintain/clean the barrel rotating mech? or a charging contact point for recharging that top part that could be a battery/energy blast magazine?

.....which is EXACTLY why these sort of details exist :D
 
You say charging point but you might not be kidding. When I saw that lightened enlarged picture thats exactly what came to mind, but not prop wise. I've seen metal contacts like that on real stuff (tactical flashlights) that are used to couple a charger magnetically when the item is sealed.

Given that pic is supposed to be from a version that's got all the bells and whistles its bound to have a lot of electronics inside so it wouldn't surprise me if that's exactly what they are for.
 
That’s an interesting theory as well. It does indeed look like a charging point of sorts and I too have seen items with similar ports. If that is indeed the case then it WOULD be slightly raised as I initially saw and also would make sense that it’s got black scoring on it as well. Good points, guys.
 
You say charging point but you might not be kidding. When I saw that lightened enlarged picture thats exactly what came to mind, but not prop wise. I've seen metal contacts like that on real stuff (tactical flashlights) that are used to couple a charger magnetically when the item is sealed.

Given that pic is supposed to be from a version that's got all the bells and whistles its bound to have a lot of electronics inside so it wouldn't surprise me if that's exactly what they are for.
Oh I'm not joking. Nerding out about prop details is something I've taken very seriously for a very long time
 
This is what I’m seeing. I dunno if I wanna go this route here as I’d have to commit to gluing that foil in there, but I like the concept.
 

Attachments

  • 648C09E2-59E2-4E40-84B3-38CF87C06A0B.jpeg
    648C09E2-59E2-4E40-84B3-38CF87C06A0B.jpeg
    2 MB · Views: 104
Testing out paint colours and layering techniques on a not so accurate model before printing my own (probably sketchy a.f) model.
Doesn't look *that* bad but still missing something...a semi gloss grape kinda something...
 

Attachments

  • IMG_20230614_223309_edit_2791900042700029~2.jpg
    IMG_20230614_223309_edit_2791900042700029~2.jpg
    3 MB · Views: 89
  • IMG_20230614_223329_edit_2791888048191177~2.jpg
    IMG_20230614_223329_edit_2791888048191177~2.jpg
    3.1 MB · Views: 94
  • IMG_20230614_235520~2.jpg
    IMG_20230614_235520~2.jpg
    3 MB · Views: 86
  • IMG_20230614_235502~2.jpg
    IMG_20230614_235502~2.jpg
    2.8 MB · Views: 105
That looks great baron! I'd love to hear about the process. And do the inset parts on the rotating bit have clear red plastic or did you just paint it gloss red?
 
That looks great baron! I'd love to hear about the process. And do the inset parts on the rotating bit have clear red plastic or did you just paint it gloss red?
Thanks Longbaugh,
Once I've printed and completed and am happy with my slightly more accurate model of it I'll do a thread documenting the process...IF it works :D
The red plastic was a temp measure cos I'm impatient.
I've since cut and installed some smoke perspex backed with the red plastic so it looks red when held up to the light but it's otherwise gray in colour as per ref pics...the ideea was top half of each side only but that obvs bleeds thru so that's the end of that genius idea :D
Whoever was responsible for the colour scheme/finish on this prop was a genius, it's really something and a lot of fun to try and replicate.
 

Attachments

  • IMG_20230616_095228.jpg
    IMG_20230616_095228.jpg
    2.2 MB · Views: 83
  • IMG_20230615_112752.jpg
    IMG_20230615_112752.jpg
    3.4 MB · Views: 85
  • IMG_20230615_110307.jpg
    IMG_20230615_110307.jpg
    2.1 MB · Views: 85
  • IMG_1187.JPG
    IMG_1187.JPG
    6.9 MB · Views: 87
  • IMG_1185.JPG
    IMG_1185.JPG
    6.7 MB · Views: 84
  • petal_20230616_101825.mp4
    9.1 MB
Last edited:
Lots of great inspiration from everybody here. I know it's been months, but I finally have something to contribute. Just finished a fully electronic version of this blaster with sounds, lights, overheat feature, and a rotating chamber.

Damn! That’s really cool what u did there. I’ve been trying to figure out how to make it rotate like that. Specifically back and forth like that. Not simply in one direction. What did you do there to make it work?
 
Last edited:

Your message may be considered spam for the following reasons:

If you wish to reply despite these issues, check the box below before replying.
Be aware that malicious compliance may result in more severe penalties.
Back
Top