You are using an out of date browser. It may not display this or other websites correctly.
You should upgrade or use an alternative browser.
You should upgrade or use an alternative browser.
Building The Death Star - PRODUCTION
- Thread starter PHArchivist
- Start date
Kris Lyssara
Sr Member
Hey, if you ARE keeping an accurate running count, I'd honestly be interested in it, just to get some real appreciation for the scale of this project.
PHArchivist
Master Member
Darth Brass
Sr Member
Squeeee!!!
PHArchivist
Master Member
Oooh, priddy lights!
They look a little large due to the lack of focus in the shot. They don't bloom nearly as much in person.
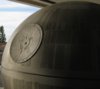
On the shots of the dish, the more grey shot (the first one), you can see I managed to flatten/thin five strips in the inner circle. It wasn't easy and wasn't without some slight deficits, But I'm happy with the results.
Also, on the "Main ring" (the one with the longest strips), I've flattened (even more so than in the the previous pics) nearly all the strips.
The lights look good! Will you go for a more uniform and consistent appearance than the prop?
MonsieurTox
Master Member
REAR WINDOW
One thing I haven't talked much at all about is the lareg section of clear acrylic in the back of the model.
Recall, on the back side, in the lower dome I have dish-sized access hole to change light bulbs.
In the upper dome, I have a large trapezoid, starting at the equator, and extending up to the arctic circle that has been left as clear acrylic (unpainted). This is an homage to the original, and to allow visitors to see the internal aspects of the model.
But...
This also leaves a HUGE amount of light shining out the back which detracts from the actual lights of the model. Plus, though the original is only part way finished (front half of the sphere), the clear area interrupts the continuity of the sphere.
So I'm thinking about painting it over.
I would do so with the base grey (now that I have more - thanks CrackerJazz!), but likely would not add cityscapes and lights.
What do you all think?
Also, for the industry pros and photographers out there:
--What effect does this have on photography?
--Would the "light bleed" help or hinder photos?
--Does the large amount of light cast on the photo backdrop facilitate pulling a matte?
Thoughts...?
Dilemma...
On the stage, that's not that important... The blue screen is lit and the light coming from the back of the DS is not an issue... (it can be an issue for one of the pass for the beauty shot though... when all lights are turned off except the inner DS light). Have you tried to light your DS and take a pic of it in the dark, to see how much it bleeds ?
That would be sad to have to paint it... I really like the idea of seing the inside of the beast and that matches the original... But on the other hand it would be weird to see light on the backwall !
Regarding the dish, you did an awesome effort to get the details thinner but now the edges looks a bit rounded to me (due to sanding and paint ?). It's not as sharp as the original... Don't take it bad Rob, but if I were you I would build another dish... With sharp raised details... You've putting so much effort in this that I think it is really worth it !
The first windows are awesome btw !!
PHArchivist
Master Member
I understand about the rounding over. Another issue is that when attacking these pieces with sand paper as I have, its difficult to maintain perfection at this scale.
What appears to the eye to be an evenly sanded piece may not actually be. In close up photography, very subtle variations in thickness become apparent, imperfections in the styrene become more clear.
For example,,,
Is it possible that when using a caustic "hot" glue, that the melted side of the detail piece actually widens a bit as it is compressed onto the substrate? And hence, as the original width top portion (in cross-section) of the piece is sanded away, does that then leave the imperfect, widened portion to now form the new top surface and outside edges? I think perhaps...
Again, to the naked eye, these subtle imperfections aren't really apparent. But in photos, I think they all add up to a slightly "unclean" or soft look.
But...
No way am I going to re-build the dish.
I think these subtle imperfections are the lesser of two evils, compared to the way-over-scaled detail pieces. To compensate completely, frankly, I'd be better off simply sanding the detail pieces off entirely, and applying new pieces to the existent dish.
Of course I could always build out another dish on the side at a later date. And if someday I have the gumption, I could install it in the future.
SurfingDoc
Well-Known Member
Love watching the progression of this thing!
SteveNeill
Sr Member
The lights are looking so good! What a beauty!
Steve
Steve
PHArchivist
Master Member
What is the circumference of a 36" diameter circle - is it 113"?
Then take back 16" since the rear 20% is not detailed.
So 97"...
I have 31" of circumference completed from the equator to the south pole, plus all of the antarctic circle.
About 3,500 holes so far...
Then take back 16" since the rear 20% is not detailed.
So 97"...
I have 31" of circumference completed from the equator to the south pole, plus all of the antarctic circle.
About 3,500 holes so far...
-... . .- --..
Sr Member
Circumference = pi x diameter where pi = 3.1416
3.1416 x 36 = 113.0976
3.1416 x 36 = 113.0976
PHArchivist
Master Member
Always hated math!
So I'm at about 35% to 40% of the lower dome.
So at this rate the lower dome itself will be close to 10,000.
Total model close to 20,000...
Wow.
So I'm at about 35% to 40% of the lower dome.
So at this rate the lower dome itself will be close to 10,000.
Total model close to 20,000...
Wow.
vaderdarth
Master Member
Wow, I can't wait to see this baby in person one day. ")
PHArchivist
Master Member
More boring math/numeric trivia:
The bit that I am using is a #80, measuring .14mm
The general scale of the model is 1mm = 60 feet
Hence the windows I am creating - in scale - are about 8.4 feet in diameter.
The bit that I am using is a #80, measuring .14mm
The general scale of the model is 1mm = 60 feet
Hence the windows I am creating - in scale - are about 8.4 feet in diameter.
Similar threads
- Replies
- 7
- Views
- 1,139
- Replies
- 14
- Views
- 1,710