Photon
Active Member
This is a project that I've been wanting to do for some time. The kit, 1:32 206 Bell Jet Ranger, has been out of production for a while and tends to go for more than I'm willing to spend. A friend in Europe eventually found one in questionable condition at a model show in Germany for 5 euros and arranged to have it sent to the States.
The kit is originally from 1965, and is not the greatest. The particular boxing that I scored was from 1985 and at some point in the past had been partially assemble and painted by a kid. So I had to strip the paint and glue the best I could and get it cleaned up.
I had naively thought this would be a quick project...just scratch building the new landing gear and having some custom decals printed. I didn't anticipate how much work it would be to get the parts to fit and clean up seams and gaps.
Anyway, that stuff is boring and I didn't bother to photograph much of it, since at this point, I'm trying to put it behind me.
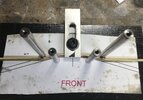
Here's where things stand at the moment:

I cut the these vents holes in the engine compartment and glued some fine mesh behind them.

The original landing gear mounts were molded as part of the fuselage and had to be removed. I didn't photograph this, but here's what it looked like before:

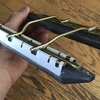
I also cut a slot to mount the rear landing gear tube as seen on the actual helicopter. Of course I originally put this in the wrong place and had to fill and re-cut it. oh well.


Next up I'll detail how the new landing gear was made. Thanks for looking.
P.
The kit is originally from 1965, and is not the greatest. The particular boxing that I scored was from 1985 and at some point in the past had been partially assemble and painted by a kid. So I had to strip the paint and glue the best I could and get it cleaned up.
I had naively thought this would be a quick project...just scratch building the new landing gear and having some custom decals printed. I didn't anticipate how much work it would be to get the parts to fit and clean up seams and gaps.
Anyway, that stuff is boring and I didn't bother to photograph much of it, since at this point, I'm trying to put it behind me.
Here's where things stand at the moment:
I cut the these vents holes in the engine compartment and glued some fine mesh behind them.
The original landing gear mounts were molded as part of the fuselage and had to be removed. I didn't photograph this, but here's what it looked like before:
I also cut a slot to mount the rear landing gear tube as seen on the actual helicopter. Of course I originally put this in the wrong place and had to fill and re-cut it. oh well.
Next up I'll detail how the new landing gear was made. Thanks for looking.
P.
Last edited:
")