Qui gons gin
New Member
Intro
With the lockdown still happening I thought It would be a good time to share what the project I’ve been working on. Around last June, I’d seen someone online convert their old hasbro clone helmet, into the real thing! And I was inspired to make my own. After some experimentation, I was very happy with the outcome. After realizing how easy this project was, I just had to make another!
For something like this you don’t need much experience – just good research skills. Now that I’ve had some practice on the subject, I really wanted to share what I’ve learnt with everyone. I have never posted anything like this before so I hope you will enjoy following my thread and if you have any questions regarding the build, please ask :]
Equipment
Getting the right equipment is essential for the best finish possible.
First of all you're going to need the Hasbro 2008 clone helmet, which is a discontinued toy. The best place to find one of these is either in your loft or on ebay (around £20-£30 used).
Tools that are essential:
-Dremel with sanding bit and disk,
-heat gun (I just used a paint stripper),
-screw drivers,
-glue gun,
-and appropriate safety gear.
Other essentials:
-lots of sand paper and/or sanding sponge,
-car body filler (I used a brand named isopon p.38) and instant filler paste
-thin sheet of acrylic or an old plastic bucket (about 1mm – 2mm thick),
-masking tape,
-filler primer spray paint, white spray paint, regular black+white acrylic paint
Optional material:
-super glue ( I used gorilla glue),
-wet and dry sandpaper,
-a tinted sheet of black acrylic (which later you will see I used to replace the visor as my original was scratched),
Materials if you plan on wearing it:
-sponge for padding the inside,
-small fans for keeping the visor defogged and your face cool
Build
First, I strongly advise to take the helmet apart and remove certain features. For example, there will probably be a black rubber piece inside that rests on your nose – remove it. Decide whether or not to keep the buttons on the side of the helmet. These activate the voice changer function. You can remove the wiring for these like I did for more space inside the helmet or keep them if you like it. There is also a bridge vertically across the visor which will hold the wires running to the speaker. I used a sanding disk to remove this feature so that it would be easier to see.
Here you can see how the helmet comes apart in to 2 pieces. A section of the fin which contains the speaker can be removed separately from the entire helmet as well.
I removed the bridge, wires, and battery pack to create space inside the helmet. I also advise you rub the outside of the helmet with some sanding paper. This is because the plastic has a glossy finish to it, and it will make it hard for paint and filler to stick to the surface. So, make sure to rub down any places that you plan on painting afterwards. If you plan on wearing the helmet, I also recommend sanding the inside, as painting it black later will help a lot to reducing light scattering (basically It will make it easier to see out of when wearing it).
.jpg")
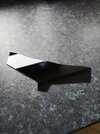
I replaced the visor by cutting out the right shape from a tinted sheet of acrylic

And shaped it using the heat gun

After the visor was glued in, I added glue to all the seams and fixed the helmet back together again, leaving the glue to dry - this will make sure the helmet joints don't move around while I’m filling it. I also reinforced the seams from the inside with some hot glue after it had dried.
Next, I extended the cheeks. As this is a toy it has a large visor for extra visibility but the clones from the movie have a very narrow visor. To do this I decided on the size and shape of cheek pieces. I want mine to look like the episode II clones, so I drew out some templates on paper to fit the visor - I may make some templates for the cheek parts if anyone wants them :]

(note: the reason my helmet has red markings on is because ive customized this helmet before and used it again for this project. Just ignore the colours.)
Once I was happy with shape of the cheek parts I traced the shape for both sides onto an old plastic bucket (about 1mm-2mm thick) and cut them out.

I used some heat to bend them to the curvature of the helmet and stuck them using hot glue. Now that part was finished, I taped over the visor to start the filling process.
When using filler to fill the seems make sure to get the correct ratio of hardener as too much can cause the filler to harden too quickly – as long as you follow the instructions on the container, you’ll be fine. I applied thin coats of hardener to the seams and any holes that I wanted covering up; this includes any gaps between the new cheek pieces and the front of the helmet. After its dry I would rub it down with a sanding sponge. If I found that some holes had not covered properly, I would give it another coat of filler. Keep doing this until its smooth in all places and there are no visible seams or dents in the helmet. This process takes a long time to get the appropriate finish – be patient!
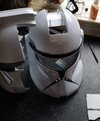
Here is what it looked like with the cheek parts and filler on,

I also used hot glue to permanently stick the buttons down from the inside and covered them with filler,

Once I was happy with the finish, I used primer spray paint to prepare the surface (I used white hycote primer). Make sure to use masking tape to cover any places that don’t want to be sprayed (especially the visor). Be sure to give it thin even coats all around, holding the spray can about 20cm away from the helmet as holding it too close will spray too much paint in one area.
This brings me up to the point I am at with the project. I still need to finish priming and decorate it. However, I have run out of primer.
I will try and update what progress I make on it when I can, however, I am very busy with university. I'll show images of the progress I've made so far so that you know what it should look like,


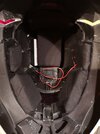
As a bonus I'll show what the inside looks like but ill probably go into detail about it later,

I hope this helps or inspires other projects.
I am also a noob to the RPF so any feedback would be appreciated, thanks!
With the lockdown still happening I thought It would be a good time to share what the project I’ve been working on. Around last June, I’d seen someone online convert their old hasbro clone helmet, into the real thing! And I was inspired to make my own. After some experimentation, I was very happy with the outcome. After realizing how easy this project was, I just had to make another!
For something like this you don’t need much experience – just good research skills. Now that I’ve had some practice on the subject, I really wanted to share what I’ve learnt with everyone. I have never posted anything like this before so I hope you will enjoy following my thread and if you have any questions regarding the build, please ask :]
Equipment
Getting the right equipment is essential for the best finish possible.
First of all you're going to need the Hasbro 2008 clone helmet, which is a discontinued toy. The best place to find one of these is either in your loft or on ebay (around £20-£30 used).
Tools that are essential:
-Dremel with sanding bit and disk,
-heat gun (I just used a paint stripper),
-screw drivers,
-glue gun,
-and appropriate safety gear.
Other essentials:
-lots of sand paper and/or sanding sponge,
-car body filler (I used a brand named isopon p.38) and instant filler paste
-thin sheet of acrylic or an old plastic bucket (about 1mm – 2mm thick),
-masking tape,
-filler primer spray paint, white spray paint, regular black+white acrylic paint
Optional material:
-super glue ( I used gorilla glue),
-wet and dry sandpaper,
-a tinted sheet of black acrylic (which later you will see I used to replace the visor as my original was scratched),
Materials if you plan on wearing it:
-sponge for padding the inside,
-small fans for keeping the visor defogged and your face cool
Build
First, I strongly advise to take the helmet apart and remove certain features. For example, there will probably be a black rubber piece inside that rests on your nose – remove it. Decide whether or not to keep the buttons on the side of the helmet. These activate the voice changer function. You can remove the wiring for these like I did for more space inside the helmet or keep them if you like it. There is also a bridge vertically across the visor which will hold the wires running to the speaker. I used a sanding disk to remove this feature so that it would be easier to see.
Here you can see how the helmet comes apart in to 2 pieces. A section of the fin which contains the speaker can be removed separately from the entire helmet as well.
I removed the bridge, wires, and battery pack to create space inside the helmet. I also advise you rub the outside of the helmet with some sanding paper. This is because the plastic has a glossy finish to it, and it will make it hard for paint and filler to stick to the surface. So, make sure to rub down any places that you plan on painting afterwards. If you plan on wearing the helmet, I also recommend sanding the inside, as painting it black later will help a lot to reducing light scattering (basically It will make it easier to see out of when wearing it).
I replaced the visor by cutting out the right shape from a tinted sheet of acrylic
And shaped it using the heat gun
After the visor was glued in, I added glue to all the seams and fixed the helmet back together again, leaving the glue to dry - this will make sure the helmet joints don't move around while I’m filling it. I also reinforced the seams from the inside with some hot glue after it had dried.
Next, I extended the cheeks. As this is a toy it has a large visor for extra visibility but the clones from the movie have a very narrow visor. To do this I decided on the size and shape of cheek pieces. I want mine to look like the episode II clones, so I drew out some templates on paper to fit the visor - I may make some templates for the cheek parts if anyone wants them :]
(note: the reason my helmet has red markings on is because ive customized this helmet before and used it again for this project. Just ignore the colours.)
Once I was happy with shape of the cheek parts I traced the shape for both sides onto an old plastic bucket (about 1mm-2mm thick) and cut them out.
I used some heat to bend them to the curvature of the helmet and stuck them using hot glue. Now that part was finished, I taped over the visor to start the filling process.
When using filler to fill the seems make sure to get the correct ratio of hardener as too much can cause the filler to harden too quickly – as long as you follow the instructions on the container, you’ll be fine. I applied thin coats of hardener to the seams and any holes that I wanted covering up; this includes any gaps between the new cheek pieces and the front of the helmet. After its dry I would rub it down with a sanding sponge. If I found that some holes had not covered properly, I would give it another coat of filler. Keep doing this until its smooth in all places and there are no visible seams or dents in the helmet. This process takes a long time to get the appropriate finish – be patient!
Here is what it looked like with the cheek parts and filler on,
I also used hot glue to permanently stick the buttons down from the inside and covered them with filler,
Once I was happy with the finish, I used primer spray paint to prepare the surface (I used white hycote primer). Make sure to use masking tape to cover any places that don’t want to be sprayed (especially the visor). Be sure to give it thin even coats all around, holding the spray can about 20cm away from the helmet as holding it too close will spray too much paint in one area.
This brings me up to the point I am at with the project. I still need to finish priming and decorate it. However, I have run out of primer.
I will try and update what progress I make on it when I can, however, I am very busy with university. I'll show images of the progress I've made so far so that you know what it should look like,
As a bonus I'll show what the inside looks like but ill probably go into detail about it later,
I hope this helps or inspires other projects.
I am also a noob to the RPF so any feedback would be appreciated, thanks!