So I know this thread has moved on from its humble origins as my macros build thread, but I figured I'd go ahead and post this update anyways for anyone interested!
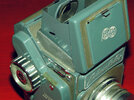
After sitting on the shelf for years, I finally picked these back up and knocked out most of the remaining details. They've been sitting about 90% finished for quite a while, but it's funny how easy it is to put a project down and forget about it once it's reached this stage. Just a few more small steps to go and these guys are officially finished.
Mystery Wedge: After finally finding the proper sized aluminum channel, I was able to make my own metal mystery wedge using some of my own methods as well as some ideas picked up from other macro builders here. This would have been way faster if I had a belt sander and a chop saw, but I was able to keep the angles super sharp and parallel using just my dremel's cutting wheel, some files and sandpaper stuck to my bench.
I can't remember which member here first did this, but I decided to follow suit and add a piece of mesh to the front of the wedge to obscure the inner workings a bit and add some interest to this mysterious crevice of the prop. In true Star Wars fashion I cut some mesh from the bottom of the VTR I used to harvest the female EIAJ port used on my mystery wedge:
The Eumig knob mounts to the wedge with a 4-40 brass machine screw that passes through a counter sunk hole in the bottom of the wedge, then threads into a nylock nut that I've epoxied to the bottom of the Eumig knob, holding it in place with tension. The whole assembly then mounts to the transition box with a single 6-32 screw. The screw passes through the inside wall of the transition box, then passes trough a hole in a simple bracket that I improvised from 1mm sheet aluminum, then threads into a nylock nut epoxied to the opposite side of the bracket:
From what I can see from available reference, it looks to me like the whole assembly was painted black. I'm not sure if the silver logo plate at the top of the knob was painted over or removed altogether, but for now I've just masked it off and left it. I like the contrast, and if further reference surfaces I can always paint or remove it.
Ready to mount:
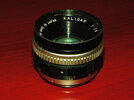
Kaligar Lens Thumb Knobs: Although I was lucky enough to find two real Kaligar lenses before the big macros boom, neither of them came with the aluminum thumb knobs featured on the screen-used prop. I picked up a set of resin cast thumb knobs from
trooper and as always they're very clean and crisp. I decided to take them a bit further, though, by milling away the cast screw detail and epoxying in some real screws. I believe I pulled these screws from the guts of one of the cameras used on this build, or from the Kalimar knobs atop the transition box (it's been a while, so I can't quite remember). I de-burred them and hit them with some cheap aluminum spray paint from Ace, which worked just fine!
I think they look pretty convincing mounted up!
I also masked off the lenses and sprayed the insides satin black to obscure the white text. I'm still planning to paint the outsides as well, I'm just still looking for the proper colors. Anyone have recommendations?

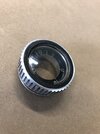
My macros have been sporting two Seagull knobs on the left side for years, but I've since converted to the idea that four Kalimar knobs were used on the hero prop. Because buying another Kalimar was out of the question, I picked up these 95% accurate knobs from a junker Soligor 66 that I got for next to nothing. The knurling is the same pattern, but ever so slightly more coarse than that of the Kalimar knobs. Also the textured vinyl material on the crowns is of a slightly different color and texture, but I'm considering punching out some circles of material from the scrapped Kalimar body and replacing them. Just need to find a hole punch in the exact right size, or it won't look quite right. Another non-aesthetic difference is that these knobs won't stay pulled out if you twist them, like the Kalimars do. I've simply pressure-fit these, just like the Seagulls were:

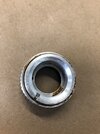
Another small detail ... I painted and weathered the Kalimar hood bracket, as seen in reference. The paint didn't want to adhere to this piece and flaked off rather easily, but I suspect that accounts for the weathering seen on screen as well, so I'm happy with it:
This build is now super close to finished, but there are still some final steps. I want to paint the outside of the lenses, install an EL sheet/image in the transition box, I'm currently looking for the Seagull straight-knurled aluminum variant knob to build an alternate knob assembly as I'm still not sure what's going on there and would love to have both options, and I'm still hunting for the 100% accurate green-tab EIAJ male plug. I regret not picking up one of Jerry's resin cast green-tab plates when he offered them ... I'd be happy with one of those. Any chance one of you green-tab havers wants to cast up some face plates/tabs?
Stay tuned, and thanks for reading!

")