joberg
Legendary Member
Very accurate for sureNo, I can't take credit. It's VERY accurate though")
Very accurate for sureNo, I can't take credit. It's VERY accurate though
 .
.  .
. 
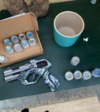
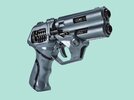
No parts are movable as all parts are all resin you glue together. There are no space either for LEDs. I hope there will be a kit some day thoughHi,
I think this blaster is going to be my next project.
Thanks for the pictures, it can help.
Do you know how this gun reloads?
Which parts must be movable?

It doesn't show in the movie, but it would be weird if Wallace didn't give his soldiers a full auto handgun, so like a Glock I would imagineThanks,
but the original, do we know how it reloads?
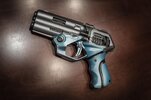
haha, well that is for the prop department to know only I guessIt looks (certainly in the last pics) that it's either:
a/ A breaking, forward tilting hinge forward of the trigger guard similar to a trad shotgun, so it holds two cartridges (one in each barrel).
or
b/ The lower barrel isn't a barrel, but a tube mag and the cartridges are loaded back, up and forward. In that case it would maybe hold 3 in the tube and one in the barrel?
Or it could be a non-traditional design that makes all of that irrelevant.
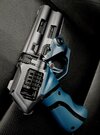
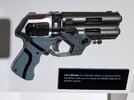
Where are these pics from?I'm going to aim for these sorts of colours. There's a lot of tricky paintwork here!
for ease, do we think it's better to the top parts all silver, mask off and do the internal black parts, or vice versa? Probably easier to spray all black, mask off the internals and then apply silver?
Where are these pics from?
As I see it, there is no silver or metallic in the blue paint, more a matt paint with a gloss varnish.
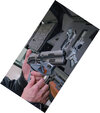
I painted mine black first and then added the colors. I will finish with two varnishes, clear for the metal parts and gloss for the blue parts and then rub it down so its a bit worn.I honestly can't remember. I was an avid fan 3 years ago, but in true ADHD style I lost interest almost overnight and have only returned now. Not sure where I dug them up from.
I don't mean the blue bits, just the tops bits.
Never really thought about this blaster before, but seeing it here has made me kind of fall in love with it. So TipTop Workshop just got my money! Thanks Don B!