You are using an out of date browser. It may not display this or other websites correctly.
You should upgrade or use an alternative browser.
You should upgrade or use an alternative browser.
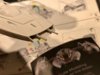
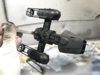
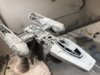
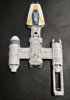
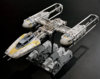
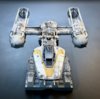
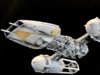
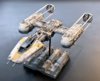
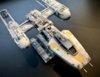
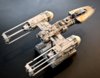
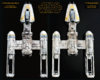
Bandai 1/72 Gold Leader Y-Wing Fighter - Assembled and painted by StevetheSwede
- Thread starter cking
- Start date


colinjreed
Member
Gorgeous! I haven’t done model making since I was a kid, but those Bandai sets are stunning.
Some beautiful 99% completed photos from Steve. Just brilliant that he is able to scale down an ILM paintjob like this.
Attachments
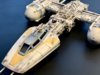
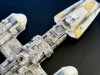
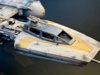
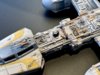
And here is the completed model. ABSOLUTELY superb work from master artist StevetheSwede!
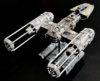
In the side by side photos, the ILM miniature is on the left and the Bandai 1/72 is on the right.")
Steve mixes all colours by himself. Not an ArchiveX paint in sight (mainly because Steve only works in acrylics which ArchiveX don't supply (yet).
In the side by side photos, the ILM miniature is on the left and the Bandai 1/72 is on the right.
Steve mixes all colours by himself. Not an ArchiveX paint in sight (mainly because Steve only works in acrylics which ArchiveX don't supply (yet).
Attachments

Analyzer
Master Member
He did an excellent job mimicking the photo and it can easily pass for a picture of the filming model
I would love to see some step by step videos or pics showing the techniques he uses. i.e. s it all airbrush, or if washes and filters, what kind of paints (oils, acrylics etc...)
As an aside, and not that it matters for anything other than a point of interest, but technically that is the "unfinished" version of Gold Leader. There was more weathering added before it was filmed
And just to be clear, it is not meant as a knock on any of the amazing work Steve did as I am sure he would have copied this just as well if this source was used. So please don't take it as negative criticism in any way. Purely informational
Below are some pics posted on a studio scale modeler's facebook page some time ago ( Monsieur Tox)
I cam across them when I was looking for source material when painting my own and was surprised as all I had seen previously were the published photos of the "unfinished" one

 www.facebook.com
I am not sure where he got the pics from, but this is how Gold Leader looked during filming. You can see that distinctive dark streak down the right side of the canopy for example on film as well as some other darker blasts marks/streaking elsewhere
Although in ways, I kind of prefer the "unfinished" look from those published source pics used. When I did mine, I tried to go somewhere in between as the one below feels a bit over the top. Pure speculation, but the additional weathering was probably added shortly before or during filming when they may have realized that much of the weathering got lost when doing test shots with the lighting used. So they added some heavier weathering?


I would love to see some step by step videos or pics showing the techniques he uses. i.e. s it all airbrush, or if washes and filters, what kind of paints (oils, acrylics etc...)
As an aside, and not that it matters for anything other than a point of interest, but technically that is the "unfinished" version of Gold Leader. There was more weathering added before it was filmed
And just to be clear, it is not meant as a knock on any of the amazing work Steve did as I am sure he would have copied this just as well if this source was used. So please don't take it as negative criticism in any way. Purely informational
Below are some pics posted on a studio scale modeler's facebook page some time ago ( Monsieur Tox)
I cam across them when I was looking for source material when painting my own and was surprised as all I had seen previously were the published photos of the "unfinished" one
The Star Destroyer Project by Monsieurtox
The Star Destroyer Project by Monsieurtox. 872 likes. The Star Destroyer Project is a tribute to the crew who built one of the most iconic model of all the movies History. I wanted to recreate part...
www.facebook.com
I am not sure where he got the pics from, but this is how Gold Leader looked during filming. You can see that distinctive dark streak down the right side of the canopy for example on film as well as some other darker blasts marks/streaking elsewhere
Although in ways, I kind of prefer the "unfinished" look from those published source pics used. When I did mine, I tried to go somewhere in between as the one below feels a bit over the top. Pure speculation, but the additional weathering was probably added shortly before or during filming when they may have realized that much of the weathering got lost when doing test shots with the lighting used. So they added some heavier weathering?
Yes, I had saved those excellent photos and was aware that the Chronicles photos are the pre-filming version of the model. However, I just prefer the look of it without all that additional weathering on it, so I asked Steve to just match this one up to the Chronicles photos.
Analyzer
Master Member
Yes, I had saved those excellent photos and was aware that the Chronicles photos are the pre-filming version of the model. However, I just prefer the look of it without all that additional weathering on it, so I asked Steve to just match this one up to the Chronicles photos.
Like I mentioned, I kind of prefer that look as well (although I did add the streak at the right side of the canopy, but I just toned it down a bit)
Just wanted to make sure if you had not seen those pictures, you still had time to ask him to add the additional weathering if that was something that appealed to you.
After all, some people like to go for total accuracy regardless of whether that may be the most realistic or better looking choice. It's why we have people replacing a fully fleshed out cockpit with a filming model cockpit that looks nothing like the filming set in the PG Falcon or why people want race car drivers as pilots
Personally, I am somewhere in the middle.
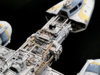
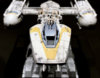
Absolutely. The detail that Bandai have got into these little kits is outstanding. With a paintjob as expertly refined as what Steve has done, it's very difficult to tell that it's such a small model when looking at the photos. Here's the final batch of photos that I received before it has been packed up for shipping.
beautiful! It's also a testament to just how fine the detailing is on these Bandai kits; they can look so much larger in photos than they really are! Love the rusty coloring on the pipes too.
Attachments
Great models, Chris! Steve always did great work! Miss seeing him post around here...
Sean
Sean
Similar threads
- Replies
- 36
- Views
- 2,537
- Replies
- 5
- Views
- 1,215
- Replies
- 32
- Views
- 3,074