You are using an out of date browser. It may not display this or other websites correctly.
You should upgrade or use an alternative browser.
You should upgrade or use an alternative browser.
Back To The Future Part 2. 2015 Jacket WIP
- Thread starter cavx
- Start date
cavx
Master Member
OK. I had no idea how much rubber this project needed, so I think my first attempt at this might not be the greatest. The technique seems solid, but my colour matching is totally crap on this project, so might be redoing the vest tomorrow. We shall see in a few hours.
Anyway...All good so long as I learn from this experience.
Degassing the silicone. I love this vacuum chamber")
Laying down the first coat. The best tool to spread this is a shower squeegee (wife doesn't know I pinched ours yet). Lucky I am using silicone which only sticks to itself so once curned, it just peels off.

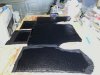
I don't know how obvious the darker shades will be until I lift this either later tonight or tomorrow. As I mentioned, I had no idea how much rubber this took so my first mix was small (and clearly a bit darker). What I did later (and should have done from the start) was mix a big batch with no cat and go from there. Primary layer used 1.3KG.
The cloth impregnated layer was placed once the primary layer had cured. The idea is that silicone only sticks to itself and bites into cloth, so here is hoping that I have a set of cloth reinforced rubber parts.
This layer used 2.0KG. I was almost going to mix 1.5KG and thought I could make a mold out of the excess if I had too. As it turns out, I was scraping the pot to get the last little bit out.
So the sleeves are goning to use close to the balance plus maybe up to another 5KG! Just blew the budget out a bit I think...
Anyway...All good so long as I learn from this experience.
Degassing the silicone. I love this vacuum chamber
Laying down the first coat. The best tool to spread this is a shower squeegee (wife doesn't know I pinched ours yet). Lucky I am using silicone which only sticks to itself
so once curned, it just peels off. I don't know how obvious the darker shades will be until I lift this either later tonight or tomorrow. As I mentioned, I had no idea how much rubber this took so my first mix was small (and clearly a bit darker). What I did later (and should have done from the start) was mix a big batch with no cat and go from there. Primary layer used 1.3KG.
The cloth impregnated layer was placed once the primary layer had cured. The idea is that silicone only sticks to itself and bites into cloth, so here is hoping that I have a set of cloth reinforced rubber parts.
This layer used 2.0KG. I was almost going to mix 1.5KG and thought I could make a mold out of the excess if I had too. As it turns out, I was scraping the pot to get the last little bit out.
So the sleeves are goning to use close to the balance plus maybe up to another 5KG! Just blew the budget out a bit I think...
Attachments


cavx
Master Member
Contec
Master Member
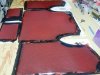
HMMM, mixed results.
What if you used a paddle Roller on the fabric to press it into the mold.?
VilleLeskinen
Sr Member
HMMM, mixed results.
http://www.therpf.com/attachment.php?attachmentid=458318&d=1427807591
So colour aside, the fabric itself worked a treat. Just not enough RED! And for the record, you don't need black to darken the red because the black comes through between the pattern darkening the material anyway.
Can't this still be painted red later on? What's the cost on the jacket so far?
cavx
Master Member
Can't this still be painted red later on? What's the cost on the jacket so far?
Really doubt paint will stick to this stuff. The challenge is (if the paint does stick) you lose the black coming through the valleys. I have more un-mixed silicone and cloth here, so will have to do this again with way more red pigment.
Cost so far -
$60 for the sheet of light diffuser.
$30 for adhesive (Weldon #3).
$290 for 5KG silicone
$10 for red pigment.
$15 for black cloth.
Last edited:
VilleLeskinen
Sr Member
Really doubt paint will stick to this stuff. The challenge is (if the paint does stick) you lose the black coming through the valleys. I have more un-mixed silicone and cloth here, so will have to do this again with way more red pigment.
Cost so far -
$60 for the sheet of light diffuser.
$30 for adhesive (Weldon #3).
$290 for 5KG silicone
$10 for red pigment.
$15 for black cloth.
Oh man! That's quite a sum! Would silicone paint (thinned down silicone that's been pigmented) work on it?
cavx
Master Member
Oh man! That's quite a sum! Would silicone paint (thinned down silicone that's been pigmented) work on it?
Yep! And people think molding and casting is cheap.
Not sure about painting or layering. I did some testers the other day using caulking silicone and acetone which made an almost paint-able mixture, which also takes the dye and sets like normal. I also did a cloth impregnated test which worked as well. So there is still that option if push comes to shove. I was actually thinking of that as the way to glue the thing together.
Anyway, when what you are doing is not working, you DO something different!
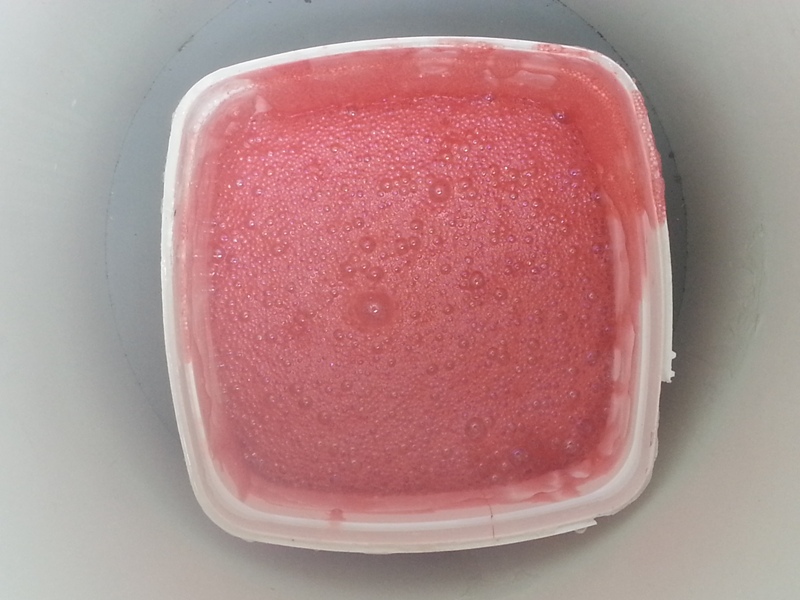
1.1KG mixed with (a metric crap-tonne of) red pigment, degassed, poured and screed.
I am not doing anything on this tonight, so tomorrow can re-assess the damage and go from there.
I think I can recycle the last attempt and use that rubber with another batch mixed with grey over the top to make parts like the pocket tops, the trim, the collar and maybe even the straps. I will need to buy another 5KG (at least) for the sleeves. You can see in the back ground where I got the dregs out of the bucket and started coating the belt parts to make a mold of them. Hey waste not want not.
- - - Updated - - -
What if you used a paddle Roller on the fabric to press it into the mold.?
Is that the same thing used for fibre glass? I think I have one.
Attachments
Contec
Master Member
Is that the same thing used for fibre glass? I think I have one.
Yes, one of those aluminum rollers. I'm wondering if that would not help when pressing the fabric into the mold.
cavx
Master Member
Yes, one of those aluminum rollers. I'm wondering if that would not help when pressing the fabric into the mold.
Yeah I will give that a go tomorrow. I just checked the rubber and it is all cured and looks nice and red.
When I did the last cloth embed, I placed the cloth down first, then poured rubber over the top and had to work it through the cloth. Tomorrow I think I will pour a layer of rubber down first, then lay the cloth and roll it.
Contec
Master Member
That should work, The exes rubber should seep thru the fabric and only the rubber trapped into the pyramids should be left and then you would get the black fabric shining thru the edges,Tomorrow I think I will pour a layer of rubber down first, then lay the cloth and roll it.
cavx
Master Member
That should work, The exes rubber should seep thru the fabric and only the rubber trapped into the pyramids should be left and then you would get the black fabric shining thru the edges,
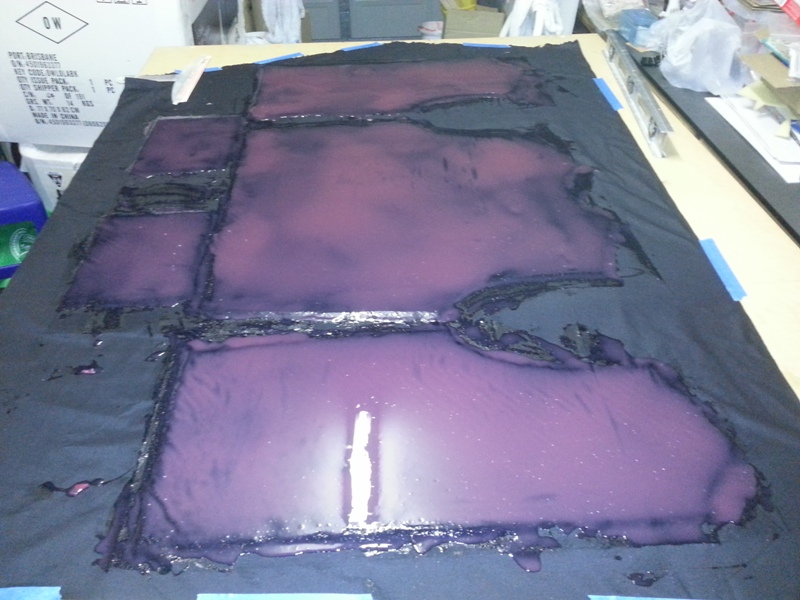
Black layer is setting up now.
In hind sight, I wonder if the red layer needed to to cure first anyway. Based on what I saw today, one could pour red and push it to even it out, then lay the black cloth and roll that. The roller does two things -
1. aids the soak and pushes the excess out
2. provides a level finish
Given that the red is super thin at the valleys, the black cloth would be seen anyway. The cloth reinforces the rubber, so provided that all the cells of the light diffuser were filled, you would have a strong bond with far less weight.
Thanks for the suggestion of the roller too. It worked a treat
Attachments
Contec
Master Member
Thanks for the suggestion of the roller too. It worked a treat
No problem, can't wait to see the results.
cavx
Master Member
No problem, can't wait to see the results.
Whilst I should say "whoa this is heavy" I want to say "impressive, most impressive".
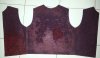
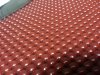
And a close up of the texture
So this is straight red, no black mixed in this time. The black rubber layer in the post above was really only a done to bond the cloth to the red rubber. Since de-molding this, I will suggest that the black layer was not actually needed. What would be even better is to lay down the red and spread that, lay the cloth and then roll that. The key is the roller which presses the cloth into the rubber to ensure a good bond. Because the cloth is black, the valleys will also be black as the red rubber would be too thin to show as red.
I guess it is safe to make a start on sleeves
Attachments
Contec
Master Member
The key is the roller which presses the cloth into the rubber to ensure a good bond. Because the cloth is black, the valleys will also be black as the red rubber would be too thin to show as red.
I guess it is safe to make a start on sleeves
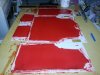
Just as i thought it would
It is so beautiful:thumbsup
How do you plan on doing the sleeves? and how are you going to do the texture on it.
cavx
Master Member
Just as i thought it would
How do you plan on doing the sleeves? and how are you going to do the texture on it.
Correct me if I am mistaken, the sleeve texture should look like leather? If so, I can use vinyl to get a "corrected leather" finish.
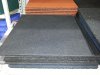
My plan is to make ovals this time, not circles. My tests indicate they sit better, though circles are easier. So if I pre-cut the 16 ovals, I can layer them up with grey silicone. Because silicone only sticks to silicone, I should be able to bond them at the edges later. This will be time consuming no doubt. I am running low on silicone, so it is probably best to get a belt done and attached or do the grey parts like the collar, trim, pocket flaps and straps first.
Contec
Master Member
Does not look like leather too me.Correct me if I am mistaken, the sleeve texture should look like leather? If so, I can use vinyl to get a "corrected leather" finish.

Contec
Master Member
That almost looks like they used recycled rubber mats for the mold of this part.
That could Very much be it....When i look at the texture i feel that i have seen it somewhere before, but can't put my finger on it.
Do a test piece with that rubber matt and see if it looks the same when taking it off.
cavx
Master Member
That could Very much be it....When i look at the texture i feel that i have seen it somewhere before, but can't put my finger on it.
Do a test piece with that rubber matt and see if it looks the same when taking it off.
I will ASAP. With this weekend being Easter, many shops will be close Friday and Sunday. I am hoping Clark Rubber is open Saturday and I will be able to grab a recycled rubber tile or two.
I was also playing with the belt. I know it is supposed to be a cover off a chair and I have two of them that I have cut down the seam to give me four parts. And this presents me with a few challenges -
1. because these parts came off chairs, they are not long enough to make one belt. I will have to join them.
2. because these parts came off 2 different chairs, the texture of each 'belt" is different. I would rather join smaller identical parts than have a mis-match.
3. because I have used silicone for the vest, how do I attach the belt unless it is made from silicone?
I had some spare red and tipped it over one of the smoother "belt" parts. The mold is great, just not long enough. So my train of thought is to coat the inside with gel (I heard baby oil will be best here) and fill the mold with black silicone so it can't stick to itself. Hey presto, one flexible black belt that can be glued to the vest.
Similar threads
- Replies
- 34
- Views
- 2,225
- Replies
- 13
- Views
- 2,918
- Replies
- 10
- Views
- 1,584
- Replies
- 5
- Views
- 827