You are using an out of date browser. It may not display this or other websites correctly.
You should upgrade or use an alternative browser.
You should upgrade or use an alternative browser.
Art Asylum / Diamond Select TOS Phaser build with metal parts.
- Thread starter spacerone
- Start date
Chrisisall
Master Member
Is there a specific adhesive/glue and filler that people use out there?
5 minute epoxy for glue/ Milliput for filler.
I got myself 4 or 5 phasers waiting to be worked on. I'm just so busy...

spacerone
Well-Known Member
5 minute epoxy for glue/ Milliput for filler.
I got myself 4 or 5 phasers waiting to be worked on. I'm just so busy...
http://i46.photobucket.com/albums/f110/chrisisall/SANY7278_zpsa7ea4a4d.jpg
Chris now I know where you hide the good stuff.

Thanks for the quick answer. Sounds like I'm good to go with the basic tools. I've ordered 4 AA phasers to start with. I knew if I just started with one I'd be sure to butcher it....and the second. :lol This way I have spares or future builds either way. Now to start my parts list and make some decisions on paint.
Is there a specific adhesive/glue and filler that people use out there?
Delta vega if you need help with the paint colors just ask.
spacerone
Well-Known Member
rc lookin good - now , where did i put that P-1 ????....looks around the room
http://i926.photobucket.com/albums/ad110/vshocktrooper/024_zpsba71b02c.jpg
ranallace that was quick!:thumbsup
I think you might find it in Chris's hidden stash.:lol
Delta Vega
New Member
Delta vega if you need help with the paint colors just ask.
Why sure! I'll take all the help I can get! I like the look of the metallic bronze handles that you turn out. I also wondered if you vary the colors used on the P1's? Right now I'm considering my first build to use what I think you called "Shadow Grey" on the P2 body and a grey on the P1. Which paints did you use for this and what brand of clear coat? It is one of the best looking phasers I've ever seen.
Also, I notice you appeared to fill and sand to remove the AA P1 access door on your latter builds and cut a new seam in the lower housing identical to the hero P1 build from the show. This was a great detail add and I'd like to try it on mine. How did you make the cut if you don't mind me asking?
And I apologize to any who might get tired of me asking questions. :$ I'm a rookie who has been used to following modeling instructions from my younger days. This is new ground for me and I'm just tickled to be able to do something that is more.....trial and error. Probably mostly error. :lol
Delta Vega
New Member
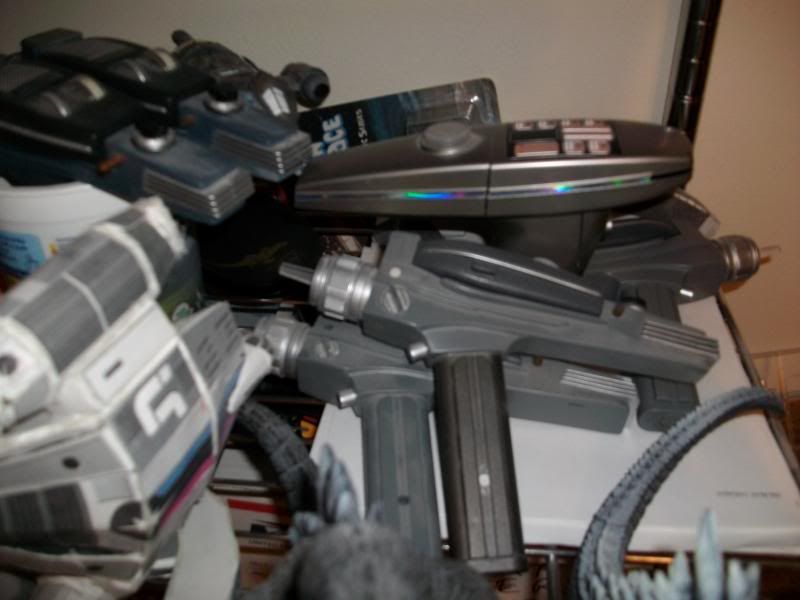
Here are some pictures of the finished Art Asylum p1 with the new dark gray paint, seam line, metal parts, and even a blue sapphire watch crown. Also some pictures of it attached to the p2 body for the finished result. What do you think about it :confused
This is the build to which I was referring.
Chrisisall
Master Member
chris - wanna send me one ? LOL
I actually have two more not opened, both grey handled (unpainted). They're rare now- I got them because I didn't have to take the crappy paint off them before painting the handles the correct colour.
spacerone
Well-Known Member
This is the build to which I was referring.
The p1 was painted with the Dark Gray Zynolyte primer and then clear coated with Testors clear coat spray. But you can probably can use other clear coat brands.

The p2 was painted with the Krylon shadow gray (1604). The handle paint is Rustoleum Dark Bronze Metallic (7272) and then clear coated with same Testors clear coat.

Chrisisall
Master Member
I used that as a base, then finely misted it with metallic charcoal the bring down the 'brownishness' down just a notch.The handle paint is Rustoleum Dark Bronze Metallic (7272)

It's actually a little more colourful than it appears here, but it's overcast outside, no Sun.
This is still a WIP.
spacerone
Well-Known Member
I used that as a base, then finely misted it with metallic charcoal the bring down the 'brownishness' down just a notch.
http://i46.photobucket.com/albums/f110/chrisisall/SANY7284_zpsc5c3aa9d.jpg
It's actually a little more colourful than it appears here, but it's overcast outside, no Sun.
This is still a WIP.
Looks good Chris! I know you do good work and that phaser should come out nice when your finished with it.:thumbsup
Delta Vega
New Member
Thanks for the paint help spacer and chris. I was wondering if I might need to mist a darker color to minimize the bronze tone. I'll have to wait and see how things turn out. Painting is so far away at this point. I should be able to start disassembling project 1 about mid-week next week. Ordering metal parts hopefully today. Picking up paints, epoxy, and filler this weekend.
Chrisisall
Master Member
Do a few tests on something else first- mixing two colours like that from rattle cans is tricky. You need to develop a feel for it. You want it even, and that takes a little experience before you do the actual handles. You don't want to accidentally wipe out the bronze, just take it down the tiniest of bits. IMO.I was wondering if I might need to mist a darker color to minimize the bronze tone.
Delta Vega
New Member
Probably the best idea for me is to not try it. :lol
Chrisisall
Master Member
Probably the best idea for me is to not try it. :lol
If you can paint at all, it's not that hard. But the basic Bronze metallic is SO close anyway, you might not want to even bother.
spacerone
Well-Known Member
Why sure! I'll take all the help I can get! I like the look of the metallic bronze handles that you turn out. I also wondered if you vary the colors used on the P1's? Right now I'm considering my first build to use what I think you called "Shadow Grey" on the P2 body and a grey on the P1. Which paints did you use for this and what brand of clear coat? It is one of the best looking phasers I've ever seen.
Also, I notice you appeared to fill and sand to remove the AA P1 access door on your latter builds and cut a new seam in the lower housing identical to the hero P1 build from the show. This was a great detail add and I'd like to try it on mine. How did you make the cut if you don't mind me asking?
And I apologize to any who might get tired of me asking questions. :$ I'm a rookie who has been used to following modeling instructions from my younger days. This is new ground for me and I'm just tickled to be able to do something that is more.....trial and error. Probably mostly error. :lol
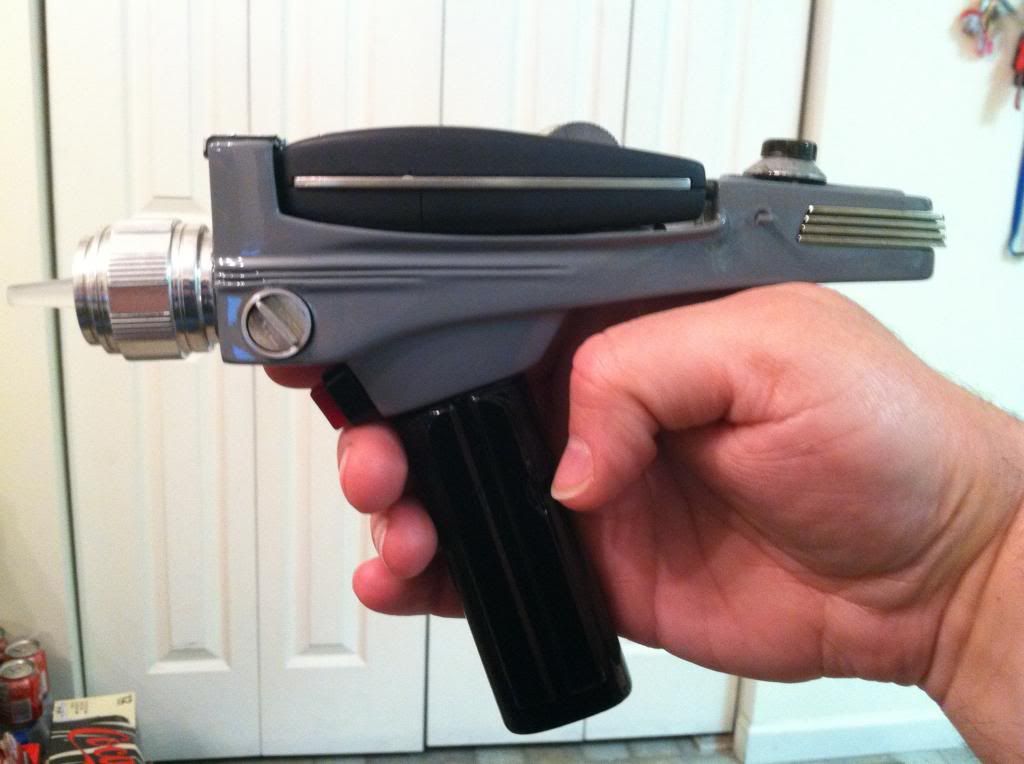
Delta Vega you will need to scribe in the line with a scriber tool like in the pic. Go slow with it and keep it straight or you will have a zig zag line.:facepalm
And don't dig in too deep or you will end up with a hole in the line and have to fill it.:cry
Just finished putting one on my p1 and getting ready to enlarge the hole for the replacement metal trigger to fit inside.

Delta Vega
New Member
Delta Vega you will need to scribe in the line with a scriber tool like in the pic. Go slow with it and keep it straight or you will have a zig zag line.
And don't dig in too deep or you will end up with a hole in the line and have to fill it.:cry
Just finished putting one on my p1 and getting ready to enlarge the hole for the replacement metal trigger to fit inside
Thanks!....I actually went back through the thread and found where you mentioned that you scribed the line. It looked so good on the finished p1 that I thought you had really put a seam there for bottom removal.
I'd have loved to have something like this when I was a kid. My first phaser (Geek alert) was created out of lego....then wood, then the AMT explorer kit. :lol Looking forward to getting all my stuff together. Waiting for things to arrive is the hard part.
spacerone
Well-Known Member
Thanks!....I actually went back through the thread and found where you mentioned that you scribed the line. It looked so good on the finished p1 that I thought you had really put a seam there for bottom removal.
I'd have loved to have something like this when I was a kid. My first phaser (Geek alert) was created out of lego....then wood, then the AMT explorer kit. :lol Looking forward to getting all my stuff together. Waiting for things to arrive is the hard part.
I can understand that. That's why they invented the transporter, so there would be no waiting and you would get instant delivery.:lol
I have all my stuff here so there is no waiting for me. Just need time to work on it. I increased the size of the trigger hole and the new metal trigger now fits like a glove.

Chrisisall
Master Member
My first phaser (Geek alert) was created out of lego....then wood, then the AMT explorer kit. :lol
Here's my second phaser from 1978, bought the nozzle from a machinist at a Star Trek Con, the rest is cardboard:

Similar threads
- Replies
- 3
- Views
- 1,375
- Replies
- 0
- Views
- 1,262
- Replies
- 10
- Views
- 2,804