Another Twisty the Clown - molding advice?

Sinned

Well-Known Member
RPF PREMIUM MEMBER
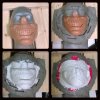
There have been several Twisty the Clown builds around here, so I won't throw in a bunch of progress pictures. I just mostly wrapped up my version last night (a few symmetry issues still to fix), and have some questions on the best way to finish, and mold it.

TwistyTheClown-03_zpsfd36a08a.jpg TwistyTheClown-02_zpsb563d481.jpg TwistyTheClown-01_zps3c393f1d.jpg

I've never worked with Chavant before, so this is a bit new for me. I really liked working with it, but I'm not sure how to best smooth it. I've brushed over it with lighter fluid, and that got rid of most of the tooling marks, but there are still some I'd like to smooth out. But I also want to keep a few, for texture.

For molding this, I've read that platinum cure silicone doesn't always play well with chavant. Is this true? Any suggestions for what would work best for this? (I typically use Rebound)

I recently tried doing a more matrix-style mold (see Eyeless Jack thread), which didn't work out as great as I hoped, and that was an extremely simple form. I do like the idea of those though, as opposed to just brushing on, and then throwing a support shell on top.

Any tips on the best way of approaching the mold? I don't have a degasser, so am worried about all the detail, were I do to the shell first, and then fill with silicone.
 
Chavant was designed as an automotive clay for prototyping cars. You'd be amazed at how close to glass smooth you can get it with the use of water and your finger, and a little bit of patience. Think karate kid, circular motions; wax on wax off stuff. If your surface is really resisting try adding some 99% alcohol. I try to stay away from Naptha (the ingredient in your lighter fluid that melts the clay) as much as possible. You could even take a very fine scotch brite pad and burnish the surface down a little and then smooth.

Chavant does sometimes give plat silicones issues when unsealed because of minute traces of sulfur in the clay.. Particularly the silicones with longer cure times are more susceptible to it. If you seal the sculpt well you shouldn't have any issues. If you're still worried, apply some Inhibit X over the sealed clay for extra insurance.


It would be really annoying to make a matrix how the sculpt currently sits. If you could remove it and place it on a smaller core it would be easier, but if not I'd just do a brush up mold of it. Pay attention in particular to undercuts behind the mask. If you don't fill them with silicone and your mother mold wraps around it can give you some issues demolding.
 
I like the look of a matrix mould but I've never tried one because I don't have a degasser. I'm very conscious of the bubbles that rise to the surface no matter how careful I am when i make a brush on mould so I would be worried about them getting trapped somewhere. I'd go with SlipKniotT's advice and brush on.
 
Try open skin sandpaper or "screen door" sandpaper as I like to call it.
It will smooth the clay out like a rake but unlike a scotchbright pad it doesn't hold onto the bits of clay that it removes so it makes the clay sand down nicely.
 
Chavant was designed as an automotive clay for prototyping cars. You'd be amazed at how close to glass smooth you can get it with the use of water and your finger, and a little bit of patience. Think karate kid, circular motions; wax on wax off stuff. If your surface is really resisting try adding some 99% alcohol. I try to stay away from Naptha (the ingredient in your lighter fluid that melts the clay) as much as possible. You could even take a very fine scotch brite pad and burnish the surface down a little and then smooth.

Chavant does sometimes give plat silicones issues when unsealed because of minute traces of sulfur in the clay.. Particularly the silicones with longer cure times are more susceptible to it. If you seal the sculpt well you shouldn't have any issues. If you're still worried, apply some Inhibit X over the sealed clay for extra insurance.


It would be really annoying to make a matrix how the sculpt currently sits. If you could remove it and place it on a smaller core it would be easier, but if not I'd just do a brush up mold of it. Pay attention in particular to undercuts behind the mask. If you don't fill them with silicone and your mother mold wraps around it can give you some issues demolding.

Great tips, as always, thanks SlipKnoT! Do you recommend sealing with Crystal Clear, or something else? I may pick up some Inhibit X, just to have around. Smooth-On mentions using it when molding wood, which is actually my next project after this, so will likely come in handy either way.

Very good to know about water/alcohol. I was getting somewhat concerned with how melty the lighter fluid made the clay. It evaporates quick, so goes back to "normal" pretty fast, but I wasn't liking the surface finish it creates.

I like the look of a matrix mould but I've never tried one because I don't have a degasser. I'm very conscious of the bubbles that rise to the surface no matter how careful I am when i make a brush on mould so I would be worried about them getting trapped somewhere. I'd go with SlipKniotT's advice and brush on.

I love how they look as well, which made me want to try it with my last project. I don't have a degasser either, so it did make me nervous. The surface of the item was really smooth, so turned out okay, but there are definitely a TON of bubbles on the top side of the silicone. Doesn't really harm anything, but I can see it eventually screwing with the solidity of the mating surface with the support shell.

Try open skin sandpaper or "screen door" sandpaper as I like to call it.
It will smooth the clay out like a rake but unlike a scotchbright pad it doesn't hold onto the bits of clay that it removes so it makes the clay sand down nicely.

Cool idea, I'll pick some of that up to try.
 
Crystal clear will work perfectly to seal it. A few light coats and then Inhibit X on top should do ya well. I actually keep my inhibit X in a spray bottle with a "mist" setting and spray the whole piece. For the first coat you'll want to take a brush and really get it into the details. Let it dry and then apply one more mist coat. Let that dry and you're golden. I have done molds of chavant just sealed without Inhibit X many times without issue, but it's better to be safe than sorry.

As for the screen door, it does work very well but if you go too heavy you'll scratch into the surface. You don't want to rake into the clay, you want to lightly burnish and polish it smooth. that's why I recommended the scotch brite. The screen, however, is a fantastic tool to add to your collection. It works particularly well on water based clay.

Awesome, I'll give it a try. I ordered up some Inhibit X, but then decided to get some tin-cure silicone too, since I hate paying crazy shipping, for just one thing. So, hopefully I'm set. :)
 
Update on progress here, finally molded, cast, starting to get ready for paint!

I used Mold Max Stroke for the mold, and really liked it, for the most part. I'm used to Rebound, which is really easy to thin, and thicken, but Mold Max behaved *WAY* different.

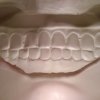
I added 10% silicone thinner to the first coat, and it still didn't spread out very thin, which resulted in some pretty unfortunate surface bubbles. I vacuum degassed the silicone, but air got trapped in some of the recesses of the teeth, etc. I thought I did a good job of stippling all that with a brush, but apparently missed some spots. I thought it would thin out way more than it did. Next time I'm hitting it with compressed air...which I was going to do this time, and then didn't. Arg!

For subsequent coats, I also found it very hard to get it to thicken up with Thi-Vex. A small batch of Rebound will turn to peanut butter with just 15 - 20 drops, but I got up to 60 or 80 with a small batch of Mold Max, and it still wasn't thick enough to my liking.

But learning curve, and bubbles aside, I really liked how it laid down overall.

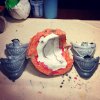
I tried out a new technique with the 2-piece support shell, by creating the dividing line with 2 pieces of plywood, bolted together beforehand. This worked out exceptionally well! Plastipaste II was used for the shell, and sticks to the plywood very well (I drilled some shallow holes in it to help with adhesion).

TwistyTheClownMold-01_zpsxadlaw68.jpg


Card stock used to get the profile of the mold, which was then transferred to plywood, and cut out.
The aluminum foil wound up being unnecessary. It was my first thought for closing the gap, but didn't work right. I wound up putting a bead of hot glue along both sides, to close up the gaps. Why orange? No reason.
TwistyTheClownMold-02_zpsqfnvglyy.jpg TwistyTheClownMold-03_zpsnw9cnwf7.jpg TwistyTheClownMold-04_zps3xcjiud6.jpg


Stupid bubbles!
TwistyTheClownMold-05_zpsv9ldbxla.jpg

Bubbles clean up fine with a knife, just annoying waste of time.
TwistyTheClownMold-06_zps7vnpqanp.jpg
 
Last edited:
Nice job. At least you're making hard copies of these, if you were casting in rubber, the bubbles would be much more inconvenient. I've not used the Smooth On silicones, I'll keep the differences in mind, thanks for posting your experience with both. I've been using Dow Corning's 3481 for the last year and really like it, works very well with matrix moulds and lasts a good amount of time. Matrix moulds can be tricky, you have to plan in advance to avoid problems later on and understand how air will move out of the jacket once you start pouring. It's worth learning though as once you use them, you won't go back to brush ups again.
 
Nice job. At least you're making hard copies of these, if you were casting in rubber, the bubbles would be much more inconvenient. I've not used the Smooth On silicones, I'll keep the differences in mind, thanks for posting your experience with both. I've been using Dow Corning's 3481 for the last year and really like it, works very well with matrix moulds and lasts a good amount of time. Matrix moulds can be tricky, you have to plan in advance to avoid problems later on and understand how air will move out of the jacket once you start pouring. It's worth learning though as once you use them, you won't go back to brush ups again.

Thanks! Yeah, would definitely be a problem with rubber and such.

I'll have to check out the Dow Corning stuff, sounds like a good option.

I LOVE the idea around matrix molds, but the one I've done didn't turn out so great. The epoxy shell stuck to the clay, so threw everything off when I tried to take it off and prep for silicone. I was able to complete the mold, but quite a bigger pain that I'd planned. Not sure what I did wrong. :( I also really worry about trapping air in the little details, since there's no way to get in there and tap them out. Although, looks like I have no better luck with brush ups. ;)
 
This thread is more than 9 years old.

Your message may be considered spam for the following reasons:

  1. This thread hasn't been active in some time. A new post in this thread might not contribute constructively to this discussion after so long.
If you wish to reply despite these issues, check the box below before replying.
Be aware that malicious compliance may result in more severe penalties.
Back
Top