Another Tie Fighter Pilot Costume

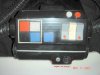
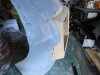
Hi Pedro. The front and rear plates were from a Pepakura file Blaxmyth had, and then fibreglassed. I then added a sheet of thin mdf to the back one and added a piece of styrene sheet that I had cut out using a template to the bottom of the front one and cut out the center section. I then made templates for the side, top and bottom, and cut these from thin mdf. Then I glued these to the fibreglass with Super strength Arahldite epoxy glue.

IMG_1804.JPG IMG_1890.JPG IMG_1902.JPG IMG_2001.JPG IMG_2002.JPG IMG_2003.JPG IMG_2009.JPG
 

Attachments

  • IMG_2019.JPG
    IMG_2019.JPG
    2.6 MB · Views: 82
Last edited:
  • Like
Reactions: MCM
After the glue was dry, I realized that the front edge needed trimming as it wasn't straight up and down. Doing that, it looked a lot better, and I then cut and glued the cover plate on with Arahldite. Once this was set, I made the neck opening smaller by cutting some plastic strip and glueing these the the underside of of the armour and then putting filler on the top surface to build it up level with the fibreglass. It was the a matter of sanding, sealing filling and sanding again and again until it was all smooth and blended into the rest of the armour. I then heavily primed it all and then sanded it all to a smooth finish ready for the top coat.

IMG_2037.JPG IMG_2038.JPG IMG_2039.JPG IMG_2048.JPG IMG_2050.JPG IMG_2053.JPG
 
Last edited:
Next, I sprayed some black primer onto it and sanded, filled, well you know the drill. It came out really well.

IMG_2451.JPG IMG_2452.JPG IMG_2457.JPG IMG_2456.JPG IMG_2442.JPG
 

Attachments

  • IMG_2446.JPG
    IMG_2446.JPG
    3 MB · Views: 75
Here are some pics of the progress on the helmet. The gloss coat and markings. I also decided to do a different canon scheme and using a picture off the net which had Red Stripes, I decided to use Blue reflective stripes and Red for the insignia on top of the mowhawk.

IMG_2460.JPG IMG_2461.JPG IMG_2509.JPG IMG_2511.JPGIMG_2542.JPG IMG_2545.JPG IMG_2548.JPG IMG_2540.JPG
 
I don't know...Is it on this year? I haven't heard anything.
 
Last edited:
Have started to install the fans by making the holding frames for them. Bent out of 25mm wide aluminium flat. The bigger fan blows air over my face and the smaller 30mm fan in the Mohawk, hopefully, will blow cool air over the top of my head, which is where all the heat in a helmet ends up. These two fans will be individually switched, so I can use each as required.

IMG_2570.JPG IMG_2571.JPG IMG_2577.JPG IMG_2578.JPG IMG_2579.JPG
 
Thanks noble 10. Yes it's getting there. I have been working on the Chest Box at the same time, so here are some pics. Using a drawing I got off the Internet, I had it enlarged to a roughly correct size,(the squares being 25mm or 1"), and began cutting out the sides in Thinline MDF. I then marked where the pipes would go and place the end pieces in a vice and using a drill, drilled holes all the way round to make it easier to remove the waste. I then marked where I needed to cut the pipe and wrapped masking tape around it to give me a straight edge to cut to.

IMG_2463.JPG IMG_2465.JPG IMG_2467.JPG IMG_2470.JPG IMG_2469.JPG IMG_2471.JPG
 
Last edited:
this pic might help you
chest box in the Lucas archive
note the bottom where the greeblies go should be angled not vertical like the printed reference your using
 

Attachments

  • tie chest box lfl.JPG
    tie chest box lfl.JPG
    190.7 KB · Views: 93
Thanks for that geordietrooper but I'm going to stick with what I have as this will be personalized for me.
 
Last edited:
Next I started assembling the pipe and caps to the sides. I then cut up the front pieces and glued them on with superglue using accelerator to speed up the process. I cut narrow strips to do the radius at the bottom and the sanded the MDF smooth before applying filler. This was then sanded smooth with a coarse sandpaper to give a nice finish. Tamiya model filler was then used to fill in any discrepancies.

IMG_2472.JPG IMG_2480.JPG IMG_2514.JPG IMG_2515.JPG IMG_2517.JPG IMG_2529.JPG IMG_2530.JPG IMG_2531.JPG
 
I then cut out and tapered the top portion of the box and glued this to the main body. When this was done, I cut out the switches from 18mm/3/4" MDF and sanded smooth then applied a coat of Superglue to seal them. I then cut out a lid to go on top. This will remain separate but will be held in place with magnets as I want to install LEDs in two of the switches.
I then sanded down the box and applied a coat of primer to it and to the switches at the same time. I assembled the tapered readout panel, to go on top, out of black styrene and then cut out a hole in the lid so the wiring for the switch could go through.


IMG_2537.JPG IMG_2538.JPG IMG_2565.JPG IMG_2575.JPG IMG_2580.JPG IMG_2582.JPG IMG_2590.JPG IMG_2593.JPG
 
Made the Fan Frames to hold the fans in position in the helmet. Large one for the face mounted just in front of my mouth and aimed upwards, and a smaller one to be fitted at the front end of the Mohawk to suck air in from the vent? at the front , and blow over the top of my head.

IMG_2568.JPG IMG_2571.JPG IMG_2576.JPG
 
I had a friend turn up some of the greeblies on his lathe and they turned out really well. They certainly make the helmet.

IMG_2603.JPG IMG_2608.JPG
 
  • Like
Reactions: MCM
I then started to instal the foam padding and electrics for the fans. I also put in the green film for the eyes.


IMG_2604.JPG IMG_2610.JPG IMG_2628.JPG IMG_2632.JPG IMG_2632.JPG IMG_2674.JPG IMG_2675.JPG
 
  • Like
Reactions: MCM
I'm digging this thread. My fiance and I are putting together a Tie pilot outfit ourselves and this thread has been a huge source of inspiration. I'm really digging your project!
 
Thank you so much for that positive feedback MCM. If you have any questions, don't hesitate to ask.
 
Now, that 'Pill Box' that I have seen so many of you ask "Where can you buy one from?". Well, this took me all of 20 minutes to cut out, paint and glue. So, anyone wanting one should have a crack at making one yourself. Come on. Give it a go. You will be surprised how easy it is to make. I first cut the MDF which is 6mm thick ( this I believe is a bit too thin, so I have now made a new one at 9mm thick ) to a size of 60mm-21/2" and 40mm 11/2"and then cut out the hinge corners and rebate for clasp at the front. Once this was done, I sanded the top edges round and then sealed the whole this in Super Glue. When this was dry, I sanded it again with wet'n'dry to a smooth finish and primed and painted it. The white is just plain white styrene which I cut to size glued the hinges and clasp plate on and then stuck it to the back of the box to line up with the recesses that were cut out on the lid. All done. Hope this helps.


IMG_2522.JPG IMG_2523.JPG IMG_2526.JPG IMG_2527.JPG IMG_2528.JPG IMG_2536.JPG IMG_2534.JPG
 
  • Like
Reactions: MCM
Back
Top