Aliens floor tile ???

Ok seeing how no one can make these actual floor tile from Lv-426, without it costing an arm and a leg.....since I have the actual measurements, on the original dimensions( as close as they are ) I will be starting this process , which will take a lot of time to cut and make slots in the tops of the railing one the actual pallet....the dimensions are fairly close.....so after more measurements are taken , I will give the closeness to each part of the pallet.....so the hardest part is to just cut thru this slowly without melting the plastic....any ideas on a slow cut....anyone ???
 
For the love of God, someone print these...

I know it is taking awhile, but:


each strut is 5 parts, so it's a 100 segments for a full tile.


Wiz, Looks really great!

2 things, I don't think the one lower detail is present in the Alien/Aliens tile + all the struts have radius edges.

 
Last edited:
Looking good Noble, will double check the reference I have for the lower bits (and update the edges), the lower bits definitely appear in the star wars movies, and also Alien, a bit difficult to tell from the shots I took from Aliens (but looks like they may well be missing). :)
 
thanks :) and check out this photo stream, some great reference shots - Set di foto di Prop Panel su Flickr

Ah I see that detail in that red pallet from Star Wars. But it's no where to be seen in ALIENS: http://www.therpf.com/f9/aliens-floor-tile-150618/index4.html#post2932368
Perhaps Cameron removed that part.. or maybe it's just a different pallet. Who knows
Hmm but here it is in ALIENS: Aliens | USS Sulaco | Flickr ? Condivisione di foto!
Weeeiird :wacko

Never noticed that before. But I did notice some of the pallet have round holes instead of circular like here: Aliens | USS Sulaco | Flickr ? Condivisione di foto!
 
No doubting there are at least 2 to 3 versions of the pallet, but I am happy with the version I have done (as it suits for what I am planning :)
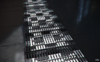
), plus the lower bits can be quickly removed if need be as they are a separate element in the mesh (kept them separate for such needs) :)

So just a few little updates to do really before I call it final :) - then to see about 3d printing, although no very little about that side of things, nor how much its going to cost :(
 
A quick test of the sci-fi floor tile; just a lighting test as I work towards getting started on the corridor from Alien (this image is roughly based on the Star Destroyer Executor floor from Empire :)).
 

Attachments

  • Executor_Floor.png
    Executor_Floor.png
    1.2 MB · Views: 397
Maybe someone could get pricing for how much injection mould tooling would cost for getting only a small section of the pallet done, ie one foot square section. This would mean you wouldn't have the border of the pallet, but it would mean that tooling is a hell of a lot cheaper, and quantity is a lot more, meaning prices would come down due to the quantity involved (ie you would need like 9 tiles to make a pallet).
 
Maybe someone could get pricing for how much injection mould tooling would cost for getting only a small section of the pallet done, ie one foot square section. This would mean you wouldn't have the border of the pallet, but it would mean that tooling is a hell of a lot cheaper, and quantity is a lot more, meaning prices would come down due to the quantity involved (ie you would need like 9 tiles to make a pallet).

Injection molding is not cheap unless you intend to produce 1000s of units per run.
The last time I looked into injection was for a product that was about 8" long. A simple 2 part mold was going to cost from USD$4K (China) through to over AUD$10K if made in Australia. When producing 1000 lot parts, each part is only a few dollars. The mold is the expensive part.
Now it you have a more complex mold, say one with side releases, add another 50%.

Because I was only ever going to do short order runs, I went with laser cutting.
 
Thanks mate, and yeah injection mould looks out :( although I have other sci fi panels in my collection which are suitable for vacuforming so looking into all avenues and pieces at the moment :)
 
Vac Forming could be viable if you can find a Vac Form large enough. If not, you can always make one.

Once I get mine complete (undergoing revisions to make it better right now), I don't see why a larger version could not be done for not allot more. The most expensive part of mine so far has actually been the plumbing (hoses, ball valves and fittings). The Vac Pump was only 100 bucks for a 3CMF unit. Surge tanks are cheap (often free) if you use old gas cylinders. The beauty of gas cylinders is that should they ever become compromised, they crush in.

The table itself can be made for less than $100 and can be 1200mm x 1200mm in MDF. I drilled close to 400 holes for the last table and so right now, I am looking at a metal version of peg board. I want metal because the heat from the plastic tends to pull some of the bonding agent (formaldehyde?) in MDF out and it sticks to the plastic. Not cool for clear pulls. Also it swells when you use (spill) liquids to assist with the cooling of parts. I am hoping to get a perforated stainless steel, so no worries there.

I began with strip heaters and sure that worked, but it was slow and didn't always give even heating. Then I experimented with halogen lights -awesome. Instant heat and lots of light on the job. I will continue with these for a while.
 
Back
Top