Aliens APC 1:18 scale with interior

Thanks Joberg - yes, me too!

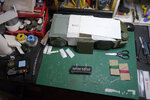
I've some new parts cooking in UV. I left them on their support for now so I don't damage them in handling before they're cured properly.

APC_21021401.jpg


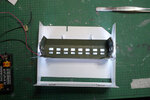
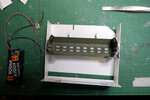
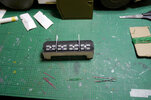
I took advantage of another round of resin printing and made a couple of copies of the Sentry Gun cases I previously printed in filament. These ones have a suggestion of contents and the lids snap on/off perfectly.

APC_21021402.jpg


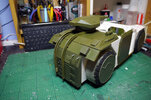
I'll be back to gluing styrene for a while now that I've got most bits printed.
 
Does UV curing only affect the surface, or does it penetrate the pieces?
Initially it creates a hard shell so that the pieces can be handled. It will penetrate over time on thicker pieces (the resin isn't completely opaque) but it's best to make them hollow if there's a lot of mass there in resin. I'll be printing in clear resin soon so we'll see if the curing process is quicker. You'd think it would be.
 
Those ammo boxes look great!!
Thanks Joberg. Looking at them again (and checking the reference) I'm sure I could do a lot more with them - but they're good for now. It would be fun to get them painted up so that might be a fun little job for an hour if (or let's face it - when) I get stuck with the main build. :)
 
So, I'm sat in our local coffee shop with the missus. She's working on her short story and I'm tinkering with ideas for the APC.

Call me crazy but I'm seriously thinking of making the DSGR missile system a functional feature - at least as far as opening up. I'm having to deal with some interesting planar geometry for the ceiling inners/outers at this point anyway so I figured 'how can I make this even more tricky to achieve' lol.

IMG_20210217_155617621.jpg


IMG_20210217_155608153.jpg
 
Ah come on! You've said it, now you've GOT to do it! (y)
I think you're right Duncanator. :)
I've done some fiddling with card and I reckon it'll work. I knew all those Chupa Chup sticks would come in useful for something. :)

APC_210217a.jpg


It's just sat on top at the moment but hopefully it'll work well.

APC_210217b.jpg


I'll make some rounded warheads for the ends of the missiles and detail out the bays.

APC_210217c.jpg


Next up is cutting out styrene copies of my card shapes and sorting out how to keep the rest of the roof detachable.
 
loving your progress since I last looked, Chupa Chup? perhaps I need to eat more sweets to get extra spares - since being a member of the RPF I'm always amazed at what peeps can make from the rubbish we normally throw away.

good stuff (y)
 
Thanks Chuffy 70. My daughter and I love a Chupa Chup!

Next up is prepping for lighting the screens in Gorman's console - the TOC station.

APC_21021901.jpg


APC_21021902.jpg


Just about to connect and test - always a nervous time (especially given my sloppy soldering).

APC_21021903.jpg


Yay! Not easy to see against the white background but it works!

APC_21021904.jpg


I got time to do a little more on the DSGR arrays too - building out the bays and sinking them into the roof.

APC_21021905.jpg


APC_21021906.jpg


APC_21021907.jpg
 

Attachments

  • APC_21021901.jpg
    APC_21021901.jpg
    160.2 KB · Views: 95
  • APC_21021901.jpg
    APC_21021901.jpg
    160.2 KB · Views: 97
  • APC_21021901.jpg
    APC_21021901.jpg
    160.2 KB · Views: 87
  • APC_21021904.jpg
    APC_21021904.jpg
    118.7 KB · Views: 99
  • APC_21021903.jpg
    APC_21021903.jpg
    125.6 KB · Views: 92
  • APC_21021902.jpg
    APC_21021902.jpg
    165.6 KB · Views: 91
  • APC_21021901.jpg
    APC_21021901.jpg
    160.2 KB · Views: 95
Thanks Chuffy 70! I've built them in 3d so they'll be printed soon.

It's time to start working on the rear ladder. This is going to be soldered up from 1.5mm brass rod.

I've never worked with brass like this before - so I was prepared for it to be a learning curve. Just as well!

APC_21030101.jpg


I filed fish-mouths in either end of each rung and tried working it with the soldering iron first. No joy there so I went with my mini butane torch and plumber's flux. That did the job and will produce decent results I'm sure - but I need a little more practice first - this first joint looks like a right dog's dinner. lol

APC_21030102.jpg


APC_21030103.jpg


Onward and upward, exelsior!
 
Here's a quick catch up of some of the little jobs I've been fitting in between work.

APC_210303LAD1.jpg


Despite my cack-handed attempt at soldering/brazing I pushed on ahead with the ladder. First up, breaking out the Dremel pillar drill.

APC_210303LAD2.jpg


I needed that to drill 4 holes into some scrap timber to build an alignment jig for the ladder rungs.

APC_210303LAD3.jpg


All set up and ready to go! That's my fireproof soldering mat.

APC_210303LAD4.jpg


..and there we are, filed, sanded and given a first coat of primer. I'll refine the joints a little more later.

APC_210303MIS1.jpg


I printed out two missile racks (one didn't print properly, so I'll re-do that one) and stuck the Chupa Chup sticks in there. They just need rounded warheads made now. I printed them in clear resin simply because that's what I had loaded up.

APC_210303LED1.jpg


I shaved down 2 red LEDs (they had domed tops) to fit into the rear lights.

APC_210303LED2.jpg


These 3d files will be printed up in clear resin, like the missile racks and will have the LED fixed inside.
 
well you have been a busy Chupa Chap...love your attempt at brass work, you've got to try these things bud or you'll never know if you can or can't - 10 out 10 for effort, and a sweet looking ladder

looking forward to more
 
Thanks Chuffy 70, I'll get some more practice in soon enough.

Another small update today. I made the vented grille section next to the ladder.

APC_21030500.jpg


You can see it here inbetween the ladder and the base of the (missing) turret.

APC_21030501.jpg


The louvres were marked out and cut from styrene.

APC_21030502.jpg


I couldn't resist chucking some olive drab on there to see how the whole assembly is looking. Not too shabby. :)
 
Thanks benderobot!

I did some more work on the rear exterior and threw some rattle can olive drab over it all to see how it was shaping up.

APC_21030601.jpg


APC_21030602.jpg


It's starting to look a lot better. I'm looking forward to getting the rear light assemblies done - I'm just waiting for a delivery (a new FEP film tray for the resin printer).
 

Attachments

  • APC_21030601.jpg
    APC_21030601.jpg
    207.7 KB · Views: 75
  • APC_21030601.jpg
    APC_21030601.jpg
    207.7 KB · Views: 77

Your message may be considered spam for the following reasons:

If you wish to reply despite these issues, check the box below before replying.
Be aware that malicious compliance may result in more severe penalties.
Back
Top