Thanks. I am watching your cutaway for ideas.Man, this build is simply inspirational! And by that I mean it inspires me to get these other models I have to finish done so I can get back to my cutaway Falcon. XD
You are using an out of date browser. It may not display this or other websites correctly.
You should upgrade or use an alternative browser.
You should upgrade or use an alternative browser.
5 ft. ANH “Wooden” Falcon
- Thread starter Searun
- Start date
Hi Searun.
I just caught up with your build & oh my, she is looking wonderful my friend!.
You work so fast with your materials of choice. I guess we go with what we know & are comfortable with which to fabricate.
I am really looking forward to seeing how you tackle the details as you have mentioned previously...as they say...the devils in the details haha.
Amazing work my friend & a joy to see here!.
Stu
Thanks eagle 1. Coming from one of the 5ft. Falcon Masters, your critique is quite a compliment.
I am certainly going off Studio Scale script by proceeding without kit parts or the equivalent, but those details will definitely be added in some manner later. Also, must have my retractable landing gear an other operational features, so that is another deviation. The bird is a harsh teacher when it comes to geometry lessons that only those who attempt it really understand. Scrutiny of those that have kindly contributed to the RPF web site has made the project possible for me.
Retired status is good since it enables every day attention to the build. Bad part is at 75, opportunity to have learned the kit collection process & implement it was an opportunity lost. Few model designs have hooked me the way the ANH falcon has. Many hours spent on references. Biggest trueth, not sure who gave it, was one must do the homework and learn to answer your own questions If you want this particular model.
I can almost hear this wisdom in Yoda's voice, if you slightly rephrased it:
"For this particular model, own homework you must do... Own questions you must answer!"
"For this particular model, own homework you must do... Own questions you must answer!"
Pyramidrep
Sr Member
Searun, You’re doing great. The good thing is you can take it as you’re own pace and as long as you’re pleased with the results, then that’s all that matters. I have huge admiration that you’re doing this at the age of 75. I’m 58 and starting to feel conscious of the sands time of time...............Biggest truth, not sure who gave it, was one must do the homework and learn to answer your own questions If you want this particular model.
And that piece of advice you quoted, its true for all S.S. builds , even the “big bugger” I’m building.
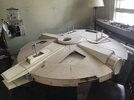
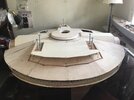
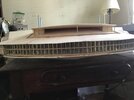
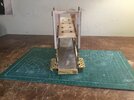
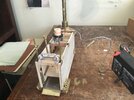
A few pictures showing the progress made on nose and main landing gear ”pods.” Deviation of landing gear wheel well boxes were intentionally set per spec about 4-1/2“ vertically from the disc core center line before skinning. The top view and stern view show what I perceive is an interesting geometry fact known to the pro’s who have made this model. That is, if you have a proper airfoil curve on the saucer, the 7-3/4“ dome radius will be intersected (sliced) horizontally and flush by the curve of the flat top of the main landing gear deck. This is verified by not seeing any gaps when you look into the stern “cave” when the chamfered sides are off. Not something I thought of when considering the importance of the disc shape. Fortunately, this web sight provided the caution on thin disc sections and the accurate drawings of a “master“ continue to reward me and continues to have my deepest appreciation. Note brass rods cut to gauge height shows plywood deck made from template/mock up is perfectly level.
Attachments
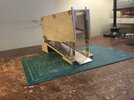
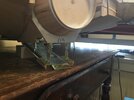
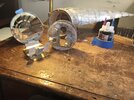
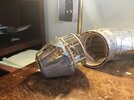
Took a break on major airframe construction to work on the boarding ramp. Still very much a work in progress. Using a self contained module that permits removal. Retracting mechanism to be a medieval drawbridge gravity drop (note the brass for weight) with cable or drum retraction to be placed on top. Falcon designers struggled with straight hydraulic strut design and a rear hinge that did not account for rotation. This I found out, afterwards, is discussed on the web in exquisite detail with a story about the 727 and DC Cooper analogy for those interested in the airline‘s lessons learned with the rear stairs bright idea. I will need to learn more about styrene, since I must now do the ramp inside walls. In any case, lots of fun adding to my brass & aluminum experience to be to applied to landing gear, cockpit and engine flap details later.
Attachments
-
 F8D83283-7CA4-4614-A669-A64FBAF83684.jpeg1.9 MB · Views: 242
 -
 BC33A505-3CC7-4504-A177-0D51CAE86A1C.jpeg1.8 MB · Views: 232
 -
 16B43635-3F7A-44BC-A65C-FADB7BB3610A.jpeg1.7 MB · Views: 247
 -
 202D53A3-1C08-4437-9934-A5C0069E7C6C.jpeg1.2 MB · Views: 238
 -
 842080C5-E33F-45B9-AD0C-F3752F1A275B.jpeg1.5 MB · Views: 259
Elegant design!
Thanks Joberg.Looking mighty good from where I stand Searun")
One can indeed get tied up in details of this machine.Elegant design!
You can see the old model airplane style in this build. Need to try and learn some new methods from you folks.Yes, these details look absolutely beautiful. Loving this approach.
Geat update!
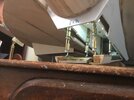
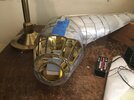
Attached is a picture of how I motorized the ramp. Note it, like the landing gear, is a removable module. Used the Castle Draw Bridge approach. Simple, but like everything else, requires adjustments & tweaking design changes.
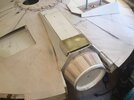
Also, starting on the cockpit using the excellent ANH drawings and concepts from the experts on the web. Notice the “squirrel cage” that provides the rotation of cone and navigator seats. Mock-ups ongoing. Must get all the dimensions correct based on material choices and differences in shelf /seat elevation between original drawings and movie cockpit.
Also, starting on the cockpit using the excellent ANH drawings and concepts from the experts on the web. Notice the “squirrel cage” that provides the rotation of cone and navigator seats. Mock-ups ongoing. Must get all the dimensions correct based on material choices and differences in shelf /seat elevation between original drawings and movie cockpit.
Attachments
Bjorn
Sr Member
Nice cockpit Searun.
It shows that you have spent a good amount of time with your research and working your geometry.
Overall it seems the falcon is somewhat simple in its basic form, however there are clearly some nuances in there to keep you on your toes.
The pioneering guys have been a great help in this regard, paving the way ahead for the rest of us.
Keep it coming!
Bjorn,
Your reference to “The Pioneers” on this model is indeed appropriate to this beginner since coming across Andre’s drawings on this site. Significant contributions at every turn In the build.
The cockpit input by SteveStarkiller, Maruska, not to mention the epic cockpit thread by SofaKing01 starting back about 10 years ago keeps me hearing the Game of Thrones quote “ You know nothing John Snow.”
Pyramidrep
Sr Member
One of the great things about this build is that it’s been built with traditional model making techniques using metal sheet, soldering, riveting, wood formwork and some wonderful engineering. They are skills that can be a rarity to see being done nowadays In a age of plastics and one that should not be forgotten or discounted.
Well done, Searum.
Well done, Searum.