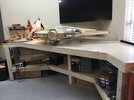
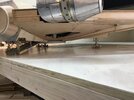
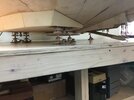
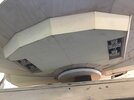
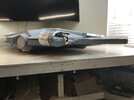
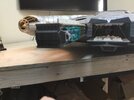
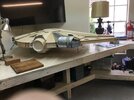
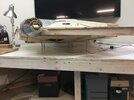
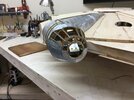
5 ft. ANH “Wooden” Falcon

One of the great things about this build is that it’s been built with traditional model making techniques using metal sheet, soldering, riveting, wood formwork and some wonderful engineering. They are skills that can be a rarity to see being done nowadays In a age of plastics and one that should not be forgotten or discounted.

Well done, Searum.
Thanks Pyramidrep.

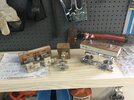
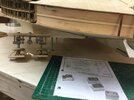
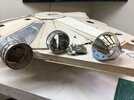
The use of styrene and 3D printing is outside my skill set. I can not duplicate the same crisp & clean construction or minute level of detail when using the old balsa “model airplane” techniques. But, when the rough looking materials are sanded & clad with aluminum armor, I can get pretty close. Plus, I have a son focusing on obtaining the “kit parts.” Weathering is something that must be commissioned to a Falcon artist.

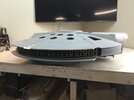
Like the Tyrell Pyramid, the Falcon is an extremely worthy esoteric subject. Time and effort placed on replication of these studio models are a tribute to the original folks involved that displayed exceptional creativity and craft. I will get it the Falcon done If I can avoid side track temptation of a Bespin landing platform and SeaLand type shipping containers to fit in between the mandibles.
 
Wife and I moved out of the appartment into a Town House. Among other things, with the help of my son, this came with a garage which results in a significant increase in efficient work space. Falcon’s removable pieces can now be easily assembled & removed. Attached photos show some progress on the cockpit interior.

The mock-up of the main landing gear was made out of wood & metal scraps per the original ANH drawings. This was necessary to insure that the details will retract without interference as the motorized elevator plug lifts into the wheel well. Also, the dimensions that result from fabrication and construction need to be confirmed before making all the parts out of the material chosen.

Thanks to my Star Wars Collector son, he has recently closed a deal with a “Greeblie Veteran“ with years of Falcon experience to provide available original kit parts. This is a tremendous development. It insures a reasonable studio scale model of this awesome design. Years of work remain, but it fits my time remaining. Otherwise, clearly impossible.
 

Attachments

  • E72B84E5-A383-4A73-BF65-CEEFB684316B.jpeg
    E72B84E5-A383-4A73-BF65-CEEFB684316B.jpeg
    1.7 MB · Views: 285
  • D365DBE4-6201-43AD-A48B-CB4C87CF513F.jpeg
    D365DBE4-6201-43AD-A48B-CB4C87CF513F.jpeg
    1.6 MB · Views: 295
  • F3F6B88C-11D3-4606-8257-A0F618BF4BFB.jpeg
    F3F6B88C-11D3-4606-8257-A0F618BF4BFB.jpeg
    1.8 MB · Views: 287
  • 6E4F6F4A-A48E-4DD3-B111-53056423507E.jpeg
    6E4F6F4A-A48E-4DD3-B111-53056423507E.jpeg
    1.6 MB · Views: 285
  • 850A5CB8-2FA5-4D08-BD8C-5182CF21E293.jpeg
    850A5CB8-2FA5-4D08-BD8C-5182CF21E293.jpeg
    1.7 MB · Views: 257
  • 42F1F21A-ACA9-47EB-B0FE-F136F8596506.jpeg
    42F1F21A-ACA9-47EB-B0FE-F136F8596506.jpeg
    1.6 MB · Views: 318
Great update Searun:cool: I wish I had your space to work on my models/projects. Good news about the kits/greeblies you'll acquire in the near future!
 
I finished most of detailing of the ANH Falcon main landing gear paying attention to the original drawings. There are many subtle differences depending on references used for all of the landing gear, so the work is considered representative. The discs are a “place keepers” until I figure out how to replicate the ventilation of them and their associated skirts. May need to learn photo etching.

Attached are some pictures of the main landing and nose gear elevators and struts with retraction mode & the bird securely sitting on this legs. Note retraction uses an Archimedes screw, so retraction requires removal of the main landing upper middle spider assembly and the lower center link. I made these as “plug ins” for when the gear is extended. Struts can readily be adjusted since strut cores are carriage bolts.

Obviously I have been deviating from studio scale. Original plan called for structural accuracy with my need for moveable gear, ramp & cockpit and aluminum armor. Now that a source of kit parts is in progress, I am glad I have not started skinning the armor. My balsa model airplane construction technique and choice of wood materials is rough compared to the crisp & clean work of others on this site. However, all major structures are removable. I can easily now modify the components to agree with the greeblie dimensions that are in route. All that said, this is certainly a long term project.
 

Attachments

  • B8BC6B7D-DF71-477F-A707-A7D7ACCDD914.jpeg
    B8BC6B7D-DF71-477F-A707-A7D7ACCDD914.jpeg
    1.6 MB · Views: 252
  • E9F380F1-2956-433B-9EF7-07BB33E466F1.jpeg
    E9F380F1-2956-433B-9EF7-07BB33E466F1.jpeg
    1.6 MB · Views: 245
  • D5F04A38-B3E8-4EFC-8C45-6C3FB280DEB6.jpeg
    D5F04A38-B3E8-4EFC-8C45-6C3FB280DEB6.jpeg
    1.5 MB · Views: 218
  • 5B3100B6-56C9-4AD7-B245-0FA9D2CDA417.jpeg
    5B3100B6-56C9-4AD7-B245-0FA9D2CDA417.jpeg
    1.1 MB · Views: 211
  • E1F500D7-A204-4857-BB67-C21BC093283F.jpeg
    E1F500D7-A204-4857-BB67-C21BC093283F.jpeg
    1.5 MB · Views: 218
  • FC0E5659-BBE7-452A-ACAB-DB8F0713AE49.jpeg
    FC0E5659-BBE7-452A-ACAB-DB8F0713AE49.jpeg
    1.7 MB · Views: 231
LOVE the landing gear -- that is a brilliant signature tell that this is your own Falcon build, and will separate it from most others as truly unique. One benefit of your build technique such that all "major structures are removable" is that you'll be able to -- if necessary -- tweak the height of the landing gear once you've completed the lower gun turret ring -- with the gun hanging there, it might need a nudge upwards by a scoche or two. (Then again, it may be perfect as is, just can't tell from the angle of the photographs). But this signature tell actually allows you to build yours with both guns displayed, something most other Falcon builders have to sacrifice if they're using a bottom-mount display stand.
 
Key landing gear clearance to tarmac observation SK.

Reason for retracting bottom turrets on B-17 & B-24 bombers & the gull wing on the F4-U for prop. The Millennium Falcon disc fuselage depth is critical. It is not very thick for vertical retraction.

Yes, good eye. I had to lengthen carriage bolts accordingly. Distance from elevator plug to tarmac when gear is extended is 3-3/4 to 4 inches maximum when one stacks up the dimensions necessary for the length of the drive gear to end of elevator plug screw. Gives about 2-5/16 to bottom of turret ring for quad gun clearance. L/G Ratio’s obtained from DeAgo & Bandai Falcons in advance. Tolerance built into design, but retraction / extension adjustment is indeed required during build. Pick construction material carefully. Interior head room to bottom the wheel well deck is just enough for retraction. In progress testing necessary. One can reduce elevator plug thickness if you mess up, but not much since about 80 Ibs load plus means gear must stay robust. Note thrust plate added to elevator plug bottom to secure nut and the upper aluminum thrust strap & washers in previous pictures to take load on drive screw when sitting on gear.
 
SK said it perfectly Searun: it's your bird and the way you're building it, it couldn't be mistaken for an other builder(y)(y)
Great update and keep up the good work:cool::cool:
 
Wow great build Searun! Impressive woodworking and metal skills
Sorry I couldn't help you out with the kits eventually (I think your son contacted me). I have started my second attempt on the 5Ft Falcon last month... I'll post my updates soon on the forum.
 
Wow great build Searun! Impressive woodworking and metal skills
Sorry I couldn't help you out with the kits eventually (I think your son contacted me). I have started my second attempt on the 5Ft Falcon last month... I'll post my updates soon on the forum.
Thanks Dimitri-Ajith. Tackling a 5ft. Falcon obviously takes more than passion.

My original plan certainly did not start off with a greeblie & kit part approach. Thanks to my son, he lucked out with a veteran source (who is a stickler for accuracy) about one year after I got started on the basic structure. Fortunately using a mock-up approach, research and shamelessly reading information by experts on this site has paid off because the kit parts (funded by my son) are starting to validate my critical dimensions. A reasonable build will result with minimum rework as I begin to do my puzzle homework with location maps, learn plastic surgery, and become an expert layout artist.

Good luck with your project.
 
With a good bit of the ANH Falcon airframe completed to dimensions graciously provided by years of labor from RPF web site veterans, here are a few pictures.

It shows a raw beginner‘s attempt at comparing & contrasting his as-built construction to some kit parts obtained to date. Minor rework was, and still will be, required in spite of doing one’s best constantly measuring to meet the specifications and picking materials. They kit parts are temporarily stuck on. They illustrate the importance of disc wall, flap width, mandible channel, jaw lip vs. jaw mouth height, and the angle width on the sides of the jaw box cheeks. The associated kit parts help validate spec. dimensions and provide confidence that my build will be reasonably accurate. They will be worked in conjunction with their related armor segments before any permanent securing is done to double check orientation.
 

Attachments

  • 63149FAD-3FE6-4D17-8C2B-C98ABA1C78B6.jpeg
    63149FAD-3FE6-4D17-8C2B-C98ABA1C78B6.jpeg
    1.6 MB · Views: 206
  • 54290652-4110-4C08-8F04-A9B4400FEF73.jpeg
    54290652-4110-4C08-8F04-A9B4400FEF73.jpeg
    1.7 MB · Views: 201
  • 030880D2-4F8A-4557-B61B-C3D0FC9FA9C4.jpeg
    030880D2-4F8A-4557-B61B-C3D0FC9FA9C4.jpeg
    1.4 MB · Views: 213
Absolutely Stunning Searun!!! So impressed with what you are doing - and it's great to see kit parts starting to be tested out!! This is going to be EPIC!!! PS - I know it's just temp mounted, but be sure to flip that Ferrari Valve cover at the very front of the mandible 180 degrees from how you have it ;) Anxiously await next update!
-Sean
 
Blown away with the speed of you progress Searun. As with Sean, great to see those parts landing on the ship.

Those kit parts are the key to working out everything.

It is the way...
 
You are probably 'feeling' the progress with the kitparts on there. Exciting times, because all your measurements and building will get clearer like you described. Greatest respect for doing it this way..... For my baseshape I just press print :) (ok not exactly that... a lot of measuring too, but after that nothing can go wrong. Except that your printer breaksdown... like now )
I think that is the beauty of doing it the way you are doing it, you can craft whatever you want with your bare hands.
Greatness...
 
Absolutely Stunning Searun!!! So impressed with what you are doing - and it's great to see kit parts starting to be tested out!! This is going to be EPIC!!! PS - I know it's just temp mounted, but be sure to flip that Ferrari Valve cover at the very front of the mandible 180 degrees from how you have it ;) Anxiously await next update!
-Sean

Thanks t2sides. The build will not be as precise as yours, but will be a best effort on my part. While I am good with port, starboard, inboard and outboard some times I forget symmetrical looking greeblies have a up & down. Sure would have been bad to have the very prominent nose on the Falcon 180 degrees “out of joint” (and there is a rectangular joint).
 
Blown away with the speed of you progress Searun. As with Sean, great to see those parts landing on the ship.

Those kit parts are the key to working out everything.

It is the way...
Thanks Bjorn,
Coming from you a real compliment. Retirement does permit concentrated building. Old age provides “time is of the essence” emphasis.

Love the way you and some of the other Falconers and Star Wars folks use the Mandelorian expression.

Regarding kit part feedback it is a fact. A critical reengineering lesson learned. Always knew drawings and high quality photographs were necessary for model accuracy and still are. However, Greeblie dimensions were new territory not fully internalized in the beginning in spite of reading about it.
 
You are probably 'feeling' the progress with the kitparts on there. Exciting times, because all your measurements and building will get clearer like you described. Greatest respect for doing it this way..... For my baseshape I just press print :) (ok not exactly that... a lot of measuring too, but after that nothing can go wrong. Except that your printer breaksdown... like now )
I think that is the beauty of doing it the way you are doing it, you can craft whatever you want with your bare hands.
Greatness...
Thanks D-A,
Started building balsa airplanes many moons ago. School was a slide rule. Work was pencil lead & blue prints from the original obtained from document control. Never learned CAD but certainly appreciated it and the computer. Photogrammetry & 3D printing is incredible. Way beyond my skill set and it is also scary.

One thing I have learned. The Falcon is a challenge to build accurately regardless of measurement, materials of construction and tools used.
For me, research and measurement checking takes more time than any serious building effort. Some rework is inevitable unless you are a wizard. You have to love it. Best of luck. Back down my rabbit hole for now.
 
Looking very good Searun(y)(y)Eager to see your next update:cool:
joberg,
Thanks for your assessment. Updates on kit part placement will be many small steps coordinated with armor segment lines as advised by the excellent video tutorials on the RPF web site. So very important to listen carefully to the words of those who have been down this road. Much can be extracted by studying what, on the surface, appears to be a simple explanation or photograph.
 
Back
Top