4' (AKA 5 foot) Falcon build

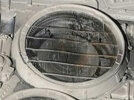
Ah, that fan. I don't think it's precisely the one used in the Falcon, though there are similarities. The biggest obvious difference is the raised lip around the edge of the flat surface. The inner wall of the fan, as it were, looked cylindrical on the Falcon fans. But isn't on the fan above.
 

Attachments

  • Screenshot 2025-01-11 at 23.29.10.jpg
    Screenshot 2025-01-11 at 23.29.10.jpg
    1.2 MB · Views: 79
Last edited:
Oh!. Okay, well that's what I was starting to suspect as I was creating my 3D model and seeing so many differences. Solved then, I'll ignore that photo. The text is super easy enough to remove, although now I'm slightly tempted to leave my name on the fans.
 
I'm not saying there was no lettering. All I'm saying is I can't see any lettering in any of the photos I've seen. :)

When I designed add-on fan models for the Bandai PG Falcon, the main things I'd say we can say with reasonable confidence are:

- We know there were 9 blades
- We know the diameter of the central disc relative to the outer section
- We know the central disc was flat
- We know the relative positions of the three circles on the disc, which were quite fine
- We know the relative length of the rectangular slot, which seems to have been deeper than the three rings
- In some photos of the bottom of the rectangular slot is at least partially a medium blue colour
- We sort of know the interior walls were straight (parallel sided) and then maybe curve inwards

And that's basically it! :) Everything else is obscured by the Koolshade...

(note: my model below is shallower than the real fans were, to accommodate motor mechanisms within the Bandai PG Falcon engine deck interior, plus is simplified/enlarged in places for printability reasons)

1736669663021.png
 
Last edited:
With some new information I'm going to rework this model. With Stu's help I should be able to get 2 decimal place accuracy on at least the fan hub portion. From there I can work out the shroud sizes (not that you'll ever see that anyway).

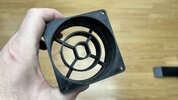
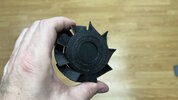
In the mean time, I printed out a low resolution prototype to check my concept. This is printed at 0.21 layer height with a 0.4mm nozzle. It gives me accurate(-ish) dimensions, but doesn't look very pretty. 0.1mm layers with a 0.2mm nozzle, and slightly slower speed, would improve the looks.

That said, it does function as I intended, and that was the point of this exercise. It also pushes air, which is sort of neat :lol:

Video here -> 3D Printed Muffin Fan.

IMG_4582.jpg.IMG_4583.jpgIMG_4584.jpgIMG_4585.jpgIMG_4586.jpg
 
Oh!. Okay, well that's what I was starting to suspect as I was creating my 3D model and seeing so many differences. Solved then, I'll ignore that photo. The text is super easy enough to remove, although now I'm slightly tempted to leave my name on the fans.
Great idea. I have deviated somewhat with my Falcon already. Therefore, I will add my name & A&P license number next time I remove my engine deck.
 
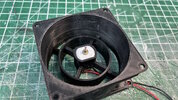
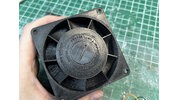
So a thing I made.

The 'muffin fan' from under the engine deck. Practically nothing about this is correct, except perhaps the fan blade shape.

As I do not have the real thing, and the only photos of the real thing I have are obscured by Koolshade, almost all of this is guess work.
  • I have no idea what the exact dimensions are, so I've tried to go from photos and dimensions of similar fans.
  • I am 99% sure the outer ring of text is a US Patent number, but I don't know the number, so I made one up.
  • I have no idea what the inner ring of text is, so I made it up.
  • In at least one, small, fuzzy, photo of the purported real thing, the top of the hub sort-of-kinda looks like it is slightly rounded, but all other images seem to show it perfectly flat. So I went with flat.
  • Also in that one lone photo, the corners of the outer casing are inset about 5mm. However you can't see that inset in any of the Falcon photos. (at least not in ones I have). So I went with completely flat front and back sides of the fan.
  • The blade shape came from the only other fan I could find that was the correct size, had close to the correct hub diameter, but more importantly, the correct number of blades; The Orion OA80AP series of metal fans used in aircraft avionics. I then took the concepts of that fan's blades and tweaked them until they looked sorta-kinda like the Falcon's fan blades. 9 blade muffin fans seem like a rare breed.
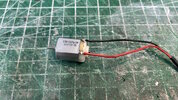
  • I wanted my fan to be functional so it was designed around the small Type 130 6VDC motor. With 3VDC it'll spin around 1000rpm, which is far, far less than what the real fans would do, but mine isn't real, and that speed will still sell the point.
If I ever find out what the text really says, it'll take me about 30 seconds to update the model. And if any of my dimensional guesses are close, I should be able to swap these fake ones out with real ones if I ever find any. I really do hate using 'fake s**t' on my build, but it sort of is what it is at the moment.

View attachment 1895298

View attachment 1895299

If you're "making up" Patent Numbers, might I suggest these eight digits: 05251977
 
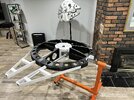
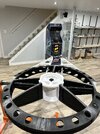
Small milestone tonight. I have the new lateral stand mount installed. I designed it myself, but had it manufactured by a metal working shop just outside of town. They can weld. I can not. They did a fantastic job. Also the Mandible sidewalls and supports are complete.

My orange engine stand is a bit of a dud. I'll have to get a new one. It's a cheap Vevor stand and it was welded together unaligned. So only 3 of the 4 casters touch the floor.


IMG_4593.jpgIMG_4594.jpg
 
Hello everyone. I'm David. I just joined this group a day or so ago and have been absorbing information like a sponge.

My personal grail build is a 4 foot Falcon replica. Over the years I've assembled a collection of the various kits required, and I've been purchasing additional ones as new part maps have been created. Thank you very much to jcoffman99 for putting together that excellent part map thread. It's helped a lot.

Anyway, I do have two questions to start.
1. I have the list of the various donor kits required, but I do not have any information on the number of kits of each I need. Some are obvious, like I at least need 3 of the Tamiya Pathers for the engineering deck, but how many of the SeaLab kits do I need? I have been able to source one original kit, but is that enough? Basically I'd just like to know if there's an updated list or document that also mentions how many per kit is required.

2. This is a bigger question. I have the full scale blueprints for the Falcon hull, but how are most people building theirs? I'd considered 3D Printing the base hull, but that wouldn't be very 'replica like' and my FDM printer is only 350mm^3, even sliced into parts that would be difficult to get a full hull. I did stumble upon a photo that someone had laser cut thin plywood frames and then lay a surface on top, but I can no longer find that information and I'm not sure if the frame CAD files were ever made public.

So I guess the short version of that long question is, what is the suggested best approach to making the base hull with a budget max of say $2000.

Thanks everyone for any suggestions. For kicks and giggles, this is my 32" build. It's mounted on a rolling TV stand so I can show people the bottom and move it out of the way if needed.

View attachment 1752471
Hi there David, just joined the forum and seen this picture, can I ask is it 3d Printed and if so where did you get the files from, i've been after making my own for a while now and this is by far one of the better ones at this size i've seen.
 
Thanks,

That's not 3D printed. It's a corrected version of the Deagostini kit.

 
Hi there David, just joined the forum and seen this picture, can I ask is it 3d Printed and if so where did you get the files from, i've been after making my own for a while now and this is by far one of the better ones at this size i've seen.

Thanks,

That's not 3D printed. It's a corrected version of the Deagostini kit.

I just found your website, and yes I can see now, I will keep looking, thanks for responding so quickly
 
A quick question regarding the wood used on the original filming model.

The wood used for the walk ways and mandible boxes, do we know what wood that was? Bass wood I'm assuming, something with little or no grain. And also, were these covered in sheet styrene before painting? Or how was this sealed?

Any ideas?

thanks

1738508553198.png
 
A quick question regarding the wood used on the original filming model.

The wood used for the walk ways and mandible boxes, do we know what wood that was? Bass wood I'm assuming, something with little or no grain. And also, were these covered in sheet styrene before painting? Or how was this sealed?

Any ideas?

thanks

View attachment 1901209
You are correct: Bass wood, covered in styrene. No exposed wood anywhere on the model.
 
Hi everyone.

It's been a hectic schedule for me since Christmas, but I have started working on a series of videos to document this build.

The first one is live, and is really more of an introduction and quick description of the project.

The next video will focus on the research involved in finding all the kits and parts, as well as a discussion of the kits themselves.
From there video's will cover such things as;
  • The kits. Sourcing kits. Cost of kit vs the shipping cost. Found parts & Kooshade. References, secret knowledge, and dead websites.
  • The Bandai kit vs the real studio model.
  • OCD Accuracy vs. OCD fixing problems (like symmetry, cleaning parts, etc...). Build frustrations.
  • Tour - The mandible pits.
  • Tour - The gun platforms.
  • Tour - The docking rings.
  • Tour - The walkways.
  • Tour - The cockpit.
  • Tour - The side walls. Casting Parts.

If there's anything in my build you'd like me to cover, just let me know.
 
Great video and looking forward to see your frame clad with all of those greeblies and paneling:cool::cool:(y)(y):love::love:
 
U-Tube video is very common today. But, it takes courage for a serious model builder to perform a video like this. Especially so for a complex subject that has become a much loved movie art work like the Studio Scale Falcon.
I found the video discussion particularly interesting regarding having a specific detailed plan and philosophy for the build explained along with a set of target goals defined. Your structural work accomplished to date is clearly impressive. I too am grateful to the original past Falcon experts and the relatively recent contributors that have been applying computer technology to support excellent model reproductions.
 
Back
Top