I have to admit, I'll be awefully disappointed if John Hurts sonic screwdriver is a modified Character Options 4th Doctor screwdriver. It's the 50th anniversary, I need a new sonic screwdriver for my Christmas list!!!
You are using an out of date browser. It may not display this or other websites correctly.
You should upgrade or use an alternative browser.
You should upgrade or use an alternative browser.
3d Printed Doctor Who Props by Doctor Octoroc (building & finishing thread)
- Thread starter Doctor Octoroc
- Start date
-
- Tags
- doctor who
- Status
- Not open for further replies.
I have to admit, I'll be awefully disappointed if John Hurts sonic screwdriver is a modified Character Options 4th Doctor screwdriver. It's the 50th anniversary, I need a new sonic screwdriver for my Christmas list!!!
Sorry to say but you may not like the following link
") The fellow who designed the CO toy is rather certain it's his that is being used:
The fellow who designed the CO toy is rather certain it's his that is being used:Hmm, that Sonic Screwdriver looks familiar! | PurpleBlancmange
However, given how much Character Options loves making sonics that only appear briefly (River's, the upcoming 7th/8th) or not at all (Trans-temporal, Build-your-own), it's a good bet they will work up one of Hurt's. And of course we in this thread all know another person who is good at that too
Doctor Octoroc
Sr Member
It's also possible that they're using a modified CO toy as the stunt prop and will create a more intricate and 'functional' hero prop for when Hurt actually pulls it out to use it. Hopefully, there's more to it than meets the eye.
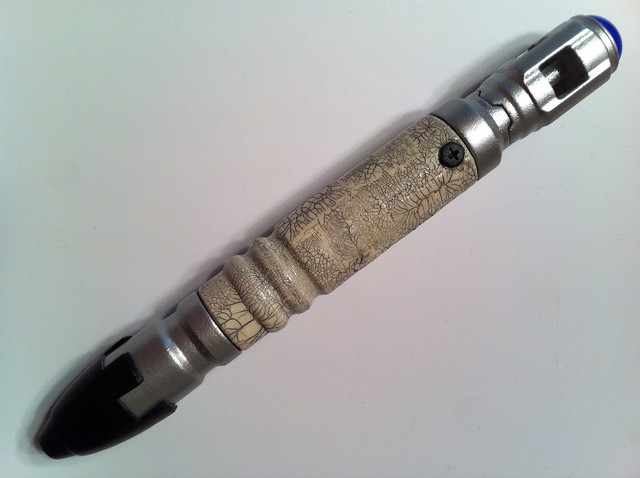
Here's my 9th Aztec. The brush-on crackle is soooo hard to apply consistently and I didn't quite achieve as uniform look as I would have liked. But I'm still happy with how it turned out. And I finished it just in time to use it on Halloween as the 9th Doctor!
I used DecoArt One-Step Crackle over Folkart 515 Vintage White (I am not sure if this is anywhere close to the right color). Then for the wash I used Americana Black Green which was just what I had on hand as it came with in the antiquing kit from the 8th sonic. The silver was Dupli Color auto paint BFM0226. And on all parts I used a filler primer followed by sanding to smooth out the print surface.
Oh also while I was doing the electronics I messed up the switch that came with the kit so I ended up using my own which coincidentally had a nice off-white button. I think the button on the original prop was black (?) but I left mine white since it accidentally matches the crackle body.


The side shown above definitely looks better than the other:

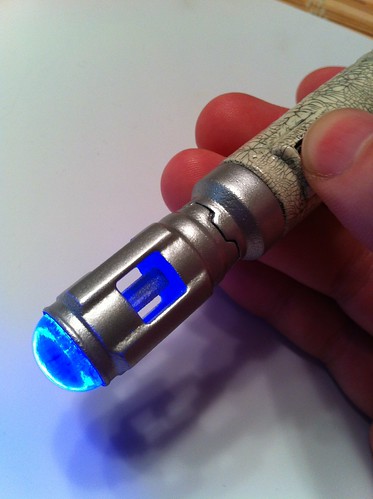
Even with only 3V applied, that LED is *bright*! It shines through the plastic and paint in the cavity below the emitter and gives off a neat glow. I got the version of the sonic with the glass cabochon, and after sanding the reflective backing off I put a small circle of white paper between the glass and the LED in order to diffuse the glow. So I ended up with no 'hot spot' in the emitter.
And the back... Is the screw supposed to be black or the color of the body? I wasn't sure...
9th sonic next to a TWC 10th sonic.

Here are the internals. The 3d print is big enough to hold AAA batteries so that's the route I took. Gave it a nice heft too! Not pictured is a black wire that connects the top end of the brass tube with the negative LED lead. Also one of the two red wires coming off the switch connects to the positive lead of the LED, and another to a a positive battery contact (the top end of the brass tube must be insulated to prevent a short). There is a bit of foam in the black end cap to hold the negative battery contact in place (the cap is friction fit for changing the batteries)

I used DecoArt One-Step Crackle over Folkart 515 Vintage White (I am not sure if this is anywhere close to the right color). Then for the wash I used Americana Black Green which was just what I had on hand as it came with in the antiquing kit from the 8th sonic. The silver was Dupli Color auto paint BFM0226. And on all parts I used a filler primer followed by sanding to smooth out the print surface.
Oh also while I was doing the electronics I messed up the switch that came with the kit so I ended up using my own which coincidentally had a nice off-white button. I think the button on the original prop was black (?) but I left mine white since it accidentally matches the crackle body.
The side shown above definitely looks better than the other:
Even with only 3V applied, that LED is *bright*! It shines through the plastic and paint in the cavity below the emitter and gives off a neat glow. I got the version of the sonic with the glass cabochon, and after sanding the reflective backing off I put a small circle of white paper between the glass and the LED in order to diffuse the glow. So I ended up with no 'hot spot' in the emitter.
And the back... Is the screw supposed to be black or the color of the body? I wasn't sure...
9th sonic next to a TWC 10th sonic.
Here are the internals. The 3d print is big enough to hold AAA batteries so that's the route I took. Gave it a nice heft too! Not pictured is a black wire that connects the top end of the brass tube with the negative LED lead. Also one of the two red wires coming off the switch connects to the positive lead of the LED, and another to a a positive battery contact (the top end of the brass tube must be insulated to prevent a short). There is a bit of foam in the black end cap to hold the negative battery contact in place (the cap is friction fit for changing the batteries)
Last edited:
Re: 3d Printed Doctor Who Props by Doctor Octoroc (building & finishing thread)
That looks great. I think you did a great job! I must get one of these in the next run. (Hint, Hint!)
Here's my 9th Aztec. The brush-on crackle is soooo hard to apply consistently and I didn't quite achieve as uniform look as I would have liked. But I'm still happy with how it turned out. And I finished it just in time to use it on Halloween as the 9th Doctor!
I used DecoArt One-Step Crackle over Folkart 515 Vintage White (I am not sure if this is anywhere close to the right color). Then for the wash I used Americana Black Green which was just what I had on hand as it came with in the antiquing kit from the 8th sonic. The silver was Dupli Color auto paint BFM0226. And on all parts I used a filler primer followed by sanding to smooth out the print surface.
Oh also while I was doing the electronics I messed up the switch that came with the kit so I ended up using my own which coincidentally had a nice off-white button. I think the button on the original prop was black (?) but I left mine white since it accidentally matches the crackle body.
[url]http://farm3.staticflickr.com/2817/10594123246_3d1a77928f.jpg[/url][url]http://farm4.staticflickr.com/3832/10631970206_2a854db1a2.jpg[/url]
The side shown above definitely looks better than the other:
[url]http://farm4.staticflickr.com/3762/10631932475_45791638a2.jpg[/url]
Even with only 3V applied, that LED is *bright*! It shines through the plastic and paint in the cavity below the emitter and gives off a neat glow. I got the version of the sonic with the glass cabochon, and after sanding the reflective backing off I put a small circle of white paper between the glass and the LED in order to diffuse the glow. So I ended up with no 'hot spot' in the emitter.
[url]http://farm4.staticflickr.com/3829/10631930785_b87f5b7a7e.jpg[/url]
And the back... Is the screw supposed to be black or the color of the body? I wasn't sure...
[url]http://farm6.staticflickr.com/5499/10632195713_0937a936ff_z.jpg[/url]
9th sonic next to a TWC 10th sonic.
[url]http://farm6.staticflickr.com/5488/10631957054_de227dfbb2_z.jpg[/url]
Here are the internals. The 3d print is big enough to hold AAA batteries so that's the route I took. Gave it a nice heft too! Not pictured is a black wire that connects the top end of the brass tube with the negative LED lead. Also one of the two red wires coming off the switch connects to the positive lead of the LED, and another to a a positive battery contact (the top end of the brass tube must be insulated to prevent a short). There is a bit of foam in the black end cap to hold the negative battery contact in place (the cap is friction fit for changing the batteries)
[url]http://farm6.staticflickr.com/5538/10594367293_9645e54708_z.jpg[/url]
That looks great. I think you did a great job! I must get one of these in the next run. (Hint, Hint!)
Last edited:

Doctor Octoroc
Sr Member
9th sonic next to a TWC 10th sonic.
That is damn beautiful, sir! You really managed to get a smooth finish on the WSF plastic! It's great to see a properly finished 9th next to the TWC 10th sonic, as I wanted to take some comparison pics myself but hadn't gotten the crackle finish to look decent. In comparing them, I noticed some discrepancies between the two, mainly that the emitter head is shorter overall - but generally speaking, they come damn close considering I had no access to actual props or decent replicas at the time I made it!
I'm curious, for those that have one of the other replicas, be it a TWC, MFX, CT or other - what they might change about the 3d print? If another run happens, I'd like to offer something a bit more screen accurate if I can. This goes for all of the models offered.
My pleasure! And again, feedback is definitely appreciated so that a potential future run will provide some more refined options.Thanks Doctor Octoroc for making these available for everone!
Last edited:
Thanks! And yes, you really were able to get shockingly close with your overall size and details -- it was very impressive to hold them next to each other and see just how much matched up. The only thing I would say other than the shorter emitter is that the diameter of the tip of the black cap is a little small on yours by comparison. But I think you have a TWC now as well so you've probably seen that already
I though that the struts might be modified to give it more of the look you see on the fully machined sonics
like this ___
............\.../
instead of ___
.............../ .....\
disregard the periods
like this ___
............\.../
instead of ___
.............../ .....\
disregard the periods
Doctor Octoroc
Sr Member
I though that the struts might be modified to give it more of the look you see on the fully machined sonics
like this ___
............\.../
instead of ___
.............../ .....\
disregard the periods
Haha...thought I was on one of the ASCII boards from back in the day. I'm not entirely sure what you were illustrating there but I didn't alter the design at all from my best guess as to how the sonics were actually designed, machined parts or not. I just built them in 3d space as I thought they actually would be, then adjusted them for the 3d printing process (lots of trial and error there).
Well, This is a better illustration


Doctor Octoroc
Sr Member
Ah, I see what you were saying. I thought as much but wasn't 100% sure.
The struts on my model are at a softer angle, like your second example. You can see that better in this example:

Don't mind the "marble" emitter head design, it was an early idea I had before discovering the lovely blue cabochons that ended up being offered with the kits.
Looking at the large rectangular cut through the head with the rounded corners, they appeared to cut into the side of the struts, as opposed to cutting the main cylindrical shape up to the point at which the struts would have joined the cylinder without the cut - from this I gathered that they must be at an angle. It appears I was wrong :behave
However, upon further research, I found something interesting.
Here's the full picture of the Tennant 10th sonic that TWC used for their 3d scan:

You can clearly see that the struts have that sharper angle, following the cut through angle.
But if you look at the head of the TWC 10th sonic:
http://www.therpf.com/attachments/f9/new-10th-doctor-sonic-screwdriver-universal-remote-imag0098.jpg-248435d1383100839
...the struts clearly taper at the same angle as my design.
It's very likely that they did it to cut down on cost. I just read through the FAQ's on the TWC website about the prop and they mention differences in the emitter head for that reason. The URC was machined by a computer and I'm assuming that the simpler design with the angled struts was a result of this method, where as the hero prop was machined by hand, and could have more intricate details.
I guess I'll do a redesign for the 9th and 10th sonics...
The struts on my model are at a softer angle, like your second example. You can see that better in this example:
Don't mind the "marble" emitter head design, it was an early idea I had before discovering the lovely blue cabochons that ended up being offered with the kits.
Looking at the large rectangular cut through the head with the rounded corners, they appeared to cut into the side of the struts, as opposed to cutting the main cylindrical shape up to the point at which the struts would have joined the cylinder without the cut - from this I gathered that they must be at an angle. It appears I was wrong :behave
However, upon further research, I found something interesting.
Here's the full picture of the Tennant 10th sonic that TWC used for their 3d scan:
You can clearly see that the struts have that sharper angle, following the cut through angle.
But if you look at the head of the TWC 10th sonic:
http://www.therpf.com/attachments/f9/new-10th-doctor-sonic-screwdriver-universal-remote-imag0098.jpg-248435d1383100839
...the struts clearly taper at the same angle as my design.
It's very likely that they did it to cut down on cost. I just read through the FAQ's on the TWC website about the prop and they mention differences in the emitter head for that reason. The URC was machined by a computer and I'm assuming that the simpler design with the angled struts was a result of this method, where as the hero prop was machined by hand, and could have more intricate details.
I guess I'll do a redesign for the 9th and 10th sonics...
Last edited:
The struts on my model are at a softer angle, like your second example. You can see that better in this example:
http://www.therpf.com/attachments/f...wdriver10solidheadinset.jpg-127585d1353287906
But if you look at the head of the TWC 10th sonic:
http://www.therpf.com/attachments/f9/new-10th-doctor-sonic-screwdriver-universal-remote-imag0098.jpg-248435d1383100839
...the struts clearly taper at the same angle as my design.
It's very likely that they did it to cut down on cost. I just read through the FAQ's on the TWC website about the prop and they mention differences in the emitter head for that reason. The URC was machined by a computer and I'm assuming that the simpler design with the angled struts was a result of this method, where as the hero prop was machined by hand, and could have more intricate details.
I guess I'll do a redesign for the 9th and 10th sonics...
I believe that they did this to accommodate for the extrusion process
TickTockMan
Active Member
Here's my 9th Aztec. The brush-on crackle is soooo hard to apply consistently and I didn't quite achieve as uniform look as I would have liked. But I'm still happy with how it turned out. And I finished it just in time to use it on Halloween as the 9th Doctor!
I used DecoArt One-Step Crackle over Folkart 515 Vintage White (I am not sure if this is anywhere close to the right color). Then for the wash I used Americana Black Green which was just what I had on hand as it came with in the antiquing kit from the 8th sonic. The silver was Dupli Color auto paint BFM0226. And on all parts I used a filler primer followed by sanding to smooth out the print surface.
Oh also while I was doing the electronics I messed up the switch that came with the kit so I ended up using my own which coincidentally had a nice off-white button. I think the button on the original prop was black (?) but I left mine white since it accidentally matches the crackle body.
[url]http://farm3.staticflickr.com/2817/10594123246_3d1a77928f.jpg[/url][url]http://farm4.staticflickr.com/3832/10631970206_2a854db1a2.jpg[/url]
The side shown above definitely looks better than the other:
[url]http://farm4.staticflickr.com/3762/10631932475_45791638a2.jpg[/url]
Even with only 3V applied, that LED is *bright*! It shines through the plastic and paint in the cavity below the emitter and gives off a neat glow. I got the version of the sonic with the glass cabochon, and after sanding the reflective backing off I put a small circle of white paper between the glass and the LED in order to diffuse the glow. So I ended up with no 'hot spot' in the emitter.
[url]http://farm4.staticflickr.com/3829/10631930785_b87f5b7a7e.jpg[/url]
And the back... Is the screw supposed to be black or the color of the body? I wasn't sure...
[url]http://farm6.staticflickr.com/5499/10632195713_0937a936ff_z.jpg[/url]
9th sonic next to a TWC 10th sonic.
[url]http://farm6.staticflickr.com/5488/10631957054_de227dfbb2_z.jpg[/url]
Here are the internals. The 3d print is big enough to hold AAA batteries so that's the route I took. Gave it a nice heft too! Not pictured is a black wire that connects the top end of the brass tube with the negative LED lead. Also one of the two red wires coming off the switch connects to the positive lead of the LED, and another to a a positive battery contact (the top end of the brass tube must be insulated to prevent a short). There is a bit of foam in the black end cap to hold the negative battery contact in place (the cap is friction fit for changing the batteries)
[url]http://farm6.staticflickr.com/5538/10594367293_9645e54708_z.jpg[/url]
I've been away for a little bit, and what a sight to greet me upon my return! That, sir, is TOP-NOTCH work! I WISH I could get crackle finish to work that well!
Xxblackbird
Sr Member
Here's my first crack at the Alt. 8th sonic. I lost the button piece for the switch so I'll have to figure out some kind of replacement. Also, the wood pieces are darker in person and the crystal is more translucent... they just don't want to photograph well on my phone.


TickTockMan
Active Member
Here's my first crack at the Alt. 8th sonic. I lost the button piece for the switch so I'll have to figure out some kind of replacement. Also, the wood pieces are darker in person and the crystal is more translucent... they just don't want to photograph well on my phone.
http://i958.photobucket.com/albums/ae69/GiantSlor/2013-11-11_18-29-34_240_zps9c6abb2d.jpg
http://i958.photobucket.com/albums/ae69/GiantSlor/2013-11-11_18-29-20_715_zps3c918052.jpg
I like it! The more I see these blue-painted emitters, the more tempted I get to pull mine off and re-do it! What kind of paint did you use on yours!
Doctor Octoroc
Sr Member
I like it! The more I see these blue-painted emitters, the more tempted I get to pull mine off and re-do it! What kind of paint did you use on yours!
Be careful if you do decide to remove the emitter bulb, the FUD is not as resilient as the WSF plastic - I managed to crack mine in the process but everything remained intact! The best way is probably to pry one of the posts holding it in place away very slightly with a small flat head screwdriver then lift it out away from that post, and do the same to the neighboring posts as you do so.
Here's my first crack at the Alt. 8th sonic. I lost the button piece for the switch so I'll have to figure out some kind of replacement. Also, the wood pieces are darker in person and the crystal is more translucent... they just don't want to photograph well on my phone.
That is excellent work! And it looks like you've found a great color for the grips too - I noticed in pics of the original that they photographed about that level of lightness. And nice subtle weathering.
For your button replacement - maybe you could use the head of a brad?
Be careful if you do decide to remove the emitter bulb, the FUD is not as resilient as the WSF plastic - I managed to crack mine in the process but everything remained intact! The best way is probably to pry one of the posts holding it in place away very slightly with a small flat head screwdriver then lift it out away from that post, and do the same to the neighboring posts as you do so.
I had this happen too - I removed it a couple of times and it progressed from cracks to a portion of the emitter crystal below the holes breaking off. Luckily, the fit is so good between the holes and the little prongs that the piece stayed in place within the posts - I glued the bulb right back in place and you would never know that anything was amiss.
Tom Starkiller
Well-Known Member
More publicity and with it a look at the top end of Hurt's sonic. Not the best resolution for looking at it in detail, but good enough. Looks like they may have just cut the top off.

- Status
- Not open for further replies.
Similar threads
- Replies
- 0
- Views
- 178
- Replies
- 4
- Views
- 1,708
- Replies
- 2
- Views
- 977