Do you have a thread going? I'd love to see it. I think I may need to ask the community for some help with references soon.Awesome work. I’ve been working on a 1/6 scale version( printed not scratch build though)
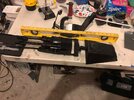
2x Studio Scale Falcon Gun Turret- Scratchbuild
- Thread starter Bondo Fett
- Start date
")