Intro
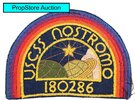
...So as part of my 1979 ALIEN - NOSTROMO CREW UNIFORM - Accurate Reproduction project run, I decided to try my hand at replicating the crew shoulder patch. And as anyone who is involved enough in the intricacies of this patch, knows that many have tried, some have come close. I have spent the past few months obsessing over every detail of these costumes and decided that if I was going to try and replicate the shoulder patch, it had to be very, (very) accurate. Getting close was just not going to cut it in this case, so it was pretty much all or nothing.
If I wasn't 99.95% happy with the result, I would not have moved forward with this. All of the details of this patch had to come together. The design, colors, fonts, proportions, design features and even some "imperfections" that were a signature of the way patches were made back in the day.
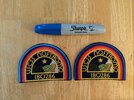
A few photos of original production made patches:
REPRODUCTION
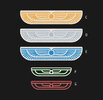
Shape
The correct 'half oval’ in accordance with the original. Meaning that the extreme left and right borders of the patch are not straight. They are bent in a slight oval shape.
Exaggerated for illustrative purposes.
Variants
Light background - Faded Grey/Blue
Dark background - Very dark navy blue
Color Pallet
Here I owe a huge thank you to my buddy IkeOffworld for taking the time to analyze all of the photos of the verified original patches we have, all of which were taken at different times, under different lighting conditions, using different cameras, with verifying resolution… he took all of that info and managed to come up with a pretty impressively close color pallet for these patches.
Stitch Direction and Style
Extreme attention was given to mimicking the stitch direction of the original. This was crazy hard and took literally weeks of revisions, going through different manufacturers until I landed one that had the right machinery that could deliver the right detail.
Thickness/Backing - The originals were fairly thin, cloth like. I opted to have mine made as sew-on with no extra backing. The Iron-on layer thickens the patch and makes it too rigid in my opinion.
Overall patch size - 10.5cm X 7.5cm or 4.13” X 3”
Photos of the final product:
Additional Photos of Production made Patches:
These patches will be a part of my larger project run and are also available for purchase as of right now on my website:
Thank you!
Attachments


Last edited:
 ]
]