I can't believe more people aren't commenting on this awesomeness!!! It's coming along so fast. Incredible work.
You are using an out of date browser. It may not display this or other websites correctly.
You should upgrade or use an alternative browser.
You should upgrade or use an alternative browser.
1:1 Scale Snowspeeder (T-47 Airspeeder) build.
- Thread starter MrV
- Start date
MrV
Sr Member
Thanks all!
Space, the final frontier... or rather lack of. (Sorry SW nerds, i don't often quote ST). Just realised that with the wings attached and folded i cannot get to anything else. Luckily the gate strap hinges allow me to remove the wings. They are going to have to go to storage whilst i finish the interior.
I think i will get one wing totally completed and that will give me some -get-up-and-go for the next wing.
Rawktrooper
Well-Known Member
does the wing include the gun and fairings? or is that all separate?Thanks all!
Space, the final frontier... or rather lack of. (Sorry SW nerds, i don't often quote ST). Just realised that with the wings attached and folded i cannot get to anything else. Luckily the gate strap hinges allow me to remove the wings. They are going to have to go to storage whilst i finish the interior.
I think i will get one wing totally completed and that will give me some -get-up-and-go for the next wing.
MrV
Sr Member
TBC. The fairings/bulkheads for the cannons will be fixed but will have a section that removes to allow the wings to fold vertically otherwise they hit the cockpit. Post #2 shows how the pieces will separate.does the wing include the gun and fairings? or is that all separate?
MrV
Sr Member
I got a chance to test the sizing of the slide projector cartridge today. I made a cardboard template that was dictated by the cartridge size but also the angle of the wing as the top edge is level to the ground. It is close enough as you can see with the photo compare against the original prop.
I can see how all of the various toys and models vary so much. If one angle is out it affects some other part of the design.

I can see how all of the various toys and models vary so much. If one angle is out it affects some other part of the design.
MrV
Sr Member
Angles and more angles. One down. The next one i will make as one piece and then cut it. This one i made in two sections and it was way hard to get them to match up. The smaller section is the piece i need to remove for transporting so the wing folds vertically.
Attachments
MrV
Sr Member
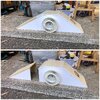
Detailing time. I have started to cover the bulkheads in the foam board. There is a little detail that reminds me of a large hinge that i cant seem to get a decent image of. They project beyond the face of the bulkhead. There are at least six of them on the bulkheads. Two either side of the cannon and one at the back (ref Bandai model). I have decided to make one then cast the others. Hello foam board again for the master. I will add some other details to the master this weekend before molding. At the moment just getting the size correct.


What is your casting process and ingredients? After this initial positive sculpt?Detailing time. I have started to cover the bulkheads in the foam board. There is a little detail that reminds me of a large hinge that i cant seem to get a decent image of. They project beyond the face of the bulkhead. There are at least six of them on the bulkheads. Two either side of the cannon and one at the back (ref Bandai model). I have decided to make one then cast the others. Hello foam board again for the master. I will add some other details to the master this weekend before molding. At the moment just getting the size correct.
View attachment 1750106
View attachment 1750108
View attachment 1750109
MrV
Sr Member
I build a box around it and make sure all gaps are sealed. Glue the part down so no silicon can fill the inside of the part (when the part is hollow like this one). Mix, pour and let set. Silicon does not stick to anything so i can use different materials when making a master.What is your casting process and ingredients? After this initial positive sculpt?
Ill be casting in polyurethane, 1:1 mix.
Here is a pic of a part i made for the speeder bike. The grey part was sanded wood and the white is the foam board.
I have avoided silicone due to cost but you changed it up entirely because you keep costs down by using whatever you want for the original sculpt. And I can't even estimate the time you save by using specific materials for their different build specialty like flat or easily bent or easily sanded. I will have to think on this a while. Thank you.I build a box around it and make sure all gaps are sealed. Glue the part down so no silicon can fill the inside of the part (when the part is hollow like this one). Mix, pour and let set. Silicon does not stick to anything so i can use different materials when making a master.
Ill be casting in polyurethane, 1:1 mix.
Here is a pic of a part i made for the speeder bike. The grey part was sanded wood and the white is the foam board.
View attachment 1750194
joberg
Legendary Member
Alumilite makes a cheap silicone and easy to mix (1:1 ratio) dries fast and is a joy to work with. Very good results alsoI have avoided silicone due to cost but you changed it up entirely because you keep costs down by using whatever you want for the original sculpt. And I can't even estimate the time you save by using specific materials for their different build specialty like flat or easily bent or easily sanded. I will have to think on this a while. Thank you.
")
joberg and greenmachines, I second that. For a lot of my projects I use Alumilite. It's especially great for small parts. When I'm casting something large, I use Smooth-on, but for everything else Alumilite!!
Similar threads
- Sale
- Replies
- 6
- Views
- 719
- Replies
- 48
- Views
- 6,002
- Replies
- 11
- Views
- 469
- Replies
- 8
- Views
- 2,310