Rebel Endor Helmet Build

Quick update, I am currently painting the donut, moving onto spraying the dark grey next. I've loosely copied the MoM helmet when weathering; As well as this I have made stencils for the insignia and black stripes seen on the helmet which will be painted on top last.

From what I can tell, the colours are right, with the green looking a bit off as there is no 'hazing' as yet over the top to darken it (see below). I'll get onto that in the next couple of days once I'm comfortable enough that I won't ruin it.

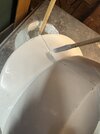
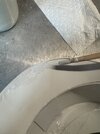
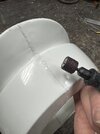
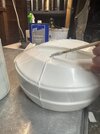
Below are some photos of my progress...

20241221_164611.png
20241221_164601.png
20241221_164556.png


And below is a portion of the battlefront texture, showing how the dark grey will be applied.
1734191616093 (1).png
 
Last edited:
Just painted the back 'vent' stripes and almost ruined the whole thing (I won't get into that) but somewhat happy with how it's come out. Even though the films helmets stripes weren't centered I aimed to keep mine somewhat. I painted the lines in the same grey as the hazing colour with a light coat of black on top as I preferred a bit darker.

Just need to add the insignia to the front left side and varnish before I move onto the cloth parts, hoping to get this whole project wrapped up before uni impedes my ability to finish it.

BackStripes.png

Edit: stripes are approx. 7mm wide with 7mm gaps starting at about 8mm after the indentation and following it until the edge.
 
Last edited:
I would definitely be interested in the doughnut part of this helmet if you decide to do a run. The 2 vacuformed halves is all I need. Great work on this by the way, looks fantastic!
 
I've posted an interest thread in the classifieds section of the forum and be continuing onto building my own cloth parts in the next few weeks once I've figured out measurements etc.

Have a Merry Christmas
 
I thought that the information on this thread was a bit scrambled and all over the place (especially with the paints) so below I made a summary sheet for everything painting for this helmet. I thought it would be easier to give actual paints so that you can find alternatives if you can't find the exact paints listed below.

The stencils are about 1:1 to what was seen on the MoM exhibition helmet which is why the measurements are a bit weird, I have attached a PDF to print as well as an SVG for anyone with a vinyl cutter so that they don't have to trace the image.


PaintandStencil.png

*Note: as I have not yet painted on the stenciled symbol the colours have not been tested for that as yet

Let me know if this is a good resource or not as I'm planning to make up more for the plastic trimming, fabric and such as once they are complete.

I also ordered a dozen or so fabric samples (thank you for the advice Psab keel) so once they arrive in the new year I'm hoping I'll have a close enough match to go forward with the fabric side of things.​
 

Attachments

  • Endor_Rebel_Symbol.zip
    546 bytes · Views: 80
  • AR_Paint_and_Stencils.pdf
    1.2 MB · Views: 95
Today marks the end of the nightmare that was painting, I thought in using a brush instead of an airbrush I could avoid issues like I had with the stripes though that wasn't the case. I had issues with bleed from the masking decal which i had to sit with a brush and fix by hand, anyhow below is a short summary of what was done.

20241229_163523.jpg

As I don't have access to a vinyl cutter, my laser cutter got to work burning the symbol into some sticker paper I had from making kenner R2 decals a few years back. The decals came out well, below is a photo of the test piece, with my first and second attempt at painting the symbol.

20241229_165056.jpg


I wasn't aiming for the crispest of lines either as the original wasn't perfect to begin with. After about 30 mins of deciding whether to paint onto the final I ended up with this:

20241229_185630.png

I think the yellow may be a bit too drab compared to the original so if anyone finds a better yellow that'd be better let me know.

When double-checking some of the decal stuff I discovered that the symbol changes from helmet to helmet drastically, with Leia's looking particularly rough in my opinion. So they must have been freehanded with masking tape to some degree.
Once I add varnish the donut should be finally finished.
 

Donut Trimming Guide

Below is a guide I've put together for anyone with kit parts (If you have my kit, do not use the faint mould line as a cutting guide). The following measurements are based upon data I had from the battlefront model, which subsequently came from a production piece.

20250301_181116.jpg

Below is the rough guideline for cutting the bottom of the helmet, the cutout for the flight cap earcups' is about 1.5 to 1.8mm from the bottom edge of the donut (Cyan Line) and 80mm in width (Green Line).

Screenshot 2025-03-02 174103.png


I then roughly trim the two halves on the bottom edge, and cut as close i can to all the edges that are adjoined to each other. I didn't here, but I would recommend also cutting a small area in the top to allow for easier cutting after joining the two halves.
1740899490485.png


When adding the adjoining panels I like to start with the back and glue up top, then the indentation, then move onto the front. Note that the panel that holds together the top of the donut is stuck on with excess so that when the hole in the top is cut its flush with that edge (at least on the prop store sold production piece).

20250301_200538.jpg


The same is done to the front, but don't add anything to the bill as that will be joined a different way later.
20250301_200534.jpg


At the parting line, the rear should be cut about 30mm from the back indentation and taper outwards until it meets the faint mould line as seen below.

20250301_181230.jpg

20250301_211322.jpg


For the top face, I have a template that i'll attach that you can follow to trace the hole. However beware that the template is off center as it is an exact trace of the production used helmets trimline which was itself off center.


For the bill, to keep its thin profile I used ABS glue and a very small strip of cutoff plastic to 'weld' the two sides together. It's pretty straightforward to do and keeps the profile thin so that the cloth part can fit overtop with ease.

20250302_172618.jpg
20250302_172631.jpg


That's about it, I probably didn't do a very good job explaining it. If you have any questions please PM me in order to not fill up this thread with a massive chain of messages and I'll fix this post as I go.

I'll also add another post below this with a FAQ and the templates I've put together.
20250302_170413.jpg
 
Last edited:
F.A.Q

B.O.M

- ABS solvent glue
- Scissors/shears
- 1 to 1.5mm ABS sheet (the 2mm cutoffs are a bit too thick to work with).
- Dremel


Templates attached below
 

Attachments

  • TopTrim.pdf
    112.6 KB · Views: 73
  • Bill Template.pdf
    883 KB · Views: 78
I used "ABS sludge" to weld mine. I have made a lot of Clone armor and other ABS stuff, and to make sludge you take a bunch of scraps from trimming and put them in a jar with some acetone, which melts it into a chocolate syrup like consistency. You then carefully apply it with something like a chopstick, and it skins fairly quickly. Once it is starting to skin, you can tap the "weld" line to drive the liquid into the crack more. It is also good for filling weak spots, especially the thin spot above the brim and any gaps in your glue pieces inside. I cut a nearly complete bill shape for that part, and used it to fill around that edge. It cures overnight, and then can be ground off and sanded like the regular ABS.
I show it in part of this tutorial video if you want to see it in motion:
Video:
Fixing Cracks in ABS armor tutorial
 

Attachments

  • IMG_5574.JPG
    IMG_5574.JPG
    1.1 MB · Views: 68
  • IMG_5572.JPG
    IMG_5572.JPG
    1.4 MB · Views: 61
  • IMG_5589.JPG
    IMG_5589.JPG
    1.1 MB · Views: 62
  • IMG_5573.JPG
    IMG_5573.JPG
    1.3 MB · Views: 54
I have looked at the logo a lot over the years, and I am convinced the red part is not actually curved. I think it is all angular, but because the lower angled part is so small, it appears sort of curved. This is what I made to use:
 

Attachments

  • EndorHelmetLogo_Ref.jpg
    EndorHelmetLogo_Ref.jpg
    361.3 KB · Views: 81
  • EndorTrooperHelmetSymbol.pdf
    313.8 KB · Views: 55
I have looked at the logo a lot over the years, and I am convinced the red part is not actually curved. I think it is all angular, but because the lower angled part is so small, it appears sort of curved. This is what I made to use:

You could be right, with the curved look of the MoM helmet's symbol possibly coming from the overspray seen below and not an intentional part of it.

Screenshot 2025-04-22 155959.png
 
Last edited:
Dam I love this thread, I bought a donut and a flight cap last year but it's, still sat waiting to be built.
I didn't realise u till this thread that the cap peak was attached to the donut!
I always assumed it was one with the flight cap.
 
And if you ever wanted even more proof Mottrex, you can see in this screenshot, when Luke pulls of his helmet, the cap falls back, but he is holding the brim. If it were attached, you wouldn't see daylight through it. This blew my mind when I realized it, but the auction prop photos sealed it.
 

Attachments

  • LukeSoftCapDetatchedHelmetProof.jpg
    LukeSoftCapDetatchedHelmetProof.jpg
    1.9 MB · Views: 66
And if you ever wanted even more proof Mottrex, you can see in this screenshot, when Luke pulls of his helmet, the cap falls back, but he is holding the brim. If it were attached, you wouldn't see daylight through it. This blew my mind when I realized it, but the auction prop photos sealed it.

But is the thinking that the attached brim is simply a support structure for a separate fabric brim? You can see the two ply look on the side view of screen caps. And possibly that overlay is attached to both the attached brim and the fabric cap.
 
But is the thinking that the attached brim is simply a support structure for a separate fabric brim? You can see the two ply look on the side view of screen caps. And possibly that overlay is attached to both the attached brim and the fabric cap.
From my research (and making a few of these things) the brim is covered in two pieces of fabric - kinda constructed like a regular baseball cap brim (to paint a bit of a word-picture). The ribbed part, and rear "skirt" piece that only Luke and Leia's helmets have, are attached to the AN-H-15 cap... with specific note to the ribbed section being either tack-stitched or glued down, because in the location shots they're pretty well pressed down onto the cap, and once they're back in the studio filming the speeder bike chase shots the edges of the ribs are popping off of the flight cap.

My guess - based on the last one I worked on - is the skirt and the front edge of the ribs are machine stitched to the flight cap, and the bias-tapped sides of the ribs are glued or tack stitched. Either way, that part isn't attached to the donut and brim.
 
Back
Top