1:1 R2D2 building from scratch - Just about done!

Re: 1:1 R2D2 homemade scratch build

Haven't come as far as i hoped for, takes longer time than expected.Center/middle leg, wasn't any blueprints for it, so I took the same shape on the center leg as the outer legs has.
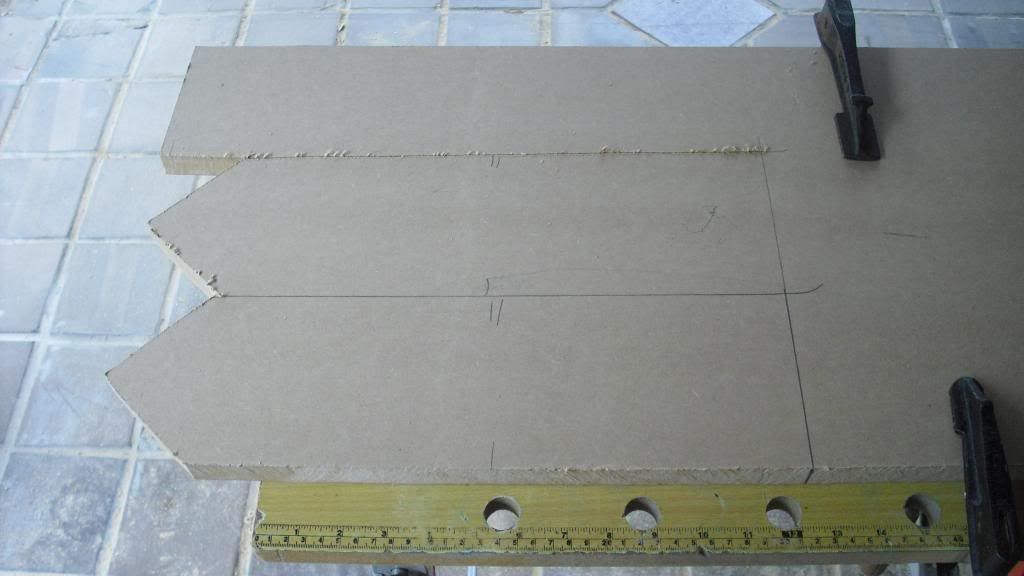
It has two notches, but most of it will be under the skirt, so no big deal. :)
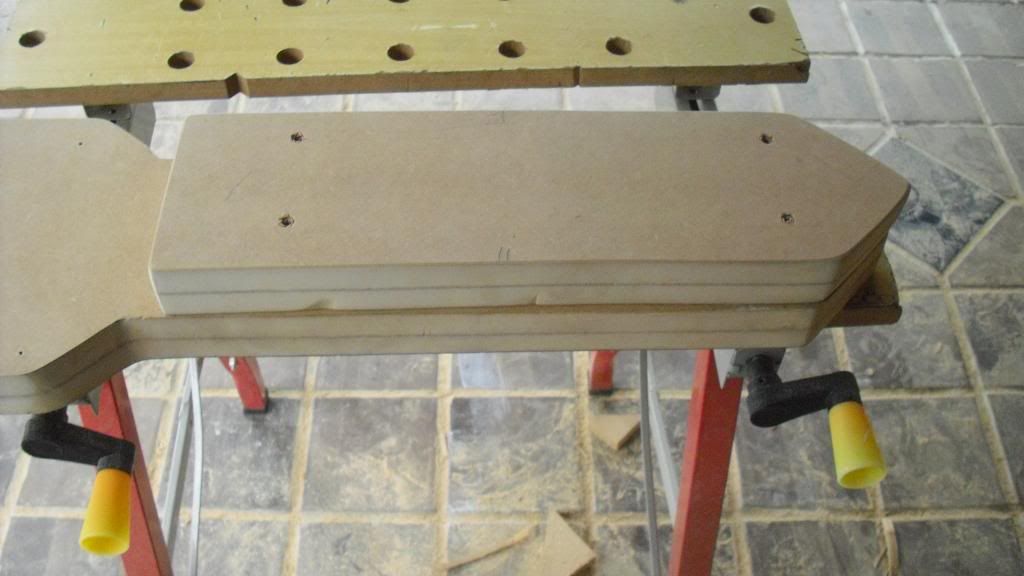
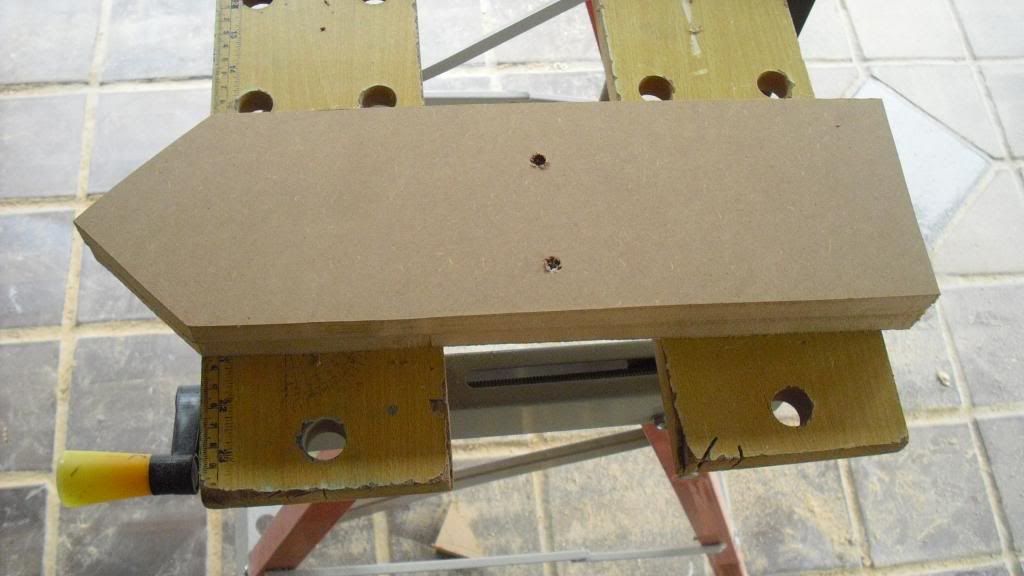
Randomly places screws for the first time on the R2!
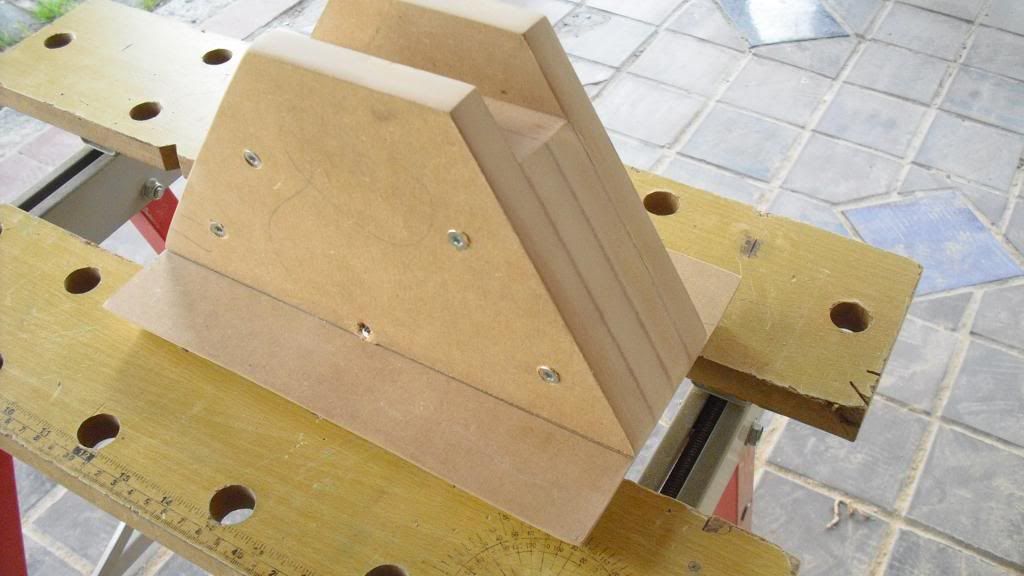
Holes for fit-testing the hose, the plan is to glue it at one end (right on the picture) to the foot and don't glue it in the battery box, just stick it in.
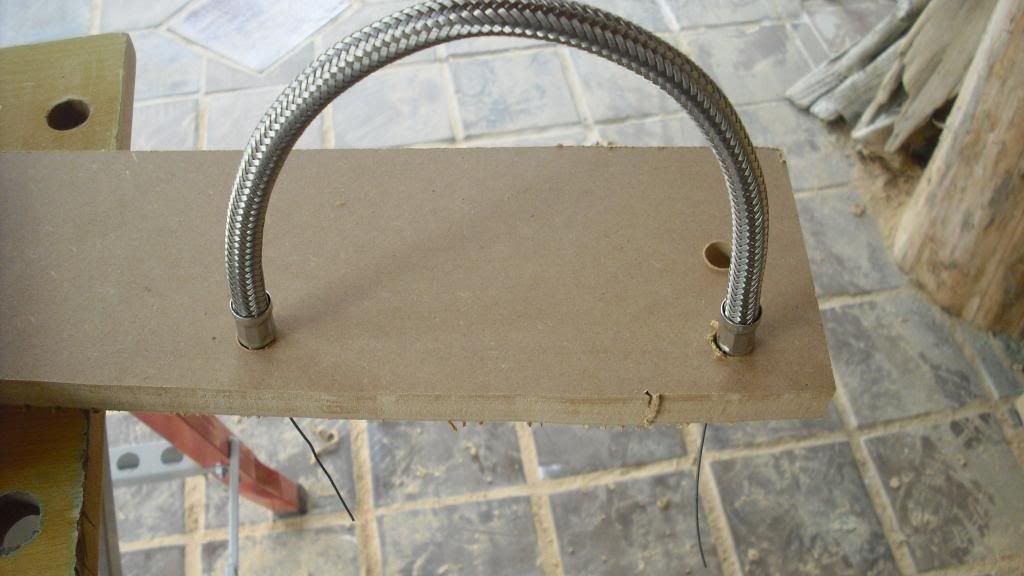
Wheels to move the R2 easier as it will be heavy:Should I place the wheels as shown in model 1 or 2? The gray rings are the wheels and it's supposed to be under the feets, simple drawing, lol
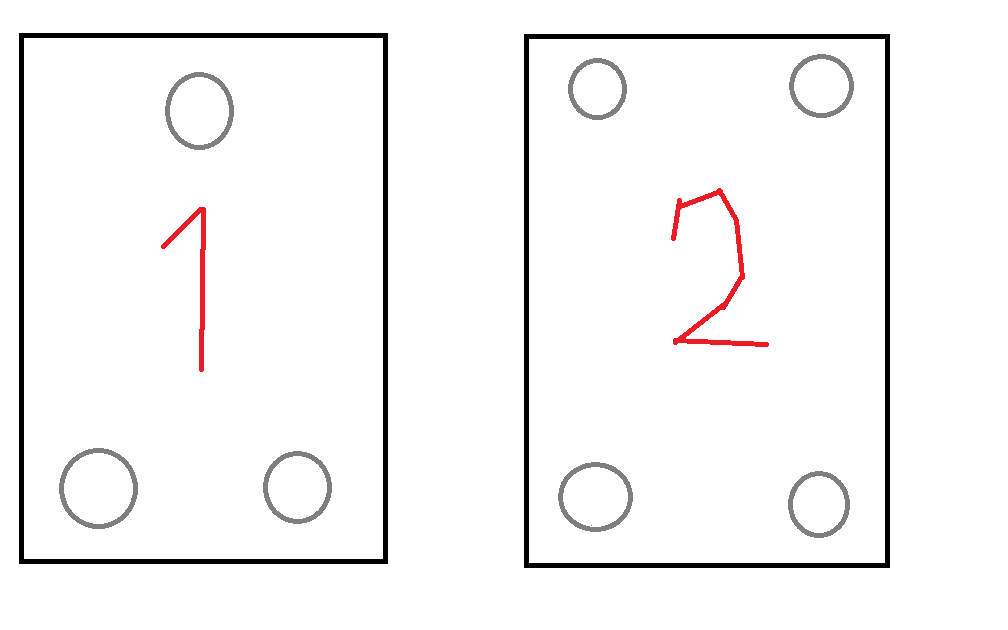
 :D
 
Re: 1:1 R2D2 homemade scratch build

Sanded the parts that was already painted today, made holes for the hoses in the feet, sprayed every part with air so it's ready for paint tomorrow (to get all the sawdust away) and painted one of the dome rings in chrome.Done sanding, super-smooth!The two holes on the foot (same on the other one) is probably a bit too close, but can't reverse that.3 layers of priming, 2 layers of paint. Note that the picture is only with the priming, I think it's the second layer.6" tube isn't easy to find in Norway, and it will be too expensive if one of the stores are going to order it for me. So I chose another way to make the ankles.1 of the ankles got a huge crack as soon as I tried to attach it to the table.After sandingNot a masterpiece, but it will do, VERY hard to get it any better.The black paint I had wasn't oil based, but water based. Will get some oil based black paint from the store on Monday, and paint the second dome ring then and the booster covers.
 
Last edited:
Re: 1:1 R2D2 homemade scratch build

Outstanding! Keep the updates coming -one of my favorite threads.
 
Re: 1:1 R2D2 homemade scratch build

Thanks, I like your Wall-E too btw! :)


Under the shoulder on the R2 where the shoulder details are positioned I was going to use a chisel to make the squared hole.
Tested on a scrap piece of MDF, cracks came very quickly. The legs would also most likely crack just as easily, and it's not worth it. The shoulder details will just be glued on without any hole, better than a hole and two huge cracks in each of the legs.

Shoulder detail:


Painted all the parts today!


Of course I managed to paint the wrong side of the right horse shoe! Perhaps I will paint it again tomorrow on the right side, also the squared holes in both the horse shoes will be painted tomorrow if I get time enough. That counts for the booster covers too.

I will at least get black oil based paint to mix with the light blue tomorrow. :)


Took a clear coating of paint today on one of the shoes and the ankle after the paint was dry, it's so shiny and smooth. All the parts made of wood and the dome will definitely get the same coat of clear paint!
 
Re: 1:1 R2D2 homemade scratch build

WHOA! It's been a few days since I last visited your build. R2 is really coming along! I really admire your dedication! :)

How are you going to approach the body / panels?

Keep those pics coming!
 
Re: 1:1 R2D2 homemade scratch build

Amazing! Congrats on your work
Can't wait to see it finished!
Thanks for sharing it at the forum
 
Re: 1:1 R2D2 homemade scratch build

Thanks, thanks! :DI won't start on the body or the panels just yet, maybe I get the opportunity to work in a few weeks to get more cash. If not, I have to wait longer.The HIPS with shipping is around 130 USD, and I will get the parts for the dome and the body at the same time (because of shipping cost), so I can't tell you an exactly when I will get that started ;)Bought a bit oil based black paint yesterday, but I really didn't get the paint like I hoped.To the left was with a bit of black, to the right with a lot of black (too much sadly...)Copied the colors from the last picture in photoshop and drew a bit to show the colors better:The left/right is still the same.
 
Re: 1:1 R2D2 homemade scratch build

Haven't really been much updates this week, my priority have been two tests at school.

Painted the booster covers today and the second dome ring today at least.
The booster covers look VERY different in different light, both pictures are taken in the shadow. The first one with blitz and the second one without.


Will get that shine when I get some clear paint on!


Mounted the two dome rings together, but forgot to take a picture. They are now drying with the clear paint as I am writing this!


The plan for the weekend is to cut out the pieces for the remaining 2 ankles (for the center leg) and glue them together. As the glue takes a lot of time to dry. And of course paint what remains on the horse shoes! :)
 
Re: 1:1 R2D2 homemade scratch build

Thanks :D


Painted the legs and horse shoes today + the only ready ankle. Horse shoes and legs are now screwed together, will get the final coat of clear paint on tomorrow!

The center foot and leg are drying right now with the clear paint.

What I have done is painted the parts with airbrush and now later on sprayed a layer with white paint from a spray can, and at the end a clear coat of paint for the smoothest finish! 3 different coats of paint! :)


Note: the booster-cover doesn't have the clear paint just yet.
Also note: on these pictures the horse shoe isn't screwed on.


The horse shoe to the left was the one I had to paint again because I painted the wrong side the last time, hahaha.


Will buy a can of clear paint and a can of white paint tomorrow and finish off that part too! The painting-part.


As previously shown: (old picture)

I know that the hoses are originally brown, but I like them better in the chrome/silver finish. Goes better with the dome and other parts with a chrome/silver finish!
 
Re: 1:1 R2D2 homemade scratch build

I'm itching to see your work on R2's dome. :) I've wanted to tackle just the dome, (don't have the room for a whole R2), for quite some time...

I think I've already said earlier, but - if so - I'll say it again. Beautiful work.
 
Re: 1:1 R2D2 homemade scratch build

Just bookmarked this page. I plan to start an R2 build soon. I just got married and moved out, and the wife and I both agree that an R2 would look great in our new place. This thread is really informative. Great work so far. Can't wait to see more progress. Keep it up.
 
Re: 1:1 R2D2 homemade scratch build

Thanks to both of you, really appreciate it! :D


Iharles: I will get started on painting the dome as soon as I'm done with the legs and the skirt. Actually that's the part I'm most nervous about because it's expensive and I put a lot of time into sanding it.

One tip if you are going to make the dome is to buy a lampshade from IKEA (I think there is a link on the first page of this thread) and a flapdisc to sand the paint, and sand it extra afterward to get a smooth surface.
I sanded the paint off from the start with a 60-paper or 40-paper and realized that a flapdisc would be better when I was about half way done, do not do like me, will save you a lot of time if you don't!

Blueprints for the dome are in the spoiler, the most advanced blueprints for the whole R2.


I don't have room for the R2 in my own room, but that didn't stop me from making one. My parents didn't knew how big he was, so that also helped!
You should really make the dome if you want to, you won't regret it. Warning: you will probably end up making the rest as well :p
The dome is also the most expensive part of the R2 counting in the resin parts. Totally I think it cost somewhere around 200 USD.


Smashterlink: great wife you got there, and an R2 would look awesome anywhere. Building one is very rewarding and definitely worth it! And it's sure that no one any of you know got something like it, a great conversation starter. :)
 
Re: 1:1 R2D2 homemade scratch build

Okay, finished off the shoulder flange took a lot more time that expected, so only 1 is done by now, will do the other tomorrow.

Screwed on the booster covers to the legs today and painted them with clear paint (drying now), but when I did that I ran into a problem I have had before in this build too, for the last couple of days.


The problem: pink spots.
I got it when I first painted over with the white spray can paint, but didn't thought that much about it, just had some more paint on.


I used screws similar to this when I put the horse shoes on.
After you screw a screw in there is this inert matter if you screw it in long enough, and there is my problem. All the red stuff was in these holes with the inert matter, and some of it wouldn't go away.


Like in this hole, and some of it got up and mixed with the paint creating light pink spots when I started to put on the clear paint. Today wasn't the first time this has happend and I'm done with those screws.
Even if I paint it again I can't get rid of all the pink spots....


Now I see why people weather their R2D2 builds, to hide things like this! :D


Smooth!


Booster covers are now in place!


Tried to screw on the ankle to one of the legs, of course it had to crack. Will glue it on some day instead.


Edit: will continue to paint the parts that is done with clear paint today, not exciting so won't take any pictures.
 
Re: 1:1 R2D2 homemade scratch build

Looks really good so far! :) About the red color showing up. If you're planning on weathering your R2, I wouldn't about it. Just add a little weathering in those areas (blacks, browns, tans, etc) to cover it up. :)
 
Re: 1:1 R2D2 homemade scratch build

Well, if you are about 1 meter or 1,5 meter away from it you don't see it. I really never though about weathering the R2, but if any more problems like this show up I probably will do it :)

If I screw up enough maybe I have to weather it this much :D
r2d2-action.jpg
 
Re: 1:1 R2D2 homemade scratch build

As evidenced from my Wall-E build, I'm a huge fan of weathering ;)

Truthfully through, a little weathering hides a multitude of errors.
 
Re: 1:1 R2D2 homemade scratch build

you're only 16? my god. good luck with this, excellent so far.
 
Re: 1:1 R2D2 homemade scratch build

Thanks LED! :)

I think after the R2 is done in a couple of months (because I need to save up some cash to buy the remaining materials) I will let it be as it is for about a week or so and then weather him.
When weathered there aren't any errors or failures, "he's supposed to be like that, he has been in service!" and thats great :D

That way I don't have to get rid of the little surface-rust that is on the dome too!

The blue color is a bit dark in normal light inside, but in bright light the blue color looks great. I guess I will grow a custom to it and that everything is relevant. :)

Note: I don't know if he's going to be done as early as in a couple of months!
 
Back
Top