You are using an out of date browser. It may not display this or other websites correctly.
You should upgrade or use an alternative browser.
You should upgrade or use an alternative browser.
Scratch-build of Rocketeer Cirrus X-3 Rocketpack
- Thread starter Valor
- Start date
-
- Tags
- the rocketeer
Agh! I'm having a paint identity crisis. The silver I chose really is a mess to deal with. Basically if you touch the pack you get silver fingers. It rubs off every time I touch the thing. Clear coat just turns it to gray. .... I sanded it down a bit and shot it with the Modern Metals Champagne Silver that I had tried before. What I LOVE about that paint is it has a great metallic look, and it does NOT need to be clearcoated. It's tough and doesn't rub off. I might be rationalizing the color again. but .... it does give the pack a very cool look .... stay tuned ")
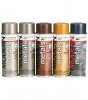
This is from the Design Masters site talking about their "Modern Metals" paint:
Most metallic finishes are achieved using dyed metal particles that lay on top the surface to mimic a metal finish. Some of these particles can slightly rub off in the hand. For a scratch-resistant, durable metallic finish choose Design Master MODERN METALS. These sprays utilize special effect pigments to achieve the metallic finish while at the same time encased in a durable finish.
Last edited:
Agh! I'm having a paint identity crisis. The silver I chose really is a mess to deal with. Basically if you touch the pack you get silver fingers. It rubs off everytime you touch the thing. Clear coat just turns it to gray. .... I sanded it down a bit and shot it with the Modern Metals Champagne Silver that I had tried before. What I LOVE about that paint is it has a great metallic look, and it does NOT need to be clearcoated. It's tough and doesn't rub off. I might be rationalizing the color again. but .... it does give the pack a very cool look .... stay tuned
I have yet to find a "chrome" that does turn my fingers silver. I just use it for a base for rub n buff now.
-Eric
EvilRocketeer
Master Member
eh, i see one big flaw...no beeman's gum!!!....
Im just joking....that is one stunning pack...bravo...it is gorgeous...I see you modeled it after the ilm metal flame pack...
absolutely gorgeous..it will be hard for someone to top this
i use a saxophone musical instrument stand to hold up my rocketpack...i can take pictures of it for you, so you can see how it works
Is Design Masters available in other colors? Like a plain silver?
The Champagne Silver is the closest to neutral in that line. They are all unique metallics. I would encourage anyone to pick up a can to try. I've never worked with anything like them. It's why it's so damn tempting to use their silver for my pack.
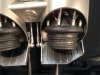
I sprayed large portions of my pack with the Champagne Silver. It has a Cool "vintage" stainless steel feel. Very appropriate for a high-tech Howard Hughes invention from the 1930s. I've also attached a comparison shot of two pieces sprayed with each color.
I know it might seem like I'm fussing needlessly, but I want to be sure, in multiple light sources, that I like this.
Attachments
Last edited:
Comics Cubed
New Member
Absolutely amazing to see one person create and complete such a remarkable piece of work.
This noob is awed.
This noob is awed.
That company has other metallic sprays outside the "Modern Metals" line though, and I think they do a cooler silver. Perhaps their other formulas are similarly formulated and won't stay wet?
I've been pouring through their website and facebook page. They seem like a great company that has great customer support for the design community. But these Modern Metals paints appear to be very unique. I've bought the other silvers from their other lines and they are similar to other Rustoleum/Krylon silvers – they smudge and rub off.
I'm going to repaint the entire pack with the Modern Metals. Stay tuned
Last edited:
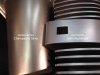
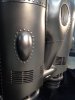
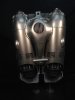
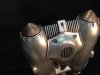
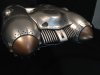
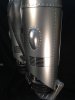
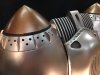
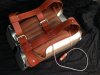
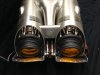
I repainted the pack this weekend with the original Modern Metals product – Champagne Silver and Bronze. I am VERY glad I went back to this paint. It's really beautiful and so simple to work with. It does not come off on your fingers and is really strong and scratch resistant.
I'm in love with the color. The pack looks stainless steel. Much deeper color than just the aluminum Rustoleum I originally used.
I also dropped the engines out of the shell another half inch. I wanted a bit more of the mechanicals showing. All for now, electronics are on the way. Harness is getting ... concepted.
Attachments

Last edited:
Comics Cubed
New Member
Just continues to amaze me.
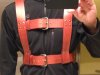
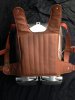
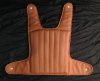
I spent some time during my Christmas break to work out the harness and electrical.
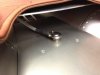
For the harness, an all-leather solution was out due to cost and my wimpy sewing machine. I found a great brown faux-leather at JoAnn Fabrics. I created the harness as two separate pieces. The faux-leather is use to create the padded "liner", while real leather straps are used for ... well, the straps. The straps are attached firmly to the pack, the liner then attached with velcro and snaps.
I debated buying Cobra buckles or something similar, but ended up going for simple prong buckles that can be adjusted. I don't have a proper coat (yet) so I'm not sure how much slack to leave in the straps for that. With the adjustable buckles, I can compensate for it later.
It's super-comfy and bears the weight of the pack nicely.
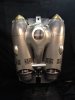
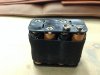
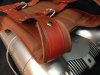
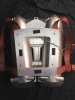
Now, for the electrical. Everything runs off of a 12-volt pack (8 AAAs) that rare housed in the pack. On "ignition" a simple computer fan spins in the pack. I wedged a bit of duct tape against the fan so it gives a characteristic whine/grind like the movie pack.
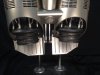
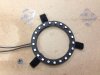
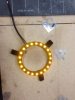
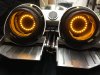
For lighting I wanted to be careful to not over do it. I bought some yellow LED light rings for $5 of eBay. They rest in the inside of the rocket bells. I also added a couple of surface mount LEDS inside the pack, just behind the vents. This slightly lights up the rocket innards so you can see them through the vents.
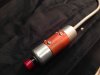
I don't have proper gloves (yet) but I wanted something logical looking to house a push button on a cord. I created a simple trigger housing out of PVC and wrapped it in a bit of leather. I also wanted to be able to disconnect the cord if need be, so I bought a mono stereo jack and plug that connects the button cord to the back of the pack for a nice finished look.
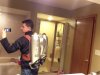
Strapping it on and firing it up is REALLY satisfying. No thruster sound ... But I swear I can hear it in my head ...
I promise a better pic with my helmet on soon.
Happy New Year everyone.
For the harness, an all-leather solution was out due to cost and my wimpy sewing machine. I found a great brown faux-leather at JoAnn Fabrics. I created the harness as two separate pieces. The faux-leather is use to create the padded "liner", while real leather straps are used for ... well, the straps. The straps are attached firmly to the pack, the liner then attached with velcro and snaps.
I debated buying Cobra buckles or something similar, but ended up going for simple prong buckles that can be adjusted. I don't have a proper coat (yet) so I'm not sure how much slack to leave in the straps for that. With the adjustable buckles, I can compensate for it later.
It's super-comfy and bears the weight of the pack nicely.
Now, for the electrical. Everything runs off of a 12-volt pack (8 AAAs) that rare housed in the pack. On "ignition" a simple computer fan spins in the pack. I wedged a bit of duct tape against the fan so it gives a characteristic whine/grind like the movie pack.
For lighting I wanted to be careful to not over do it. I bought some yellow LED light rings for $5 of eBay. They rest in the inside of the rocket bells. I also added a couple of surface mount LEDS inside the pack, just behind the vents. This slightly lights up the rocket innards so you can see them through the vents.
I don't have proper gloves (yet) but I wanted something logical looking to house a push button on a cord. I created a simple trigger housing out of PVC and wrapped it in a bit of leather. I also wanted to be able to disconnect the cord if need be, so I bought a mono stereo jack and plug that connects the button cord to the back of the pack for a nice finished look.
Strapping it on and firing it up is REALLY satisfying. No thruster sound ... But I swear I can hear it in my head ...
I promise a better pic with my helmet on soon.
Happy New Year everyone.
Attachments
-
 IMG_1671.jpg677.3 KB · Views: 343
 -
 IMG_1672.jpg997.6 KB · Views: 243
 -
 IMG_1675.jpg799.5 KB · Views: 235
 -
 IMG_1687.jpg533.9 KB · Views: 259
 -
 IMG_1689.jpg771.7 KB · Views: 257
 -
 IMG_1690.jpg819.4 KB · Views: 265
 -
 IMG_1679.jpg701.6 KB · Views: 271
 -
 IMG_1681.jpg777.6 KB · Views: 390
 -
 IMG_1682.jpg892.2 KB · Views: 295
 -
 IMG_1683.jpg152.4 KB · Views: 368
 -
 IMG_1685.jpg567.6 KB · Views: 340
 -
 IMG_1688.jpg647.5 KB · Views: 305
 -
 IMG_1691.jpg624.1 KB · Views: 398
 -
 IMG_1692.jpg915.1 KB · Views: 283
 -
 IMG_1693.jpg832.5 KB · Views: 336
 -
 IMG_1694.jpg738.4 KB · Views: 247
 -
 IMG_1695.jpg487.8 KB · Views: 269
 -
 IMG_1696.jpg560.9 KB · Views: 335
 -
 IMG_1697.jpg765.7 KB · Views: 348
 -
ignition.mov4.5 MB · Views: 274
Last edited:
joberg
Legendary Member
FAB paint job (tears in my eyes seeing it)...as for silver and depending on the material, sometimes it helps to "cook" your piece into the oven to fix the paint and without using a clear coat: depending on how many coats you put on your prop, the rule of thumb is: set oven at 150F/70C for 20min. cool off and touch to see if the whole thing is dry. Should work. The harness/leather work is looking good and sturdy (bathroom is big: msg from the wife to you:lol)
Eager to see it with the helmet!
Eager to see it with the helmet!
Similar threads
- Replies
- 0
- Views
- 103