Scratch-build of Rocketeer Cirrus X-3 Rocketpack

One more thing. I built a display stand for the Rocket our of simple metal pipe and fixtures. I also added a serial data plate on the base. For this, I was inspired by BROTHERSFOSTER's great work. I created the graphics in Adobe Illustrator and printed them on a piece of waterslide decal paper. I applied the decal to a piece of sheet aluminum.
 

Attachments

  • image-1.jpeg
    image-1.jpeg
    277.4 KB · Views: 261
  • image.jpeg
    image.jpeg
    599.8 KB · Views: 375
Nice. Looks totally period. :) The water slide decal trick is one of my favorite embellishments. It looks so good and is so easy.
 
I'm super excited. I've been looking for a simple way to do a sound board for inside the rocket. I know Arduino is a way, but I didn't know where ti begin.

I was able to get the three necessary sound files – the fan wind up, the thrust, and the whining fan at the end.

I just ordered a custom made sound chip from replicaprops.com. Rob was INCREDIBLY helpful. The ship will come preprogrammed with my sounds. When I get it, I will be able to trigger the correct lights and sounds from my push button. All for like $60 in parts!

asavage, if you're listening, I can hook you up :)

Stay tuned finheads!
 
I have a sound board from him as well. I have all my sounds working from a single switch. I did notice one thing. I have a start up sound but it is further down on pin out assignment. I had to build a relay set up to have that play first before any of the others. Once that was figured out, it works beautiful. Even bought a small T-Class amp on eBay for about 5 bucks. If you need any help, just let me know.
 
THIS, is how cool Rob from replicaprops.com is. I ordered the board and sent him the sound files at 6:00. By 9:00 he programmed my board and emailed me a test video. SOOOOOO, excited!

 
Last edited by a moderator:
Small update. I improved the lights in the rocket cones. I built a simple frame mounted to a PVC tube to hold the two light rings that go in each rocket. The tube them slips into the rocket's hole. Much cleaner, sturdier solution.
 

Attachments

  • image.jpeg
    image.jpeg
    270.8 KB · Views: 215
  • image-3.jpeg
    image-3.jpeg
    227 KB · Views: 178
  • image-2.jpeg
    image-2.jpeg
    480.8 KB · Views: 197
  • image-1.jpeg
    image-1.jpeg
    344.9 KB · Views: 182
I have the new sound chip and speaker system installed. And it's fantastic. It really brings the pack to life. I'll try to detail a bit of what I did.

You can check out the result here:

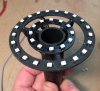
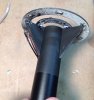
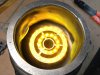
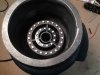
First, I removed the existing fan I had in the center circular vent to make room for the speaker, because the fan noise will now be through the chip.

The audio files were given to me by Jason Ehl. A tremendously helpful guy. He built a similar system in his pack and had already sourced the appropriate start up, thrust and fan wind-down sound files.

I then passed the audio files on to Rob at replicaprops.com. Again, an incredibly helpful guy. He programmed the sound chip for me. I could not believe how affordable and convenient this product is. The sounds I set him are now a standard option for others to buy on his site.

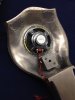
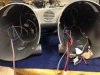
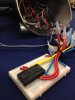
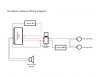
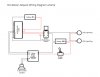
The wiring of the chip, speaker and lights was not trivial. It required two battery packs (the chip runs on 3V, the lights on 12V). I also had to track down the appropriate DPDT momentary pushbutton switch. Here's the switch you want:
MB2061SB1W01-DA-RO NKK Switches | Mouser

You can install this with or without an additional amp. This is the amp to buy:
7 WATT MONO AMP

Mine's on order, but honestly, it's quite audible without it. But hey, louder is better, right?

I've attached two wiring diagram options, with and without the amp. The additional switch for the amp version is so that you can kill power to the amp when not using it or it will draw power out of your batteries.

I'm tremendously happy with the result! Finally. I think my Cirrus X-3 is complete :)

Again, I want to thank Jason Ehl and Rob from replicaprops.com. I could not have done this step without the help of these guys.
 

Attachments

  • IMG_2004.jpg
    IMG_2004.jpg
    734.2 KB · Views: 273
  • IMG_2002.jpg
    IMG_2002.jpg
    799.5 KB · Views: 252
  • IMG_2003.jpg
    IMG_2003.jpg
    636 KB · Views: 231
  • Rocketeer_rocketpack.jpg
    Rocketeer_rocketpack.jpg
    106.4 KB · Views: 222
  • Rocketeer_rocketpack_amp.jpg
    Rocketeer_rocketpack_amp.jpg
    122.7 KB · Views: 225
Last edited by a moderator:
Wow! That really looks amazing. I noticed how the sides of the engines lit up also. Did you add lights there too?

Sent from my XT1080 using Tapatalk
 
Yup. There's a couple LEDs on the underside on the housing throwing some light on the inside of the rocket housing.
 
Last edited:
The button housing is 1" PVC tube with caps on the ends. The middle is extra leather from the straps. And thank you, it's one of my favorite parts :)
 
a question for you, im just starting the build on my own cirrus x-3 and how did you get the shape of the center piece of the pack between the rocket housings? and as far as the motors go is it just some parts u threw together?
 
a question for you, im just starting the build on my own cirrus x-3 and how did you get the shape of the center piece of the pack between the rocket housings? and as far as the motors go is it just some parts u threw together?

So ... I think you'll find those answers by reading this thread [emoji6]
 
This thread is more than 4 years old.

Your message may be considered spam for the following reasons:

  1. This thread hasn't been active in some time. A new post in this thread might not contribute constructively to this discussion after so long.
If you wish to reply despite these issues, check the box below before replying.
Be aware that malicious compliance may result in more severe penalties.
Back
Top