Scratch-build of Rocketeer Cirrus X-3 Rocketpack

Finished up the master for the nosecones. Got the grooves in and attached the 13 little finlettes. Looking pretty sweet. I'll be buying the Smooth-on Brush On Starter kit to mold and cast these.
 

Attachments

  • b_holes.jpg
    b_holes.jpg
    174 KB · Views: 569
  • B-cone2.jpg
    B-cone2.jpg
    152.3 KB · Views: 474
  • b_othtubes.jpg
    b_othtubes.jpg
    738.7 KB · Views: 534
  • b_cone.jpg
    b_cone.jpg
    169.8 KB · Views: 485
Last edited:
This is looking great. Going to attempt my own scratch build of one of these after I finish the helmet I'm working on. Looking forward to seeing this finished. :)
 
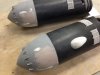
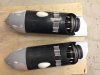
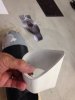
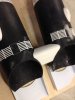
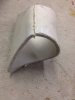
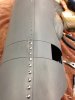
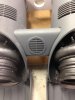
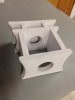
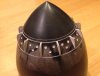
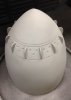
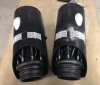
Okay, Here's a status. I have rocket tubes and engines, flaps, cones, all built. Where am I at? I'm having a REALLY hard time deciding how to proceed on the center section. Everything else has been relatively geometric and easy to build. The entire center section is organic.

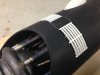
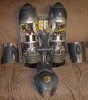
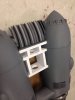
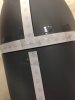
I want this thing to be sturdy at the end. I imagine I need to brace the tubes together with a couple pieces of MDF or something.

It's complicated in my mind because it's double sided, and organic.

After I put permanent braces between the tubes locking them into position.
Here's my options as I see them.

A) I build up the center section with fiberglass and bondo. I'm not nuts about this because I fear over time and carrying this thing around the bondo will crack in places.

B) I build up the center section with clay and I do a large brush on mold for each side. Then slush cast each open-sided mold. This would create a nice 2-sided resin shell for the center section. Downside is the cost of materials.

c) I try to build the center section as a single piece OUTSIDE of the tubes. Then slush cast it as a one big piece, then fit it into place. Downside: Lots of fitment trial and error.

Anyone have an opinion or think of another way?
 

Attachments

  • photo 1.JPG
    photo 1.JPG
    500.7 KB · Views: 375
  • photo 2.JPG
    photo 2.JPG
    589 KB · Views: 388
  • photo 3.JPG
    photo 3.JPG
    213.7 KB · Views: 360
  • photo 4.JPG
    photo 4.JPG
    233.6 KB · Views: 327
  • photo 5.JPG
    photo 5.JPG
    508.3 KB · Views: 319
Last edited:
Dude, your build has been epic, every step of the way.

Do it right, use clay and silicone. In the end your pack will be worth it.

If you cut corners, you'll regret it down the road.
 
Thanks!! I really want to do it right. I'm a bit of a noob on casting (although I've been successful so far). Do you think I need to do it as two "open-face" casts – front and back? Know what I mean?

I would do front and back, with a mother mold.

I would personally lean towards doing the pulls in fibreglass.

As for connecting everything together, you would want some sort of rigid structure underneath. You can jb weld and bolt a 1" square aluminum tube structure that links the rockets together, permanently mount the back to it and have the front removable by rare earth magnets.

That way you can easily service it in the future if you want to change fan motors or lights. I would make the separation line in the back side of the radiator fins.
 
I agree with brandomack, I was already thinking of making the face of the center section on my build detachable with magnets. I share your trepidation about the "organic" center section. Fortunately, I'm just starting on all the geometric stuff for the rockets, so it'll be a while before I get to where you are. Thanks for blazing the trail!
 
I found this pic online. I like the detachable nature of just the center "dome" over the fan. I think this is how I'll proceed.
 

Attachments

  • packb4overhaulopen2.jpg
    packb4overhaulopen2.jpg
    24.5 KB · Views: 1,137
Usually scratch built packs are pretty meh, I'm glad to report yours is well above par.

I would like to do a pack as well but too many jobs in the que.

Good luck and keep it up
 
Very clean build Valor, going through the motions like a true pro. Love your paint tut, the molding, the...heck, everything looks A+ in my book!
 
Small update, I used a 3" diameter PVC pipe for the lower center support. I heated the pipe piece with a heat gun and smooshed it into the flatface profile I needed. Then cut and sanded the two ends to conform to the rockets. .... It's a TAD oversize by my measurements, but I may try to live with it.
 

Attachments

  • image-1.jpeg
    image-1.jpeg
    265.7 KB · Views: 457
  • image-2.jpeg
    image-2.jpeg
    154.9 KB · Views: 348
  • image-3.jpeg
    image-3.jpeg
    168.4 KB · Views: 363
  • image.jpeg
    image.jpeg
    200.2 KB · Views: 385
Small update, I used a 3" diameter PVC pipe for the lower center support. I heated the pipe piece with a heat gun and smooshed it into the flatface profile I needed. Then cut and sanded the two ends to conform to the rockets. .... It's a TAD oversize by my measurements, but I may try to live with it.

Great idea! the rocket is looking great! Subscribed :)
 
Not totally sure yet. I'll handle it myself. Rattle can. Something aluminum looking. I'm probably going to weather her a bit. So not a perfect chrome finish.
 
Some more smallish progress. First, I was just NOT happy with the scale of the lower support I made from PVC. It needed to be a bit smaller. So I plugged the ends and poured resin right into the PVC piece. An exact copy of the profile, but with the diameter of the center of the piece – perfect. I added the round vent. Use the same grid that is used for the 4 vents on the tubes. I plan on running threaded rods through this piece to secure the tubes together.

I also have a plan for the main center section. First I built a support structure from 1/2 inch Sintra. I'll glue and screw this in piece to lock the tubes into position and build the center on top of it. TIP: If you ever want some pieces of Sintra to use for a small project, ask a local sign shop for scraps. They'll usually have a pile laying around they are happy to hand over to you.

The foamcore top radiator you see attached to the center support is just for sizing. I'll be making a real one soon.

Also, I found the perfect-scale rivets (called split rivets) at the hardware store. Drilled and glued almost 200 of them all in place.

All for now.
 

Attachments

  • image-1.jpeg
    image-1.jpeg
    660.1 KB · Views: 433
  • image-2.jpeg
    image-2.jpeg
    238.3 KB · Views: 457
  • image-3.jpeg
    image-3.jpeg
    218.9 KB · Views: 351
  • image-4.jpeg
    image-4.jpeg
    231.2 KB · Views: 416
  • image-5.jpeg
    image-5.jpeg
    305.7 KB · Views: 363
  • image-6.jpeg
    image-6.jpeg
    306.5 KB · Views: 380
  • image.jpeg
    image.jpeg
    198 KB · Views: 383
This thread is more than 4 years old.

Your message may be considered spam for the following reasons:

  1. This thread hasn't been active in some time. A new post in this thread might not contribute constructively to this discussion after so long.
If you wish to reply despite these issues, check the box below before replying.
Be aware that malicious compliance may result in more severe penalties.
Back
Top