Scratch-build of Rocketeer Cirrus X-3 Rocketpack

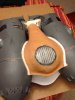
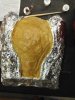
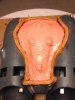
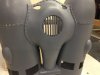
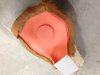
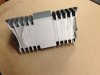
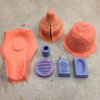
I'm starting to sculpt the front center section of the pack from clay today. I'm sculpting it as one large piece that I'll brush on a rubber mold and cast in resin. As I previously mentioned, I really got stuck thinking about how to make this part. It will be an open-face, one sided mold when I'm done. I'll slush-cast the resin in it. I really hope it all fits back on when I'm done.

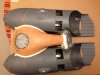
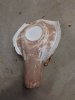
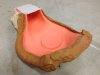
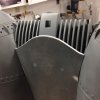
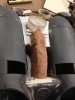
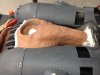
For the back I'm not going to create the swooping curved piece. It will be more hard-edge. Less than screen-accurate, but simpler to build. It gets covered by the harness anyway.

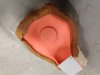
Got this far before I ran out of clay ... off to Michaels!
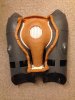
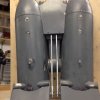
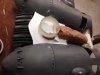
 

Attachments

  • image-1.jpeg
    image-1.jpeg
    195.7 KB · Views: 437
  • image-2.jpeg
    image-2.jpeg
    473.2 KB · Views: 457
  • image.jpeg
    image.jpeg
    234.1 KB · Views: 402
So, I'm this far with the center portion of the pack. I'm generally pretty happy with the sculpt. Still a bit of clay smoothing to do. I'm not going to stress to much about surface finish as I'll be smoothing out the cast I pull from the mold.

I'm more of a hard-edge model-maker, so this giant clay sculpt for the center section was intimidating to me. Keeping the entire thing symmetrical and accurate to the actual pack is tricky. It seems every reference photo I have of the ACME pack looks a bit different depending on the perspective of the camera.

I also embeded a styrene vent for the central vent. I heat-formed a piece of styrene over a metal bowl to get the convex shape, then painstakingly cut and filed out the slats.
 

Attachments

  • image-1.jpeg
    image-1.jpeg
    277.1 KB · Views: 435
  • image.jpeg
    image.jpeg
    631 KB · Views: 457
Eh, now that I compare my sculpt with pics of the ACME, I think I missed proportionally. My circular vent is too high up. The flared out areas need to be rounder. I'm gonna tear out the clay and go at it again. ....
 

Attachments

  • packs.jpg
    packs.jpg
    139.6 KB · Views: 803
Yeah, that piece is the most difficult one to achieve on that prop...btw, the small piece at the bottom should be closer from the beveled cuts of the PVC tubes;)
 
Yeah, that piece is the most difficult one to achieve on that prop...btw, the small piece at the bottom should be closer from the beveled cuts of the PVC tubes;)

Now WHY would you point that out to me ???? :) I actually knew that. I made the decision to split the difference on spacing between the edge and the vents.
 
I finished a new sculpt of the center area done. Much, much, much happier with this one. I also rebuilt the circular vent a different way so the slats can be deeper.

I used some clay to wall in the area I'll mold. Applied Oomoo silicon and Plasti-paste for the mother mold.

***On a side note, Does anyone have a source for a sound board of the Rocketeer rocketpack starting up and shutting down?
 

Attachments

  • image.jpeg
    image.jpeg
    343.5 KB · Views: 382
  • image-1.jpeg
    image-1.jpeg
    983.2 KB · Views: 307
  • image-2.jpeg
    image-2.jpeg
    1 MB · Views: 300
Last edited:
I used the silicon mold and mother mold I pulled of the center section to pour a resin cast of that piece. This was a really tricky pour (For me at least). It involved slush casting a pretty complex open face mold. In the end there was a lot of grinding, cleanup and bondo-ing to do to smooth everything out. But the end result looks fantastic, and it fits the pack like a glove. I wanted to keep this central area removable for servicing the pack, so I mounted a mechanism inside to hold it inplace, but be easily removable.

I also ended up redoing the round central vent and casting it as a separate piece. It was easier that having in the main mold.

I've started on the final (I think) piece*–*the top radiator. .... The end is in sight!
 

Attachments

  • IMG_1508.jpg
    IMG_1508.jpg
    179.5 KB · Views: 301
  • IMG_1527.jpg
    IMG_1527.jpg
    138.8 KB · Views: 347
  • IMG_1528.jpg
    IMG_1528.jpg
    131.8 KB · Views: 362
  • IMG_1529.jpg
    IMG_1529.jpg
    106.2 KB · Views: 392
  • IMG_1530.jpg
    IMG_1530.jpg
    103.6 KB · Views: 375
  • IMG_1531.jpg
    IMG_1531.jpg
    130.6 KB · Views: 302
  • IMG_1488.jpg
    IMG_1488.jpg
    111.7 KB · Views: 285
  • IMG_1490.jpg
    IMG_1490.jpg
    114.5 KB · Views: 284
  • IMG_1505.jpg
    IMG_1505.jpg
    111.2 KB · Views: 273
  • IMG_1506.jpg
    IMG_1506.jpg
    124.8 KB · Views: 282
  • IMG_1507.jpg
    IMG_1507.jpg
    107.2 KB · Views: 298
I saved the radiator at the top of the pack for last. Partly because I knew it would be simple (and fun) to build, and partly because I wanted it to be the cherry on top –the finishing touch. I built it out of 1/4" sintra and 1/8" styrene. It actually took a bit of trial and error to get the various layers and profile looking correct. But I;m happy with the results.

I also wanted to share how the back looks. It's not screen accurate, but the back will be covered with the leather harness anyway. I also wanted to keep the panel on the top in the back removable to service things. And, I didn't want to have to sculpt and mold the organic, curvy shape of the screen-used packs. This design meets all the requirements. You can see how the flap control rods inter the pack. I also included a pic of the inside of the pack to show the screw mechanism that keeps the front center piece tight to the pack.

Apart from some minor touch-ups, this completes the build! That's three months of almost daily working on this. I still can't believe how happy I am with this.

Paint will be next.

- - - Updated - - -

I wanted to recap the various molds I made in the build of this project. This was cool to me because moldmaking and casting was something I always wanted to learn to do, and this project gave me a number of molding/casting opportunities.
 

Attachments

  • IMG_1532.jpg
    IMG_1532.jpg
    802.7 KB · Views: 371
  • IMG_1533.jpg
    IMG_1533.jpg
    673.8 KB · Views: 351
  • IMG_1534.jpg
    IMG_1534.jpg
    599.6 KB · Views: 376
  • IMG_1535.jpg
    IMG_1535.jpg
    484 KB · Views: 435
  • IMG_1537.jpg
    IMG_1537.jpg
    484.9 KB · Views: 346
  • IMG_1539.jpg
    IMG_1539.jpg
    467 KB · Views: 365
  • IMG_1540.jpg
    IMG_1540.jpg
    569.6 KB · Views: 362
I should say this completes the structural part of the build. I plan on installing lights into the two engines for a glow. And I have a three inch computer fan on order. Oh, and I have a harness to figure out.
 
This thread is more than 4 years old.

Your message may be considered spam for the following reasons:

  1. This thread hasn't been active in some time. A new post in this thread might not contribute constructively to this discussion after so long.
If you wish to reply despite these issues, check the box below before replying.
Be aware that malicious compliance may result in more severe penalties.
Back
Top