View attachment 896426
:angry
NO NOT THAT CREEPY UNCLE!!! :angry
THIS CREEPY UNCLE!!
View attachment 896428
First off all joking aside, I am totally blown away with Roman Props new Balance v4! If anyone is wondering about the creepy uncle, Seths gave lukes green lightsaber in TLJ the nickname "the creepy uncle" and once he said that it has stuck with me! so from there on out i have always referred to this saber as just that! so thank you seth!
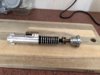
This isn't really a tutorial because i took many liberties with this project, and its more of a fun free wheeling afternoons work. The saber came to me mostly assembled, minus the tri ring, and arrows.
so right away i had to take it all apart and see what makes it tick
View attachment 896429
all beautiful cnc'ed aluminum, and copper, anodize... just gorgeous!
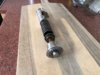
my goal was to mimic the saber's look in the picture below, which to me had some heavy aluminum weathering, though in TLJ i think the creepy uncle may be a tad bit cleaner... still up in the air until the bluray. but since this is a fun saber for me, anything goes!!
View attachment 896430
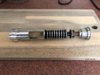
so before i start beating this up, and weathering it out, i took a nice clean shiny pic of her. before she goes off for the chemical burns!
View attachment 896431
in my haste, i e6000'ed the arrows in. i wasn't thinking, i should have waited, because it would have made the oven clean bath much easier
View attachment 896433
a few hours later i just used a skewer to remove the extra e6000 webbing, cleans up great!
View attachment 896434
the pommel cubes i ended up wet sanding with 320, then polishing with my dremel with jewelers polish to smooth them over
View attachment 896435
View attachment 896436
soaked and scrubbed the pommel with alcohol to remove the polish, and then off to the driveway for the oven clean bath!
View attachment 896438
I ended up soaking them for 20 minutes. i also used a cheap paint brush from the toy section from the dollar store, with this brush i was able to put the over flow of oven clean on the control box and avoided the black button and arrows. it would have been much easier to just wait to glue the arrows on... but live and learn
View attachment 896439
let soak for 20 minutes then washed in warm soapy water, same pink water as last time! lol
it darkened it but not much....
View attachment 896440
so i let it soak again for another 20 minutes, and i got my desired look!
while i was oven cleaning the parts, i put 2 vitamins water bottle caps in a tupper ware container, poured white vinegar into the tupperware but just below the vitamin bottle caps, put the copper neck, and copper lid (not the card) on top of the bottle caps, and closed the tupperware up! they stayed in there for 4 hours to darken alittle
View attachment 896442
i began weathering the emitter with some aluminum black, and broke out the acrylics to start a wash
View attachment 896443
View attachment 896444
the rest of the body just got washes of acrylic
View attachment 896446
View attachment 896447
i screwed up pretty big on this one though... usually with D rings, i cut alittle off each side to help slide over the cube. so i didnt even attempt to put the tri ring on first, i just cut... which turned on horrible because the tri ring slides in the hole and can expose the giant cut... very disappointed in myself on this one...
View attachment 896449
WARNING: dont cut the tri-ring. i would try to put it on without cutting, you will end up seeing the gap removed.. i never thought of this, and this was my first tri ring install so live and learn

When assembled, i am very happy with it. this was a fun project and have to thank roman for doing this run!
View attachment 896450
View attachment 896451
View attachment 896453
View attachment 896454
Also want to thank my friend who got this for me! really appreciate it buddy!
So c'mon gang! show off your creepy uncles here!!!
-Danny
View attachment 787555
View attachment 896284
View attachment 896285
View attachment 896286
View attachment 896287
View attachment 896288
View attachment 896289
View attachment 896290
View attachment 896291
View attachment 896292
View attachment 896293
View attachment 896294
View attachment 896295
View attachment 896296
View attachment 896297
View attachment 896298
View attachment 896299
View attachment 896300
View attachment 896301
View attachment 896302
View attachment 896303
View attachment 896304
View attachment 896305