You are using an out of date browser. It may not display this or other websites correctly.
You should upgrade or use an alternative browser.
You should upgrade or use an alternative browser.
Rey - Star Wars: The Force Awakens Build (open for everyone!)
- Thread starter TheLadyNerd
- Start date
division 6
Master Member
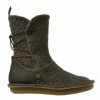
That is the pic I found, even added it to the email I sent them.
I also added that many more would be interested since it will be seen an a major motion picture coming out soon.
I have something else to post in a minute about an item I saw at work today, just have to run it through photo shop first.
I also added that many more would be interested since it will be seen an a major motion picture coming out soon.
I have something else to post in a minute about an item I saw at work today, just have to run it through photo shop first.
division 6
Master Member
Jaina Solo
New Member
While we're on the subject of boots, I started modifying a pair of knock-off Uggs and I took photos of my progress in case anyone is interested. I'm glad that the real pair of boots exist and I hope to be able to get a pair in the future, but for anyone who might not be able to find or afford them maybe this write-up will help you in your own costuming endeavors. I posted everything under a spoiler-cut since it's image-heavy:
I was about halfway done with this boot when division 6 found the link to the original boots (thank you for doing that BTW, you're a superstar!). I was a little disheartened because I had spend quite a few hours working on these only to discover that the boot actually existed, but I went ahead and finished this boot because A) I still needed a pair of boots for SDCC, and B) I forgot how much fun it is to craft something from my own hands. The more I gravitate towards movie and TV costumes, the more I find myself buying things and the less I find myself actually making things, so this ended up being a very fun project (with the exception of stabbing myself with a needle). Obviously no one will mistake these for the real boots, but I'm pretty happy with how they came out, and maybe someone can take something away from this.
I needed a pair of boots for San Diego Comic Con because my Rey 1.0 costume will be making an appearance in the masquerade. I ended up using a lot of materials that I had leftover from other projects since I was really lazy and didn't feel like going out while I was working on it, so while none of the materials I used are 100% accurate, I was impressed that a lot of what I had was pretty close (thanks to my personal craft hoard I've accumulated over the years).
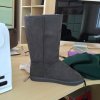
I started off with a cheap pair of knock-off Uggs that cost like $18 on Amazon; I don't even remember which ones I bought, just that they were cheap and I could get them here quickly using Prime.
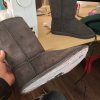
I ripped off the sole as I am planning on creating a new sole from cork.
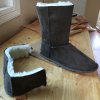
I cut a couple of inches off the top since they were too tall. I saved the excess material as I needed it to add onto the sides of the front flap.
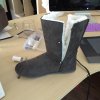
Split up the sides.
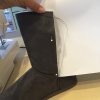
The reason I didn't end up going with the knit boots is that, although it looked like less work initially, I was concerned that splitting the calf on either side would not leave enough "overlap" for the front and back of the boot. So once I split the boots, I created a pattern for the overlap.
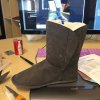
Used the excess material to create the overlap on both sides. At this point I wasn't sure what I wanted to do about the fleece inside; I didn't know if I wanted to cover it with a smoother fabric as seen in the actual costume, or if I wanted to save myself the trouble and try to incorporate the fleece into the final boot somehow.
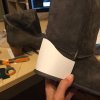
Patterning out the leather piece of the heel. I used to have a Clone Wars Aayla Secura costume but my dog ate the leather off of the top a couple of years ago, so I had thrown the costume out and the boots for it were sitting in storage doing nothing. The boots were grey, and while they weren't an exact match for Rey's leather parts, they were pretty close. I decided to make the sacrifice and let Aayla live on in Rey.
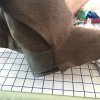
I skipped the picture of patterning out the felt parts of the fabric, but I did it in much the same was as above. I had bought like six yards of wool for a Henry Jones, Sr. costume I was planning on making for my dad one day, and it turned out to also be a pretty good match. Not exact, but at this point I was just kind of happy that I was having to do so little driving around town trying to find the perfect material. I'd like to still make Henry Jones, Sr. someday, but I could afford to spare a 1/4th of a yard for Rey purposes.
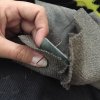
The struggle is real when sewing leather. Doeskin, which I think is what the Aayla boots were made of, is fairly thin leather but for some reason it's incredibly hard to penetrate with a needle and thread. Where my sewing machine has had no problem sewing through certain types of leather in the past, it became clear rather quickly that it didn't have the power to sew through doeskin even with a leather needle. I punched holes with an awl where I planned to put stitches, but doeskin has this remarkable self-healing ability and very often a hole that was there one second was gone the next. This project would have gone by much faster if I hadn't used real leather (which is ironic because I'm not even sure if the heel part of the actual boot is real leather).
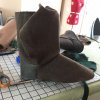
Making sure all the pieces fit together tightly before I sewed them to the base boot. A little later (after I had glued the fabric to the boot) I realized I had gotten the seam where the leather meets the toe piece wrong, but at that point I had already put so much effort into it that it wasn't worth it to rip it all apart for one little seam. Maybe a more detail-oriented person would go back and correct that error, but after stabbing myself several times with a leather needle my attitude at that point was ain't nobody got time for that ****.
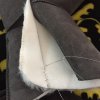
It was also at that point that I decided to make less work for myself and incorporate the original fleece into the boot rather than try and cover it up with a different material. It was already three layers thick (fleece + grey faux suede + wool) that I feared adding another layer was going to make it feel like I was wearing puffy snow boots. So I took what leftover fleece there was from the top I had cut off and added it to the inside so that the fleece layer inside matched with the outer layer on the outside.
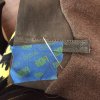
I almost forgot about the back strap, which would have been impossible to sew on after I had glued everything together. My Aayla boots also had a back strap, which I salvaged (I'm already getting into character, apparently). It was thinner than the back strap on Rey's boots, but in already had holes punched in it, so I conceded to make my life easier and just used the existing back strap. The painter's tape was there to hold everything together while I was hand-stitching it, since sewing pins were out of the question.
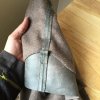
The finished back strap. The leather looks quite different depending on what light you looked at it in, which I bet the same can be said for the original boots. #thedress #blueorwhite
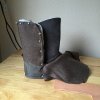
Pinning everything in place in preparation for sewing the fleece and wool layers together. The fabric is not glued to the base yet; just pinned there for placement purposes.
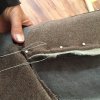
I wish I had taken a better picture of this, but basically I just whip-stitched the fleece and wool layers together.
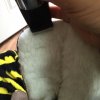
My solution to the "they're clearly not fur-lined" problem was to take my dad's beard-trimmer and shave the hair down as far as I could. Synthetic hair is surprisingly difficult to shave off and the bear trimmer did almost nothing. I'm going to have to bring home my horse's clippers before I can get the hair down to a manageable level, but this is the ultimate plan.
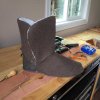
After I stitched and ironed everything down. It's starting to take shape!
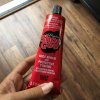
Hello, darkness my old friend
You've come to stink up things again
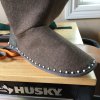
I only ended up glueing the bottom part of everything to the base. I thought I would need to put glue over every surface the make everything nice and flat, but it worked out that I had pulled the fabric taut enough over everything that I didn't have any wrinkling or weird folds.
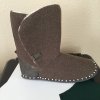
Started attaching the lace tabs. I had made it almost all the way through this project without any major damage to myself, until my hand slipped and the wrong end of a sewing needle punctured my finger and stopped at the underside of my fingernail. I like to think of myself as a pretty tough 30-year old woman, but even I shed a few tears and briefly contemplated going to the hospital. The silver lining to this story is that I managed not to get a single drop of spurting blood on the boot.
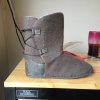
Finished tabs and removed the pins after letting the Shoe Goo dry overnight. I just have to add the soles but I bought what I thought were 1/2" cork boards and it turns out they were like 1/16" cork roll wrapped around a half-inch frame. :\ So my search for soles (sole-searching?) continues.
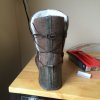
All laced up! One boot down, one to go. *sobs*

I started off with a cheap pair of knock-off Uggs that cost like $18 on Amazon; I don't even remember which ones I bought, just that they were cheap and I could get them here quickly using Prime.

I ripped off the sole as I am planning on creating a new sole from cork.

I cut a couple of inches off the top since they were too tall. I saved the excess material as I needed it to add onto the sides of the front flap.

Split up the sides.

The reason I didn't end up going with the knit boots is that, although it looked like less work initially, I was concerned that splitting the calf on either side would not leave enough "overlap" for the front and back of the boot. So once I split the boots, I created a pattern for the overlap.

Used the excess material to create the overlap on both sides. At this point I wasn't sure what I wanted to do about the fleece inside; I didn't know if I wanted to cover it with a smoother fabric as seen in the actual costume, or if I wanted to save myself the trouble and try to incorporate the fleece into the final boot somehow.

Patterning out the leather piece of the heel. I used to have a Clone Wars Aayla Secura costume but my dog ate the leather off of the top a couple of years ago, so I had thrown the costume out and the boots for it were sitting in storage doing nothing. The boots were grey, and while they weren't an exact match for Rey's leather parts, they were pretty close. I decided to make the sacrifice and let Aayla live on in Rey.

I skipped the picture of patterning out the felt parts of the fabric, but I did it in much the same was as above. I had bought like six yards of wool for a Henry Jones, Sr. costume I was planning on making for my dad one day, and it turned out to also be a pretty good match. Not exact, but at this point I was just kind of happy that I was having to do so little driving around town trying to find the perfect material. I'd like to still make Henry Jones, Sr. someday, but I could afford to spare a 1/4th of a yard for Rey purposes.

The struggle is real when sewing leather. Doeskin, which I think is what the Aayla boots were made of, is fairly thin leather but for some reason it's incredibly hard to penetrate with a needle and thread. Where my sewing machine has had no problem sewing through certain types of leather in the past, it became clear rather quickly that it didn't have the power to sew through doeskin even with a leather needle. I punched holes with an awl where I planned to put stitches, but doeskin has this remarkable self-healing ability and very often a hole that was there one second was gone the next. This project would have gone by much faster if I hadn't used real leather (which is ironic because I'm not even sure if the heel part of the actual boot is real leather).

Making sure all the pieces fit together tightly before I sewed them to the base boot. A little later (after I had glued the fabric to the boot) I realized I had gotten the seam where the leather meets the toe piece wrong, but at that point I had already put so much effort into it that it wasn't worth it to rip it all apart for one little seam. Maybe a more detail-oriented person would go back and correct that error, but after stabbing myself several times with a leather needle my attitude at that point was ain't nobody got time for that ****.

It was also at that point that I decided to make less work for myself and incorporate the original fleece into the boot rather than try and cover it up with a different material. It was already three layers thick (fleece + grey faux suede + wool) that I feared adding another layer was going to make it feel like I was wearing puffy snow boots. So I took what leftover fleece there was from the top I had cut off and added it to the inside so that the fleece layer inside matched with the outer layer on the outside.

I almost forgot about the back strap, which would have been impossible to sew on after I had glued everything together. My Aayla boots also had a back strap, which I salvaged (I'm already getting into character, apparently). It was thinner than the back strap on Rey's boots, but in already had holes punched in it, so I conceded to make my life easier and just used the existing back strap. The painter's tape was there to hold everything together while I was hand-stitching it, since sewing pins were out of the question.

The finished back strap. The leather looks quite different depending on what light you looked at it in, which I bet the same can be said for the original boots. #thedress #blueorwhite

Pinning everything in place in preparation for sewing the fleece and wool layers together. The fabric is not glued to the base yet; just pinned there for placement purposes.

I wish I had taken a better picture of this, but basically I just whip-stitched the fleece and wool layers together.

My solution to the "they're clearly not fur-lined" problem was to take my dad's beard-trimmer and shave the hair down as far as I could. Synthetic hair is surprisingly difficult to shave off and the bear trimmer did almost nothing. I'm going to have to bring home my horse's clippers before I can get the hair down to a manageable level, but this is the ultimate plan.

After I stitched and ironed everything down. It's starting to take shape!

Hello, darkness my old friend
You've come to stink up things again

I only ended up glueing the bottom part of everything to the base. I thought I would need to put glue over every surface the make everything nice and flat, but it worked out that I had pulled the fabric taut enough over everything that I didn't have any wrinkling or weird folds.

Started attaching the lace tabs. I had made it almost all the way through this project without any major damage to myself, until my hand slipped and the wrong end of a sewing needle punctured my finger and stopped at the underside of my fingernail. I like to think of myself as a pretty tough 30-year old woman, but even I shed a few tears and briefly contemplated going to the hospital. The silver lining to this story is that I managed not to get a single drop of spurting blood on the boot.

Finished tabs and removed the pins after letting the Shoe Goo dry overnight. I just have to add the soles but I bought what I thought were 1/2" cork boards and it turns out they were like 1/16" cork roll wrapped around a half-inch frame. :\ So my search for soles (sole-searching?) continues.

All laced up! One boot down, one to go. *sobs*
I was about halfway done with this boot when division 6 found the link to the original boots (thank you for doing that BTW, you're a superstar!). I was a little disheartened because I had spend quite a few hours working on these only to discover that the boot actually existed, but I went ahead and finished this boot because A) I still needed a pair of boots for SDCC, and B) I forgot how much fun it is to craft something from my own hands. The more I gravitate towards movie and TV costumes, the more I find myself buying things and the less I find myself actually making things, so this ended up being a very fun project (with the exception of stabbing myself with a needle). Obviously no one will mistake these for the real boots, but I'm pretty happy with how they came out, and maybe someone can take something away from this.
Jaina Solo
New Member
division 6
Master Member
I just checked my email and got a reply as well. Should be out in Sept.
Can reserve now.
Can reserve now.
MiraDarkstar
Active Member
How do we reserve?I just checked my email and got a reply as well. Should be out in Sept.
Can reserve now.
division 6
Master Member
Last edited by a moderator:
MiraDarkstar
Active Member
Thank you so much for both finding these and following up with the company.
Last edited by a moderator:
kristen jones
Master Member
I just emailed them as well, and mentioned it's use in TFA, and also that I had been directed to them from here.
If we all do this it would likely move things along.
If we all do this it would likely move things along.
division 6
Master Member
She asked how I found out about the company and shoes so I gave her the long store telling about this forum and this thread. 
division 6
Master Member
Jaina, that's a great post on modifying the boot. :thumbsup
Pretty much along the lines of what I was intending to do.
Pretty much along the lines of what I was intending to do.
DlarianFerrel
Active Member
I got an email too and told them about how we searched for months trying to find the right boot and had almost decided they didn't exist and would need to be fabricated.
I am so excited that these will be available. I plan on starting my savings now as these will be my birthday present to myself.
I am so excited that these will be available. I plan on starting my savings now as these will be my birthday present to myself.
TheLadyNerd
Well-Known Member
Fantastic!! This just made my day. I'm going to start saving up now. (And I just sent them an email as well to try to get on the reservation list.)
division 6
Master Member
I'm still there with you.
Got a message from Cecilia saying in about a month or so they will be setting up a pre-order link for the boots.
She is keeping a list of everyone who has contacted here so far.
If you plan on pre-ordering now then you should include your shipping address so shipping costs can be figured out easier.
She also said the soles will be brown not tan but that is an easy fix on our end with a few minutes of dry brushing them for a nice dirty weathered look.
kristen jones
Master Member
I have also heard back from Cecilia, and she also told me the same. VERY excited for these! 
division 6
Master Member
Has anyone found a suitable pattern for the top?
division 6
Master Member
Any thoughts on the fabric used for the head covering (shirt) ?
I haven't found anything with that texture.
I haven't found anything with that texture.
DlarianFerrel
Active Member
The Osnaburg cotton i got at walmart is pretty spot on. It does however have little dark specks throughout. But after washing it the texture is as close as i can tell from a picture.
division 6
Master Member
I looked up Osnaburg and it apparently has the specks in it.
Will it stretch enough for your face if you make a t-shirt out of it?
Will it stretch enough for your face if you make a t-shirt out of it?
Similar threads
- Replies
- 18
- Views
- 1,504
- Replies
- 9
- Views
- 753
- Replies
- 2
- Views
- 604

