dashy
New Member
INTRODUCTION:
There are many variations possible with this prop idea, I encourage you to think of how you can improve on what I’ve done, find alternatives and experiment. My aim with these designs was to keep it simple and elegant, whilst working out what I could achieve without adhesives - this was an interesting challenge but I recommend you consider adhesives and other ways of connecting pieces too.
Regarding the 2 different designs: Made an alternative to try another idea. I accidentally threw out the original design last year and lost the patterns. Re-made the paper patterns for it based on what I could remember. The reason why I've only re-made part of the original design (the part that really needs clarification) is because I chose to make do with what I had left over after making the alternative idea - I thought I had bought that plastic from a local art store but the owners don’t recall having it for sale. :unsure So I checked out a local plastic supplier, bought an offcut sheet of "2mm" (they didn’t have 1mm or 1.5mm, thought 2mm was worth a try) with the intention of re-making all of the original design but it was definitely too thick, measured closer to 2.5mm, struggled to cut it and heat-shape it. :facepalm Hopefully the design is clear with the photos I've taken for this tutorial.
Those LED berry lights are just one option, perhaps you would prefer wiring and programming your own custom LED configuration.
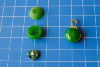
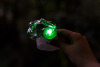
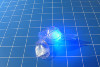
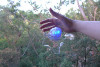
Inside there is a plastic tab between 2 lithium cell batteries (CR 1220, 3V). Pulling it out turns the LED on, this tab can be pushed back in to turn it off. The light only has one setting, it is programmed to fade on and off continuously.
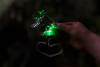
When turning on multiple lights I timed it so there would be at least 2 fully on at any time. I’ve noticed that the lights sometimes don’t maintain this timing, the fading changing slightly for a currently unknown reason.
I don’t know how long the batteries last, haven’t left one on for long enough to find out. The batteries can be pushed out and back in.
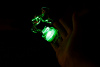
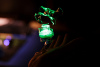
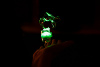
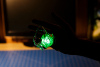
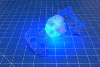
Diffusion is a key factor with lights. The further away an LED is from a translucent surface the more diffused it will be. Keep this in mind when working out your design.
The reason I’ve used those snips is because it is quick and simple/basic.The cut edges are a bit rough but do smooth out somewhat when heated. Thought it would be too time consuming (and straining on my hand) cutting that thickness with a utility knife but maybe that tool is worth mentioning. A scroll saw (with the right blade) might result in a smoother cut too. The best option is having the PETG laser cut for a very clean, precise edge.
PETG cools down quickly so you won’t have much time to shape before needing to re-heat, be careful to avoid over-bending and snapping. Extreme angles/bends are more fragile / likely to snap so keep this in mind.
MATERIALS:
EQUIPMENT:
SAFETY:
INSTRUCTIONS:
Original Design - VERSION 1
1. Adjust pattern size, length, shape, etc, to your fit and preference. Test fit / mock up with paper.
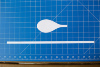
2. Transfer patterns to PETG plastic by tracing around it with a pen onto the protective film/cover that is later peeled off. To save having to trace along straight edges, simply mark the corners then join the lines with a ruler.
3. Cut out shapes with snips or your preferred equipment then peel off the covers.
4. Place the pieces on a flat table/bench, heat the edges with a heat gun to smooth them out a bit. Do both sides. Do not have a cutting mat underneath or nearby when heating as the heat will warp the mat.
5. Heat shape the piece that wraps around your hand. (I’ve numbered it ‘1’ on the pattern). Focus on making the ends merge and meet up before refining the middle area to fit closely. Bend the circles together around each other on the sides to form a cup shape holder that is open at the top. This part will be refined later when fitting the 2nd piece into it.
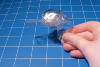
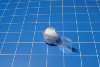
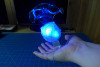
6. Sand the outside of a berry light ball to diffuse the light.
7. Cut out some tracing paper and tape it around the berry ball, this will further diffuse the light and disguise the ball.
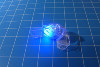
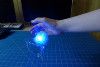
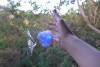
8. For the 2nd piece heat the middle then wrap it around the berry light ball, make sure the fit is very snug. The plastic does flex a bit which helps with this. Next merge the rest of the straight sections together.
9. Refine the cup shape holder until the ball section of the 2nd piece can plug / snap into it securely.
10. The holder needs to be facing towards the tips of your fingers; bend the strips just below it down 90° to one side then twist them around.
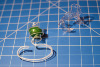
11. For the half circle areas, gently bend them back / out then warp it into a wavy shape.

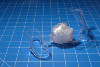
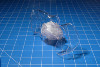
Editing this post years later after realising how confusing these photos are, hopefully this additional info helps clarify:
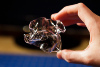
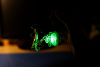
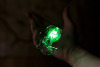
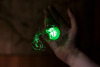
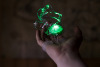
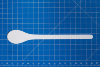
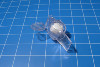
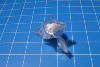
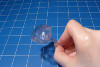
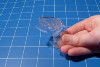
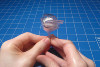
Below I quickly recreated only a section of the design (central LED section) with a small amount of left over plastic so I could show more photos of it. So imagine the patterns without the half circles (top pattern) and middle hand-wrap section (bottom pattern). Those two small circle ends merge together to create a 'pouch' for the LED and it's 'wrap'. The LED is wrapped up in the middle strip section of the top pattern.


________________________________________________________________________
Design alternative - VERSION 2
1. Adjust pattern size, length, shape, etc, to your fit and preference. Test fit / mock up with paper.
2. Transfer patterns to PETG plastic by tracing around it with a pen onto the protective film/cover that is later peeled off. To save having to trace along straight edges, simply mark the corners then join the lines with a ruler.
3. Cut out shapes with snips or your preferred equipment then peel off the covers.
4. Place the pieces on a flat table/bench, heat the edges with a heat gun to smooth them out a bit. Do both sides. Do not have a cutting mat underneath or nearby when heating as the heat will warp the mat.
5. Heat shape the piece that wraps around your hand (‘1’). Focus on making the ends merge and meet up before refining the middle area to fit closely.
6. Sand the outside of 4 berry light balls to diffuse the light.
7. Remove the electronics from the balls.
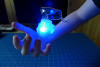
8. Tape the balls together firmly with 3 on the bottom, one sitting on top in the centre (pyramid shape). It is important that the balls don’t shift apart.
9. Sand the 2 strip pieces (‘2’) on one side to diffuse the plastic. I forgot to do this until after step 10 which made it more difficult, I ended up leaving it looking patchy.
10. Heat shape wrap the 2 strip pieces (‘2’) around the balls. Allow an opening that is large enough (when flexed) to pull out the balls later (the tape comes off easily).
11. The ends of the piece ‘1’ merge into this wrapped up mass, weaving through / underlapping + overlapping strips, make sure it is wrapped tightly / securely.
12. The straight part / end of piece ‘3’ also merges in the same way as the previous step.
13. Warp the rest of piece ‘3’ into a wavy shape.
14. (Optional) Cut up some strips of tracing paper and try either taping it onto the balls, into the wrapped mass or shoving them in before or after the balls are in place.


There are many variations possible with this prop idea, I encourage you to think of how you can improve on what I’ve done, find alternatives and experiment. My aim with these designs was to keep it simple and elegant, whilst working out what I could achieve without adhesives - this was an interesting challenge but I recommend you consider adhesives and other ways of connecting pieces too.
Regarding the 2 different designs: Made an alternative to try another idea. I accidentally threw out the original design last year and lost the patterns. Re-made the paper patterns for it based on what I could remember. The reason why I've only re-made part of the original design (the part that really needs clarification) is because I chose to make do with what I had left over after making the alternative idea - I thought I had bought that plastic from a local art store but the owners don’t recall having it for sale. :unsure So I checked out a local plastic supplier, bought an offcut sheet of "2mm" (they didn’t have 1mm or 1.5mm, thought 2mm was worth a try) with the intention of re-making all of the original design but it was definitely too thick, measured closer to 2.5mm, struggled to cut it and heat-shape it. :facepalm Hopefully the design is clear with the photos I've taken for this tutorial.
Those LED berry lights are just one option, perhaps you would prefer wiring and programming your own custom LED configuration.
Inside there is a plastic tab between 2 lithium cell batteries (CR 1220, 3V). Pulling it out turns the LED on, this tab can be pushed back in to turn it off. The light only has one setting, it is programmed to fade on and off continuously.
When turning on multiple lights I timed it so there would be at least 2 fully on at any time. I’ve noticed that the lights sometimes don’t maintain this timing, the fading changing slightly for a currently unknown reason.
I don’t know how long the batteries last, haven’t left one on for long enough to find out. The batteries can be pushed out and back in.
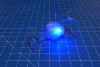
Diffusion is a key factor with lights. The further away an LED is from a translucent surface the more diffused it will be. Keep this in mind when working out your design.
The reason I’ve used those snips is because it is quick and simple/basic.The cut edges are a bit rough but do smooth out somewhat when heated. Thought it would be too time consuming (and straining on my hand) cutting that thickness with a utility knife but maybe that tool is worth mentioning. A scroll saw (with the right blade) might result in a smoother cut too. The best option is having the PETG laser cut for a very clean, precise edge.
PETG cools down quickly so you won’t have much time to shape before needing to re-heat, be careful to avoid over-bending and snapping. Extreme angles/bends are more fragile / likely to snap so keep this in mind.
MATERIALS:
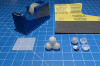
- PETG thermoplastic; the sheets I used were about 1.5mm thick
- Durable paper / card
- LED Berry lights, blue colour
- Sticky tape / Sellotape
- Tracing paper
EQUIPMENT:
- Curved ‘Aviation’ Offset Snips
- Heat gun
- Sandpaper, grit depends on whether you want a smooth or rough surface
- Utility knife and/or scissors (for paper / card)
- Ruler
- Pen
- Heat-resistant gloves
SAFETY:
- Read the MSDS relating to PETG. What I concluded from it: At the very least heat thermoplastic in a well-ventilated area. I currently don’t think a respirator is necessary for this particular project due to its size but if you are concerned at all then it would be a good idea to contact the plastic manufacturer and/or a company which makes respiratory protection gear, such as 3m.
- Do not over-heat PETG. The technical data sheet for the brand of PETG I used mentions the ‘Degradation Temperature’. Heating the plastic at / beyond this temperature will degrade the plastic and release even more toxic fumes. The temp listed is 250 ºC (482 ºF). I set my heat gun to 200 ºC (392 ºF), this was more than sufficient for shaping.
- Avoid heating the electronics and batteries, this can cause damage and is a fire hazard.
- Wear heat-resistant gloves to protect your hands whilst handling the heated plastic to avoid burns.
- When cutting keep your fingers a safe distance away from the blades, make sure everything is secure and in control, don’t rush it (I know this is obvious / common sense but I need to include it anyway).
INSTRUCTIONS:
Original Design - VERSION 1
1. Adjust pattern size, length, shape, etc, to your fit and preference. Test fit / mock up with paper.
2. Transfer patterns to PETG plastic by tracing around it with a pen onto the protective film/cover that is later peeled off. To save having to trace along straight edges, simply mark the corners then join the lines with a ruler.
3. Cut out shapes with snips or your preferred equipment then peel off the covers.
4. Place the pieces on a flat table/bench, heat the edges with a heat gun to smooth them out a bit. Do both sides. Do not have a cutting mat underneath or nearby when heating as the heat will warp the mat.
5. Heat shape the piece that wraps around your hand. (I’ve numbered it ‘1’ on the pattern). Focus on making the ends merge and meet up before refining the middle area to fit closely. Bend the circles together around each other on the sides to form a cup shape holder that is open at the top. This part will be refined later when fitting the 2nd piece into it.
6. Sand the outside of a berry light ball to diffuse the light.
7. Cut out some tracing paper and tape it around the berry ball, this will further diffuse the light and disguise the ball.
8. For the 2nd piece heat the middle then wrap it around the berry light ball, make sure the fit is very snug. The plastic does flex a bit which helps with this. Next merge the rest of the straight sections together.
9. Refine the cup shape holder until the ball section of the 2nd piece can plug / snap into it securely.
10. The holder needs to be facing towards the tips of your fingers; bend the strips just below it down 90° to one side then twist them around.
11. For the half circle areas, gently bend them back / out then warp it into a wavy shape.
Editing this post years later after realising how confusing these photos are, hopefully this additional info helps clarify:
Below I quickly recreated only a section of the design (central LED section) with a small amount of left over plastic so I could show more photos of it. So imagine the patterns without the half circles (top pattern) and middle hand-wrap section (bottom pattern). Those two small circle ends merge together to create a 'pouch' for the LED and it's 'wrap'. The LED is wrapped up in the middle strip section of the top pattern.
________________________________________________________________________
Design alternative - VERSION 2
1. Adjust pattern size, length, shape, etc, to your fit and preference. Test fit / mock up with paper.
2. Transfer patterns to PETG plastic by tracing around it with a pen onto the protective film/cover that is later peeled off. To save having to trace along straight edges, simply mark the corners then join the lines with a ruler.
3. Cut out shapes with snips or your preferred equipment then peel off the covers.
4. Place the pieces on a flat table/bench, heat the edges with a heat gun to smooth them out a bit. Do both sides. Do not have a cutting mat underneath or nearby when heating as the heat will warp the mat.
5. Heat shape the piece that wraps around your hand (‘1’). Focus on making the ends merge and meet up before refining the middle area to fit closely.
6. Sand the outside of 4 berry light balls to diffuse the light.
7. Remove the electronics from the balls.
8. Tape the balls together firmly with 3 on the bottom, one sitting on top in the centre (pyramid shape). It is important that the balls don’t shift apart.
9. Sand the 2 strip pieces (‘2’) on one side to diffuse the plastic. I forgot to do this until after step 10 which made it more difficult, I ended up leaving it looking patchy.
10. Heat shape wrap the 2 strip pieces (‘2’) around the balls. Allow an opening that is large enough (when flexed) to pull out the balls later (the tape comes off easily).
11. The ends of the piece ‘1’ merge into this wrapped up mass, weaving through / underlapping + overlapping strips, make sure it is wrapped tightly / securely.
12. The straight part / end of piece ‘3’ also merges in the same way as the previous step.
13. Warp the rest of piece ‘3’ into a wavy shape.
14. (Optional) Cut up some strips of tracing paper and try either taping it onto the balls, into the wrapped mass or shoving them in before or after the balls are in place.
Attachments
-
 16210178237_166fdb20ca_n.jpg31.8 KB · Views: 9,445
 -
 16396080365_2c33021938_n.jpg31.2 KB · Views: 9,198
 -
 15773616904_7e36ca7806_n.jpg30.4 KB · Views: 9,120
 -
 16208680210_f3509b045a_n.jpg30.2 KB · Views: 8,970
 -
 16209847269_e8b4c501e3_n.jpg30.6 KB · Views: 8,990
 -
 16209855139_993ced6f9e_n.jpg35.8 KB · Views: 8,958
 -
 16394336751_9abb29335b_n.jpg29.5 KB · Views: 8,892
 -
 16396070775_912ed30779_n.jpg32.3 KB · Views: 8,894
 -
 15773602854_473dfb437a_n.jpg33 KB · Views: 8,824
 -
 16370105446_6a2b545c16_n.jpg31.7 KB · Views: 8,861
 -
 16209845139_179d0b14db_n.jpg39.1 KB · Views: 8,723
 -
 16396075385_35cd771aaf_n.jpg37.4 KB · Views: 8,689
 -
 15773622314_535cd255e5_n.jpg39.5 KB · Views: 8,595
 -
 16394340011_2eb4dfc021_n.jpg37.8 KB · Views: 8,473
 -
 16370109176_63ecf16652_n.jpg36.1 KB · Views: 8,396
 -
 16395165922_e2897b3073_n.jpg33.1 KB · Views: 8,340
 -
 16396090295_b1be9d8ebf_n.jpg38.1 KB · Views: 8,355
 -
 15773630744_1faf58d69d_n.jpg24.1 KB · Views: 8,226
 -
 16394348051_58a9175d3e_n.jpg25.6 KB · Views: 8,307
 -
 16208459508_66716d02a4_n.jpg25.2 KB · Views: 8,327
 -
 16394348911_dbb0f84cd2_n.jpg22.4 KB · Views: 8,159
 -
 16209863529_9f85c7166e_n.jpg18.9 KB · Views: 8,259
 -
 15773635214_51e726f898_n.jpg31.8 KB · Views: 8,282
 -
 16208466578_97991f6b07_n.jpg33.9 KB · Views: 8,487
Last edited: