MK38 Igor build (04/29> Painting and detailing)

Re: MK38 Igor build (04/09> LCD Display installed)

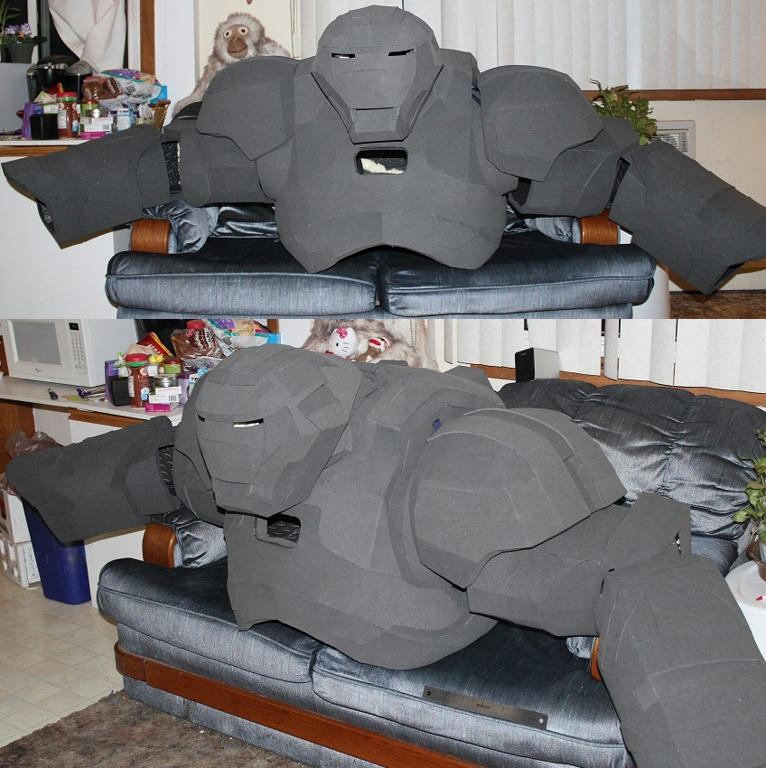
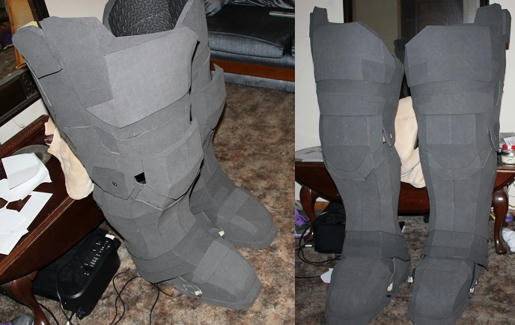
So, I've been working on the boot straps and the webbing/buckle system for a partial suit-up (hopefully tomorrow). I guess I kind of want to make sure the main body is working well with the legs and boots, get all of the harnessing/strapping set up properly, and then I'll tackle the trimming of the biceps and attachment of shoulder bells. In a perfect world, that's all getting done tomorrow. :lol

In the meantime, thought I'd share something that I'd never used before: MAGNETIC JOINTS. I usually use chicago screws on my knee and elbow joints, namely because they're tough, easy to finish out, and they work well. The downside is that they require a screwdriver (and a minute) to remove, so for the most part you are stuck with these components attached unless you want to put the work in to disassemble. With Igor, the wearer's hands won't be reaching much past the elbow joint, so with chicago screws the entire arm would have to be removed if you wanted to use your hands for something. Combine that with a bicep that is often buckled to the upper torso, and the entire process can be a hassle.

Fast forward to last week, I had picked up some Dritz brand magnetic snaps for another project. They come in packs of two for about $3, and include both sides of the 'snap' along with backing plates. These little guys were originally made for fabric, and each side has mounting prongs that get pushed through material and bent over:


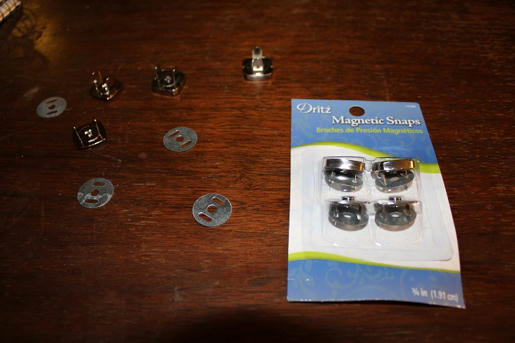
When I tore open the first package, I immediately noticed two things: First, when stuck together, the two sides spin against each other with practically no friction. Second, while there is only a single magnet on one side of each snap set, it is EXTREMELY STRONG. I'm not sure it's neodynum, but it was an effort to pull the two sides apart with my fingers. After some experiments, I elected to use these as my knee and elbow joint hardware:


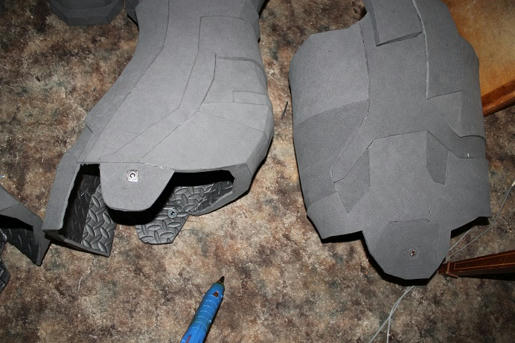
I precut the prong holes in the foam, installed them with the metal backing plates, and set the prongs with a pliers and hammer. These things work AWESOME. The chromed finish at the connecting point makes them swivel even easier than my chicago screw-washer assemblies, and it would be nearly impossible to get those joints to pop loose unless you want them too. Separating the joints is as easy as sliding your hand up between the joint pieces and popping it apart. The prong-fasteners also sit below the surface of the foam on the exposed areas, so there will be no issue in gluing the foam detail caps flush over them. Overall, I'm very happy with them, and I don't have to worry about losing half of a chicago screw anymore. :wacko


If somebody wants to try those snaps, you can find them at Walmart of all places. I'll post suit-up pics tomorrow (well actually today) when I get the strapping finished up. Thanks for looking! :thumbsup
 
Re: MK38 Igor build (04/09> LCD Display installed)

Those magnetic snaps are genius!

Thanks! I just wish I would have discovered them a couple of years ago....:lol

Busy day so far...I kicked off this morning borrowing my neighbor to test the boots and leg joints with the cod assembly. First off, the boots are held on using Velcro-brand Velstraps:


I also borrowed my neighbor to test fit the lower pieces together. The magnets work great, very happy with the convenience. The cod is riding high in the attached pics, namely because the webbing suspenders haven't been adjusted down yet, and my neighbor is a couple of inches too tall :). And yes, the helmet is being worn, but it is crazy bobble-head looking :lol


Next up, the upper half. Each shoulder bell is held on with more webbing and parachute connectors, two per side. The guides for the webbing were burnt into the torso with a soldering iron:

0413 shoulder bell attachments.jpg

With the bells attached, I took a couple of pics of the entire upper torso, neck and helmet together. The helmet is just set on here, tonight it will get mounted on its pivot-points properly. To recap, the upper torso rests on the wearer's shoulders an padded PVC rails, while the lower torso and cod is held up with adjustable webbing suspenders:

0413 upper torso and bell test.jpg

I also started getting final electronics tests and fitting done. The majority of the electrical hardware gets permanently installed after sealing and painting, just to prevent any overspray mishaps and such that could ruin the camera, LED covers, etc.... Final fitted and tested the cooling fans:


I also final tested the reactor and helmet LEDs, and everything looks good. The helmet LEDs only shine forward (much like regular helmet LEDS), so the inside of the suit can stay as dark as possible. After finish painting, the helmet LEDs will get glued into the helmet, and the arc reactor gets installed behind a trim bezel in the chest. The diffusing covers are .030" Styrene cut and shaped to fit:

0413 LED tests.jpg

....And a last test of the LCD screen with the helmet in place. Sorry for the garbage picture, but it was a hassle to reach into the section from below and get a shot from about where your head goes. It's pretty cool-looking when you're wearing the torso, you feel like you're sitting in a movie theater :lol


(the multiple picture formats is my fault; apparently mediafire doesn't want to upload half my stuff today)


Still a lot of stuff on today's to-do list, so I'm getting back to it. Thanks for checking out the progress :thumbsup
 

Attachments

  • 0413 final fan mounts.jpg
    0413 final fan mounts.jpg
    152.6 KB · Views: 203
  • 0413 monitor test.jpg
    0413 monitor test.jpg
    79.5 KB · Views: 175
Re: MK38 Igor build (04/13> partial suit-up)

I Can NOT Wait for this to be finished and painted and detailed! OMG its already amazing I cant imagine what itll finish as :O
Tony Stark eat your heart out.....
 
Re: MK38 Igor build (04/13> partial suit-up)

I Can NOT Wait for this to be finished and painted and detailed! OMG its already amazing I cant imagine what itll finish as :O
Tony Stark eat your heart out.....

I might be exaggerated but. . .this is the IRONMAN COSTUME BUILD OF THE YEAR

Thanks a ton guys.... But there are A LOT of pretty amazing builds out there right now.Hopefully it's only getting better as we near the finish line. :thumbsup

I keep forgetting how this suit is really going to look, because it's always in several pieces spread around the house. The chest no longer fits through my bedroom door :lol, and I just discovered through my templates that this dude's got Popeye arms. Sealing and paint will be coming up pretty quickly as well, I've only got a couple of more days of work on the forearms, hands and spine, then it's all detailing and cleanup. I've gotta talk to Mark, but I'm also thinking Igor would really pop with a weathered finish after the initial paint. Nothing crazy like damage, just a nice wash that'll highlight all of the panel lines and bring out a lot of the 2-3mm details that get lost sometimes.

Not quite as heavy (or 'air-brushy') as the Sideshow Igor, but kind of like this:

hottoys3.jpg
 
Re: MK38 Igor build (04/13> partial suit-up)

Finished up the forearms and installed elbow joints this evening. I've got the rest of the week off, so I'm hoping to get everything detailed and paint-ready pretty quick. Tomorrow's project: finishing up the mechanical 'gloves' and locating the hand-controls for the arm extensions.

Igor's arm-span is about 7 feet right now from wrist-to-wrist... Monkey-arms is probably going to be 8 feet at the finger-tips... That should be pretty awesome with articulated fingers :thumbsup


Yep, the biceps and bells are just set in place, otherwise the strapping is hidden.Thanks for look'n :cheers
 
Re: MK38 Igor build (04/13> partial suit-up)

That is absolutely massive! It looks great, and I can't wait to see it all together. Keep up the good work.
 
Re: MK38 Igor build (04/13> partial suit-up)

This build is SICK. Nice work Laellee. I have to wonder, where is the camera positioned on the suit? I had a thought that the camera would be on the forehead or "facial slit" and the eyes used to illuminate the area for you to see in the dark
 
Re: MK38 Igor build (04/13> partial suit-up)

Monkey-arms is probably going to be 8 feet at the finger-tips... :cheers

8 feet? Wow. . .I will look forward on that part. I can't imagine it at the moment :lol

And also. .when I read that "Monkey-Arms". . .I thought you are mentioning about that stuffed monkey on the background :lol keep it up man
 
Re: MK38 Igor build (04/13> partial suit-up)

Thanks guys! Yeah I've got a hell of a lot of monkeys around here for some reason. It's borderline creepy :lol


This build is SICK. Nice work Laellee. I have to wonder, where is the camera positioned on the suit? I had a thought that the camera would be on the forehead or "facial slit" and the eyes used to illuminate the area for you to see in the dark

I held off on the camera location until I had the final proportions more established... The final mount should be right between the neck wrap and the Arc opening. This definitely wasn't an overnight decision, I have a method to the madness:

1) I considered the mouth opening, but scrapped it for a couple of reasons. First, the helmet and neck assembly are completely removable, held on a flange by magnets, and I didn't want there to be any cable connections (such as the camera) between this piece and the torso to need unplugging. The helmet has its own power supply as well, so there is no wiring between the components either.
The helmet itself moves, so a camera mounted there could also be moving around a lot. II opted for a more stable view in the chest, and the 170 degree lens still gives good peripheral vision.
2) The chest mounting location puts it at just about 6 feet, the same as the wearer's natural height, so it'll be a familiar perspective. The camera will also be unnoticeable in this location, mounted flush with the chest panel, and easily adjusted.
3) For seeing in darkness, the camera itself is a low-lux model, and does really well on its own. It also has auto image adjustment for low light conditions, and also has its own built-in illumination if needed.

Final mounting on the camera won't likely happen until after sealing, but this is the plan so far. :thumbsup
 
Re: MK38 Igor build (04/13> partial suit-up)

You build this thing so fast.. Does the final details will be done in free hand?
 
Re: MK38 Igor build (04/13> partial suit-up)

Quick update...

I've been grinding away on the glove extensions, doing a bit of re-engineering to so that they will function well. Quick summary below:

The fingers themselves (made twice now :facepalm) are 6mm foam, each individually boxed for strength, and then hinged with sealed 3mm foam hinging. As you can see in the pictures below, each individual finger is four sections, including the extra segment that serves as a mounting base. I installed a length of elastic cording in the top half of each finger (above the hinge), and fastened it other tension before installing my hinging (black cordage in the upper left pic below). After the hinging and lower foam boxing was installed in each finger, this elastic keeps the fingers pulled straight when at rest, so the hand when not used remains an open palm (lower right pic is a flexed finger section to see where the hinging is located). Next up, I drilled out holes for the control lines in each finger section (70-some holes), made attachment points in each finger tip, and then threaded my control lines through the lengths. The control lines are made from 75-lb test paracord material, just to be sure that they aren't going to fail, and will eventually run back to the control handles in the extensions. Simple system: Pull a cord, bend a finger. Pull them all, make a fist.


The palm assemblies are being freehanded out of 6mm foam, and the gloves themselves will be filled out with expanding foam to keep them from flexing when the fingers are articulated. I've got the first application of expanding foam sprayed into the palm backs now, hopefully I can get away with one more application to fill after the repulsors are mounted.Needless to say, these get a lot of clean up and detailing before sealing and painting, but you get the idea of their function and size:


Paint's showing up on Tuesday as well... Very excited to do a color test and get going on that as well. Thanks for looking!
 
Re: MK38 Igor build (04/13> partial suit-up)

Thanks guys, anything is better than those static 'Hot-Toys' style hands that get stuck on oversized suits. I'll just be a lot happier when these are finished, those control lines are extremely strong, but they make the pulls look like garbage when they are exposed. That will be remedied shortly :thumbsup
 
Re: MK38 Igor build (04/13> partial suit-up)

I finally got the wrapping to fit around the gloves properly, and installed the control rods. The inner hand supports are 1/2" PVC (as is the upper assembly), reinforced with both EVA and expanded foam applications. For now, paint caps are set into the repulsor openings, the repulsors themselves will go in once the hands are sealed and painted. I'm thinking that I may also add the 'scallops' that go around repulsors to the palm, so they look a bit more like the traditional IM glove, but I don't want to overdo it; it's pretty obvious in the reference pics that Igor's hands are their own style, and not just giant IM gloves.


I've also been working on the main spine. The Igor game model's spine design sucked, so I've just been freehanding using reference pics. The spine itself has a silver core section, and then blue vertebrate plates that fit over this core. There are also a series of bolts that protrude from each side of these plates and attach to Igor's lower back 'muscles', which wrap around the entire back as well. Since painting something like this in one piece would be a nightmare, I've got it split into components that will be paintedand then glued all together for assembly. I'm using short lengths of PVC to work as axles for some of the moving parts, when finished all of the open ends will have caps or covers.


Beginnings of inner spine and vertebrae pieces.... 90% of the inner spine will not be visible, but whatever:


Moving along, test fitting and adding pieces to the outer plates...


Spine and plates held in place on the back for a test fit. I had to wait for this before the rest of the back 'muscles' could be located and added. For the keen-eyed, in this pic the lower torso is upside-down, it's easier to work on it that way. The whole dealio is flaring a lot (and horribly misaligned) because it's not fastened yet.


Hope everyone had a good Easter, I think I'm ready for a beer. Thanks for looking.
 
Re: MK38 Igor build (04/13> partial suit-up)

i don't know if you mentioned this earlier but. . .how the hell will you seal that suit? :confused i mean, its gigantic. . .if you'll gonna use PVA glue for example. . .damn you'll need alot of those. .if you'll use plastidip. . .you'll need to dig deep inside your pocket. . .

ohh and great progress there man. . .spine details looks killer :thumbsup
 
This thread is more than 5 years old.

Your message may be considered spam for the following reasons:

  1. This thread hasn't been active in some time. A new post in this thread might not contribute constructively to this discussion after so long.
If you wish to reply despite these issues, check the box below before replying.
Be aware that malicious compliance may result in more severe penalties.
Back
Top