NefeniCosplay
New Member
Hi everyone! My name is June and I've always loved the Elder Scrolls series! When Skyrim came out, I spent many sleepless nights wandering in dungeons and exploring vast cities. Needless to say, it's a game that's close to my heart and when I was able to craft the Glass Armor in the game, I fell in love with the set. After attending a few conventions and seeing all the talent cosplayers had in creating beautiful armor sets, I decided to make my very own Glass Armor set!
I started with the reference picture by the amazing Ray Lederer:

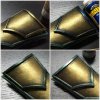
And began to pattern all my armor pieces in photoshop. I printed out numerous versions of my drafts and did test fittings with paper. I went back into photoshop multiple times to re-scale it for a better fit and redo some curves for a more aesthetically pleasing look.Here is an example of the bracer I did with 4 different layers:

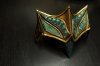
Then I used worbla and craft foam to sculpt the bracer. I used the sandwich method for the bracer and double-layer worbla strips for the details. Here is the final result before priming and painting:


I the repeated this process for my leg armor. On the detail of the upper leg armor, I cut out a v-shaped design out of craft foam and covered it with worbla. Then I carefully placed each one on starting from the top.


Then I moved on to the breastplate (which was pretty difficult to figure out the cups!) I picked up a 6-inch acrylic globe used for lighting from home depot and heated up a double layer of worbla and draped it over the acrylic globe. After it cooled, I attached it to my base and used a bra to shape the top. After the base was done, all I had left was to add a bunch of details! The cutouts were made by taking a panel of double layer of worbla and cutting away the triangle shapes to make grooves / etches. The same technique was used for the details on the breastplate cups.


Then I moved on to fastenings and did a trial & errors on how I wanted the glass part to look like. I primed everything with 4 to 5 layers of Gorilla wood glue. I used green iridescent paint over a dark blue/green/gold acrylic paint base and added acrylic gel medium to get the shiny/glossy glass look.


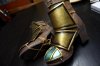
Here are some of the completed pieces after the painting process:


It's been an amazing journey so far! I still have the hip armor, helmet and weapon/prop to finish but I've had a bunch of help & support throughout and I would like to share my experiences with you too! You can follow more updates on my fb page. Happy crafting!")
-June (Nefeni Cosplay)
I started with the reference picture by the amazing Ray Lederer:
And began to pattern all my armor pieces in photoshop. I printed out numerous versions of my drafts and did test fittings with paper. I went back into photoshop multiple times to re-scale it for a better fit and redo some curves for a more aesthetically pleasing look.Here is an example of the bracer I did with 4 different layers:
Then I used worbla and craft foam to sculpt the bracer. I used the sandwich method for the bracer and double-layer worbla strips for the details. Here is the final result before priming and painting:
I the repeated this process for my leg armor. On the detail of the upper leg armor, I cut out a v-shaped design out of craft foam and covered it with worbla. Then I carefully placed each one on starting from the top.
Then I moved on to the breastplate (which was pretty difficult to figure out the cups!) I picked up a 6-inch acrylic globe used for lighting from home depot and heated up a double layer of worbla and draped it over the acrylic globe. After it cooled, I attached it to my base and used a bra to shape the top. After the base was done, all I had left was to add a bunch of details! The cutouts were made by taking a panel of double layer of worbla and cutting away the triangle shapes to make grooves / etches. The same technique was used for the details on the breastplate cups.
Then I moved on to fastenings and did a trial & errors on how I wanted the glass part to look like. I primed everything with 4 to 5 layers of Gorilla wood glue. I used green iridescent paint over a dark blue/green/gold acrylic paint base and added acrylic gel medium to get the shiny/glossy glass look.
Here are some of the completed pieces after the painting process:
It's been an amazing journey so far! I still have the hip armor, helmet and weapon/prop to finish but I've had a bunch of help & support throughout and I would like to share my experiences with you too! You can follow more updates on my fb page. Happy crafting!
-June (Nefeni Cosplay)
Attachments
Last edited:
