Millennium Falcon Bunk Bed Build - TFA Details 5/8 Scale

The last several months, we have been faced with the very real probability of losing our house. It looks like we’re in the clear and good thing, because I’m not ready to tear apart the world’s greatest Millennium Falcon bunk bed! But enough sob story… I’m back on track with an eye on the finish line. Time for a long overdue update.
With the center console body taking shape, I turned my attention to the console itself. Cutting it out? Quick and easy. Laying out the details? Complicated and time consuming. Once again, it’s not entirely screen accurate but a faithful representation.

20160603_013033_zps0yqfpnrq.jpg


I took a guess at the angles and did my worst with the ol’ jigsaw.

20160603_013112_zps2ovfsyco.jpg


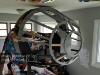
Holes, holes, holes, holes, holes… I lost track of how many. Each one will have a Christmas light shoved through with a high probability of going dead and ticking me off (again!!!). The cut out and wooden brace are for my next surprise.

20160610_170057_zps4wugmgjg.jpg


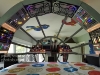
Ta-da! This 7” digital photo frame fits like a glove… of course I planned it like that. It will be the navigation screen. Eventually, I removed the rounded edges at the top so I can slide the frame in from the top, rather than press it in from the front. It's a matter of access which will come in handy later.

20160610_170151_zpsdsnicgk8.jpg


It sits so flush and satisfies my OCD. I took about a dozen more pictures but I’ll spare you.

20160610_170214_zpsk3rmdw0y.jpg


Several days (or weeks was it?) later, I wrapped the console in vinyl and punched the holes for the lights. The digital photo frame shows through the vinyl well.

20160619_065457_zpsvvpfhmyk.jpg


Here it is mounted (temporarily) to the body. You can see why I needed access to the photo frame from the top, rather than the front. If I ever have to change it out or access the memory card, I can remove it easily.

20160707_210618_zpsa4oobug0.jpg


Oh that body! It was unsightly to say the least. I didn’t take into consideration the compound angles when cutting it out so every joint needed a copious amount of filler. It probably would have been faster for me to dip it in a 50 gal drum of wood putty or straight up carve it out of solid oak.

20160919_213016_zpsmtbuttzc.jpg


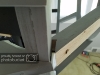
Just to be clear, those chunks missing from the side and middle bracket are intentional! I had to make some relief cut outs for the photo frame and lights.

20160919_212950_zpscvz23nlq.jpg


I’m further along now and promise more frequent updates. When the updates catch up with the build, then I’ll be in serious trouble! So give me a swift kick… and I’ll keep building!
 
Next feature on the control panel to tackle: throttle housing. Trying to scale everything down to around 5/8 has been a challenge. I’m ok with the results but I feel like the controls are a little cramped. My hands are just slightly bigger than a child though so maybe I'm over thinking it. I started by making a cardboard template. I even remembered to account for compound angles!

20160929_003916_zpsp0oialyk.jpg

Cut additional material off the sides to account for wood thickness. Drilled holes for hardware and, once again, label label label everything! The angles and slots were a bear to cut out with my limited range of patience... er... tools. "The vinyl will cover it." - me trying to justify my shoddy workmanship.

20160929_003945_zpsjoauwrnj.jpg


I don’t have a decent picture of the hardware but it’s simple enough: threaded rod, nuts, o-rings. This allowed me to tighten down on the individual throttles and adjust the resistance. That part worked out well. The angled ends of the slots were another story. I’ll spare you the details but basically I’m just glad to have fingers still. "The vinyl will cover it." - me trying to justify my shoddy workmanship.

20161001_071934_zpscmmskpa9.jpg


It was a absolute mess trying to adhere the vinyl and honestly, it looks WORSE in person. The vinyl pulled away from the slots and I had a sticky mess on my hands (literally). But it’s done. After this picture I took it to my paint booth (garbage can in driveway) and gave it a nice, thick coat of black. "The paint will cover it." - me trying to justify my shoddy workmanship.

20161002_042148_zpstcill5me.jpg


On a more positive note, the console is looking good! I did not have the material (or patience) to cover this beast in vinyl. I sanded, re-sanded, and sanded again but you can still see the wood grain. At least the top is smooth as glass!

20161002_042616_zps3z09l4qk.jpg


20161002_123230_zpsot90v4no.jpg


Next stop, guts and details… some of my favorite things! I’ll keep building!
 
Here’s a Gollum-worthy riddle for you: I consumed one bird, while being consumed by another.

Happy Thanksgiving! My weekend consisted mainly of a turkey and a falcon. I was ready to wire it up! I mentioned in a previous post that I spliced a dimmer switch into an extension cord so the LED lights won’t turn my children’s retinas into ash. The digital photo frame and rope light needed full power though. I’m no master electrician but I have been shocked several times. Unfortunately, the only superhero power I was granted was overconfidence.

The plan was to have one light switch to power the whole thing. From left to right; light switch, full power outlets, dimmer switch, dimmer outlets. It worked beautifully with one exception. I had the bright idea to use a light switch with a built-in night light. This allowed some electricity to trickle past (even when switched off) into my dimmer and consequently, the lights! I swapped it for a cheapie and it works like a charm.

20161004_213140_zpsffwms8tj.jpg


Standing proudly with face plates and mounting board attached.

20161005_214410_zpsxk4fm7hq.jpg


Installed on the inside of the console. If you look closely, you can see the different light switch. I did not install the dimmer knob because I don't want the children changing the setting.

20161006_074832_zpsmqazl8lf.jpg


I spent several evenings installing the Christmas lights into the console panels. I can tell you without hesitation that this task is the most tedious, time-consuming, and frustrating. I have thought of several methods to improve this portion but most are cost prohibitive and child labor laws are tough to get around. The results are beautiful though and worth the effort. Also, pinstripes!!!

20161002_132029_zpsmhxhmlpg.jpg


It’s amazing how much those little details make the console pop. As I mentioned, I had some trouble with the vinyl separating from the throttle housing. I will have to touch it up at a later date.

20161003_213933_zpsvnz9gvej.jpg


I’ll leave you with another beauty shot.

20161002_132044_zpsxyf1uska.jpg


It’s so close!!! I’ll keep building!
 
Glad to hear you managed to stave off the wolf. That bunkbed is amazing, best of luck with your housing (and bed)!

Thanks FF! They'll never take me alive!

AWESOME!!


Jim - TK50899

Thank you, Jim. It's finally coming together!

It's... So... Pretty...!:cry

:D I must admit I spent too long just staring at it. Thank you!

Wooo Hooo
Awesome work!

Thanks for the encouragement! I'll keep it up!

We have life! :)

Indeed! Thank you, SK. You're an inspiration and set THE standard for large scale prop builds!!!
 
While trolling the clearance aisle at Walmart, I happened across this utility runner. It is flexible with a diamond pattern and absolutely cried out to be part of something amazing. I used it on the floor and as an added bonus, it hides some of my many mistakes!

20161002_065933_zpsb98zylfc.jpg


I couldn’t wait any longer before putting the console in the falcon. I will probably regret it when I’m trying to put on the finishing touches but I needed to free up some real estate in the living room. The excitement was PALPABLE as is evidenced by my son’s face. You can see the runner pouring over the edges of the floor. I cut it oversized and plan to trim it down after skinning the outside.

20161006_081650_zpsbcfxf4kz.jpg


Installed, with everything plugged in and zip tied in place. I still have to install several pieces on the console; buttons, rockers, nav screen bellows, etc. The yokes are noticeably absent but rest assured, I plan to include them. This isn’t the ANH falcon!

20161006_083955_zpsidnpckdm.jpg


NOW, for the real excitement… to flip the switch and watch my children’s faces beam.

20161006_084651_zpsbbqkehvt.jpg


20161006_084709_zpsirsgcx7c.jpg


Not designed for three, but they made it work!

20161006_084831_zps94ucirja.jpg


20161006_085100_zpsveyetomy.jpg


What a joy to see them jump to light speed! She’s still a long way from finished and I have very few ideas how I'm going to make the yokes. Whatever I decide, it will have to mount to the top of the console to keep as much leg room as possible. We’ve got a busy weekend with family coming up but I’ll find some time and as usual, keep building!
 
FANTASTIC!!! The smiles tells the whole story! :)

I might be able to help you with those yokes!

Thanks SK! I have several pieces of pipe I bent but haven't posted any pics of that mess... yet. I tried different diameters, thicknesses, materials, etc but couldn't get the 90 degree bend without them kinking. I've put the yokes on the back burner for now but I'll definitely hit you up when the time comes! You've been an inspiration!
 
Thanks SK! I have several pieces of pipe I bent but haven't posted any pics of that mess... yet. I tried different diameters, thicknesses, materials, etc but couldn't get the 90 degree bend without them kinking. I've put the yokes on the back burner for now but I'll definitely hit you up when the time comes! You've been an inspiration!

I have a few 3D printed yokes that you can use if need be. Shoot me a PM! :)
 
I did (unsurprisingly) little this weekend. It’s a busy time of the year! I installed the front window ring and struts. At some point between cutting out the struts and installing them, I had the brilliant idea to shave down the leading edge to accommodate the ¼” skin. That would have worked beautifully had I not cut down the trailing edge. :facepalm

20161006_150559_zpsm59qiikt.jpg


I also tend to forget that this is real life and not a blueprint scribbled on a napkin. The struts should have been cut individually to account for warping and abnormalities (screw ups I’ve made). I cut them all relatively the same and ended up with this…

20161006_142006_zps87pwavrq.jpg


At the end of the day though, she’s closer to being finished. We’re on the home stretch!

20161006_142625_zpscspa8n9y.jpg


Here’s a quick video of the interior. During the pan, the lights seem to fade in. That’s just an optical illusion because they’re unidirectional. Check out that gorgeous screen!


Attachments

  • 20161006_150559_zpsm59qiikt.jpg
    20161006_150559_zpsm59qiikt.jpg
    489.6 KB · Views: 35
  • 20161006_150559_zpsm59qiikt.jpg
    20161006_150559_zpsm59qiikt.jpg
    489.6 KB · Views: 45
  • 20161006_142006_zps87pwavrq.jpg
    20161006_142006_zps87pwavrq.jpg
    315.3 KB · Views: 45
  • 20161006_142006_zps87pwavrq.jpg
    20161006_142006_zps87pwavrq.jpg
    315.3 KB · Views: 50
  • 20161006_142006_zps87pwavrq.jpg
    20161006_142006_zps87pwavrq.jpg
    315.3 KB · Views: 47
  • 20161006_150559_zpsm59qiikt.jpg
    20161006_150559_zpsm59qiikt.jpg
    489.6 KB · Views: 42
  • 20161006_142625_zpscspa8n9y.jpg
    20161006_142625_zpscspa8n9y.jpg
    555.4 KB · Views: 45
  • 20161006_142625_zpscspa8n9y.jpg
    20161006_142625_zpscspa8n9y.jpg
    555.4 KB · Views: 46
  • 20161006_142625_zpscspa8n9y.jpg
    20161006_142625_zpscspa8n9y.jpg
    555.4 KB · Views: 39
Last edited by a moderator:
A quick note today:

After the kids go to bed, I have a two hour window to A) spend quality time with my wife or B) work on a Millennium Falcon bunk bed. Most of the time, I choose the former but I have made some progress. I enjoy the little details that go into a build like this but sometimes, I want to see something big! I had the chance to make that happen late last week during an afternoon lull.
My oldest and I used craft paper to cover the outside. We needed a template and it also gave us an idea of what it will look like. It was super exciting for us (mainly me)!

20161111_110223_zpssgukzgfc.jpg


20161111_110237_zpsimwarj0g.jpg


20161111_110447_zpsvp72mujb.jpg


The missing pinstripe on the console is driving me crazy but I'll return to the detail work later. I cut out and installed some of the exterior panels but haven't had a chance to upload the pics. I will do that first thing tomorrow and (albeit slowly) keep building!
 
This thread is more than 7 years old.

Your message may be considered spam for the following reasons:

  1. This thread hasn't been active in some time. A new post in this thread might not contribute constructively to this discussion after so long.
If you wish to reply despite these issues, check the box below before replying.
Be aware that malicious compliance may result in more severe penalties.
Back
Top