Yes! It's Yet Another Portal Gun!

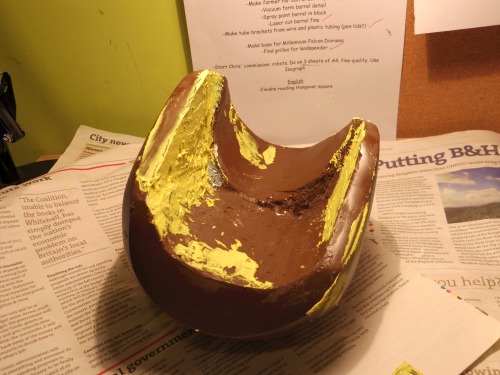
Oh and by the way, has anyone got any ideas on how to strengthen the shells so they'll be durable? At the moment they're very solid indeed (and still lightweight) but relatively brittle; I dropped the big one off my desk earlier and there's a crack/dent. Only small, but I'm worried about how well it'd hold up during a con around lots of people. I had an idea of vacuum forming it, but I'm unsure if the former we have at college will take the height of the larger shell.

Couple of layers of fiberglass maybe? (If so, might want to do that now, because you're going to have to spot-fill all over again :p)

As for sounds, this is the site who make the board that the Furin Wheatley uses (And they do a Portal gun pre-load)

Sound board for props and costumes model 1M

Nice build. I'm in the "plan-replan-rereplan-rerereplan" stage of building an interchangable personality sphere. Looking at how you're getting on with sculpting the curved surfaces for the gun is helping me decide the best way of doing my build. (I bought a NECA portal gun :p)


Oh wow! Sweet-as! I hadn't realised they did a portal gun one :eek
I am in your debt, even though others did direct me to them before

I've actually got a decent idea sorted out, the vaccum former we have at college will fit the shells, so I'm going to vac-form them with either HIPs or PVC, then sand and smooth and paint.
I'm looking forward to your core build for certain, and I know how much planning takes :wacko I spent maybe a month or two on main planning?
 
Last edited:
I remember doing the shells on mine were the biggest pain in the.... well , you know. I keep wanting to redo my shells to be more accurate. keep up the hard work man and good luck with the rest of your build !
 
Whew, this is getting along alright now. I've set a target deadline of April in time for May MCM Expo, but I can see it getting done before that though.

I cut out the fins by hand, and superglued them to the center barrel

tumblr_mem5xxyHIc1rvpchho1_500.jpg


I then got a bracket laser-cut and solvent-glued that to the barrel itself. I then used 4 M4 nuts and bolts to attach it securely to the main barrel plate:

tumblr_mem62ySluq1rvpchho1_500.jpg


tumblr_mem646iPGg1rvpchho1_500.jpg


Look at all that multicolour goodness!

tumblr_mem66m4Rqq1rvpchho1_500.jpg


So far, it's totalled in at:
-158 parts (including parts glued to other parts)
-52 nuts, bolts and screws
-Disassemble able into 50 parts
 
Tubes 'n claws now.
I've got this idea that I want the entire gun to disassemble into more packable pieces, so using Lego parts I've devised a way to make the tubes unplug from each shell

tumblr_mepoiy7wzp1rvpchho1_500.jpg


By using pen lids I started making the attachments for the tubes

tumblr_mepoly1Oz71rvpchho1_500.jpg


Little bit messy in the photo, but it'll be cleaned up

tumblr_meponsHTXu1rvpchho1_500.jpg


And using large paperclips, I started the claw cages. Huzzah for stationery!

tumblr_mepopiQhq01rvpchho1_500.jpg
 
Yaaaay, more spot filling:

tumblr_meq44xq7sg1rvpchho1_500.jpg


tumblr_meq45ogdLm1rvpchho1_500.jpg


tumblr_meq46oJqEz1rvpchho1_500.jpg


Anyone want a canary yellow Portal Gun? :lol


tumblr_meq48eHc9K1rvpchho1_500.jpg


I reckon these shells could be done by the end of the month...I can hope at least!
 
Don't take this the wrong way but, I love how the shells are so big and bulky! (Rather than the more streamlined version NECA made) it really gives the gun more of a gamey feel, which is awesome!
 
Don't take this the wrong way but, I love how the shells are so big and bulky! (Rather than the more streamlined version NECA made) it really gives the gun more of a gamey feel, which is awesome!

No no, absolutely! I've always considered the NECA ones to be too flat in general; but I think compared with the in-game model I kind of over-did the chunkiness. Ah well, I'm not complaining, it's a great project to have on-the-go.

Any tips you've got from your build would be appreciated greatly :angel
 
I'm on a roll with this at the moment; POWERHOUSE IT TIL THE END OF THE YEAR!

Anyway here's some pics:

tumblr_mf4gkpqzO91rvpchho1_500.jpg


tumblr_mf4glfI7871rvpchho1_500.jpg


I was working on this at college, they didn't even question it :D

tumblr_mf4gn7Xunk1rvpchho1_500.jpg


The thickness of the left side of the front shell has been bugging me for a while now, and the lopsidedness actually makes the whole front wonky; the front point doesn't line up correctly with the middle of the barrel. I decided to fix that by guesstimating the width of the other side, and then cutting that away from the other side, then just badly hacking away at it with a penknife

tumblr_mf4gqi6qv51rvpchho1_500.jpg


As you can see, it's pretty messy. But what I plan to do is to create an insert piece that will be glued and bolted to the shell, which will in turn bolt onto the barrel frame. It'll all make sense once I've done it, I'm sure :rolleyes
At least now it's centered correctly, even if it is wobbly.

tumblr_mf4gt95YmK1rvpchho1_500.jpg


Just more notes on the sanding; really does yer 'ead in!
 
this is looking beautiful. i've been thinking about companion cube coffee tables (much more my skill level). this looks fantastic.
 
this is looking beautiful. i've been thinking about companion cube coffee tables (much more my skill level). this looks fantastic.

Thank you very much! That sounds like a really neat idea, I'd love to see that happen :popcorn

At any rate, onwards with the project.

tumblr_mf87r9lT9p1rvpchho1_500.jpg


I mixed up the millionth batch of filler, decided to mix in some yellow food colouring just for fun. Turned out more like tennis-ball green :eek

tumblr_mf87tgUiC91rvpchho1_500.jpg


tumblr_mf87ugzCCz1rvpchho1_500.jpg


It's all looking a wee bit odd at this stage, but forwards to success!
It's just such a pain there's nowhere in my house to actually sand things, save from outside in the fickle British winter
 
Looking great! I keep thinking I want to make a Portal gun and then I see these threads and remember how much work it is @_@

Keep it up! Can't wait to see the finished build.
 
Looking great! I keep thinking I want to make a Portal gun and then I see these threads and remember how much work it is @_@

Keep it up! Can't wait to see the finished build.

Thank you muchly. All these words of encouragement from everyone are very...well..encouraging :lol

By the way, your Mass Effect sculpt is amazing!
 
Uggh maan, how familiar is this kind of picture getting now?

tumblr_mfaltdfuLT1rvpchho1_500.jpg


weeeel anyway, while those were drying, I thought I may as well make a POTaDOS, just because it doesn't seem too difficult and would look quite neat.

tumblr_mfalwa1xXy1rvpchho1_500.jpg


Just a block of surformed foam to get the basic shape.
At any rate, with a bit of 180 and 240 grit wet and dry between layers, the shells start looking a bit cleaner.

tumblr_mfalxsqMY41rvpchho1_500.jpg


Anyway, I seem to be at the "I've-got-to-work-backwards-before-I-can-work-forward" stage, which is both annoying an comforting; in that at least I know I'll get a good finish.
I can hope at least.

tumblr_mfam2fBEF61rvpchho1_500.jpg


What you see here is the middle barrel, with the copper tube that runs through the middle of it. I mean...dear goodness how on earth did I make this abomination?! Look at it! It's at least 5mm out! No wonder everything seemed wonky, it really was.
While I worked on the shells, Rodger started making parts for a new and improved barrel design.

tumblr_mfam7l01ab1rvpchho1_500.jpg


I eyeballed the placing for the seam line; but then spotted some issues with the surfacing, so I sprayed over it. Then, while I was sanding down the surface with a 240 wet and dry sponge, the surface started peeling, I don't even know how, since the paint was dry through and through. I've got a feeling that the heater probably didn't help.

tumblr_mfamc4ppmX1rvpchho1_500.jpg


A bit of liquid green stuff sorted out that problem at least

tumblr_mfamdgrJtI1rvpchho1_500.jpg


But man. Man oh man. Damn that heater to hell. Although actually no, because the garage is just SO cold.
The right side of the back shell bubbled up pretty badly in one part because of the heat, so I pushed it back into place and sanded it down as best I could, then mixed up some filler to smooth it out a little

tumblr_mfamh53dOl1rvpchho1_500.jpg


tumblr_mfami383Jk1rvpchho1_500.jpg


And a complimentary picture of our (cleaned) workspace

tumblr_mfamjwjZ921rvpchho1_500.jpg
 
B-b-b-back to work.
I started making new MDF parts for the middle barrel, as the original was so wonky everything wasn't going onto straight (well duhh)

tumblr_mfqahcTmdn1rvpchho1_500.jpg


Then I got back to work on fixing the bubbly lump on the big shell;

tumblr_mfqajqpkfj1rvpchho1_500.jpg


It's like looking at a...Portal...themed...rainbow..thing....yeah er maybe not. Added then some liquid green stuff to smooth out the minor bumps. I really couldn't live without this stuff!

tumblr_mfqam8Nb111rvpchho1_500.jpg


While I was bolting together the new mid-barrel frame, Rodger was making a forming buck to create that...curvy..vent/barrel piece...thing. You'll know it when you see it anyway

tumblr_mfqar0mbSg1rvpchho1_500.jpg


tumblr_mfqatsTL0z1rvpchho1_500.jpg


tumblr_mfqav8ZKO61rvpchho1_500.jpg


It all goes together very nicely I think! Now this here is the forming buck Rodger was making:

tumblr_mfqawr13Nk1rvpchho1_500.jpg


What I'm going to do, is rather than having a single piece that curves all the way round with vents then cut into it (like the Portal 1 version), I'm going to make curved plates, that will all link together just like the Portal 2 version. I haven't seen anyone tackle the Portal 2 version/style of barrel yet, so it'd be cool to have something a little different.

tumblr_mfqb0etU0f1rvpchho1_500.jpg


The shells have been smoothed and sanded so much now, that using a simple 240 grit causes it to go quite shiny and polished!

tumblr_mfqb6sk3Pd1rvpchho1_500.jpg


I reckon these shells will be done and dusted by the end of January if I can continue at the same pace as now.
Here are some rough assembly shots:

tumblr_mfqb9gFHOA1rvpchho1_500.jpg


tumblr_mfqbalD19P1rvpchho1_500.jpg


It really is a bit chunky...:facepalm I just don't have the skills for this! Eh well, I like it, and it's something I can say I made myself; and it doesn't look as bad in-person.
 
Unfortunately I don't have many build photos of the stages between where I left off and where I got to today so that's a bit of a bummer :facepalm at least it's not too big of a deal.

Anyway, I bought some HDV50 as recommended highly by several fellow RPFers (thanks to those guys very much)
I actually tried drilling the indicator hole earlier, but I didn't use the best drill bit for the job and ended up with a shaky oval in the top; so I then filled it with bondo, drilled a guidance hole and then using the correct type of 22mm bit: drilled a hole.

tumblr_mgeymm4RKj1rvpchho1_500.jpg


I managed to get the buck that Rodger made vacuum formed at my old school, did it in 1mm HIPs. It fits nicely, i'll form a second one next week so that I can get the Portal 2 style vents in.

tumblr_mgeyvlL9Of1rvpchho1_500.jpg


tumblr_mgez78mrRb1rvpchho1_500.jpg
 
IT'S GETTTIINNGG THEERRREEEEE
Somehow! Yes, it is coming along pretty darn well if I do say so myself. I'm almost expecting something to go wrong, seeing as how well everything else has gone. I made an MDF forming buck and vacuum formed it to make the side nodules (sadly no photos of this). I then slopped a load of bondo into the vac-formed piece, and voila:

tumblr_mgqaryjHiS1rvpchho1_500.jpg


Now these are rough because there were some air bubbles in the casts, so at this point here I had just covered a layer of bondo on to sand.

tumblr_mgqav9ueJ41rvpchho1_500.jpg


Sexy rear shot, obviously

tumblr_mgqax90YdX1rvpchho1_500.jpg


I had some help today from my friends John (sanding the shell) and Diva (making a set of Evangelion headsets) so that was a bonus, many hands make light work after all.

tumblr_mgqazpOpmy1rvpchho1_500.jpg


I simply attached the nodules (?) onto the shell with some more bondo, and also ran a line of bondo down the seam to smooth it out a little.

tumblr_mgqb2xI1FR1rvpchho1_500.jpg


tumblr_mgqb4ngCSX1rvpchho1_500.jpg


Meanwhile, in the fume-filled workshop...:behave
 
One week later...

tumblr_mh39akQSvq1rvpchho1_500.jpg


I used some copper wire to keep the tubes in shape

tumblr_mh39cv9GtG1rvpchho1_500.jpg


Then I made some MDF claw bases; the little extra bit goes into a hole drilled into the side of the shell; which is then bondo'd into place.

tumblr_mh39fprhdM1rvpchho1_500.jpg


tumblr_mh39i3KQmk1rvpchho1_500.jpg


Worked out well, not sure how much strength it has though. Seems like it could hold up to a day or two of comic-con at least

tumblr_mh39n8JiEP1rvpchho1_500.jpg


Back to the spray booth with this one again

tumblr_mh39ppPcLw1rvpchho1_500.jpg


Our very "tidy" workspace. Here I glopped bondo around the claw base so that it'd retain a little more strength, then I sanded it smooth

tumblr_mh39tavtR61rvpchho1_500.jpg


WE INTERRUPT THIS TO BRING YOU A WARNING: Don't use solvents in an unventilated space.

tumblr_mh39vwvdMy1rvpchho1_500.jpg


tumblr_mh39xtAYxZ1rvpchho1_500.jpg


That would be me with the ASHPD, and John with the POTaDOS

And finally some photos of the vacuum formed pieces for the mid-barrel.

tumblr_mh3a16KCmZ1rvpchho1_500.jpg


tumblr_mh3a1gOUUh1rvpchho1_500.jpg


tumblr_mh3a1nTAVL1rvpchho1_500.jpg
 
Last edited:
Back
Top