X-Men 2 Carphone

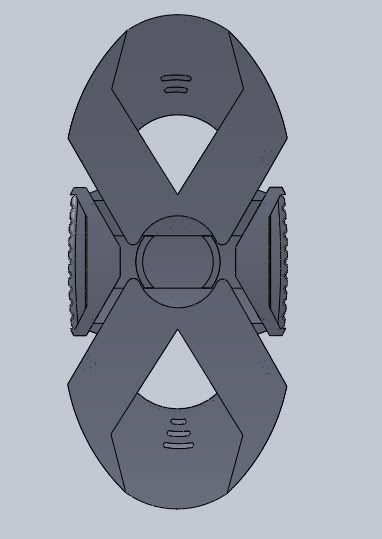
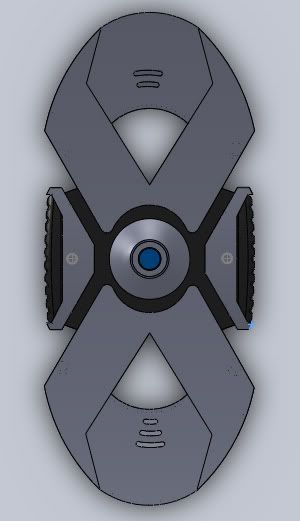
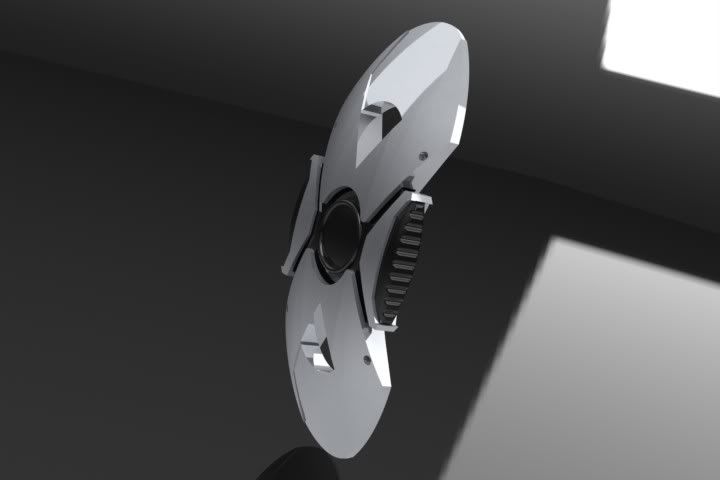
Nice job superDrool :thumbsup That was similar to what I was thinking although your design in better. I had the latches split in half with the horizontal spring in the middle. Your design has fewer parts and it ensures they work together at the same time. The only thing I didn't see is a stop that prevents the two halves from flying completley off, this could easily be added to the back.

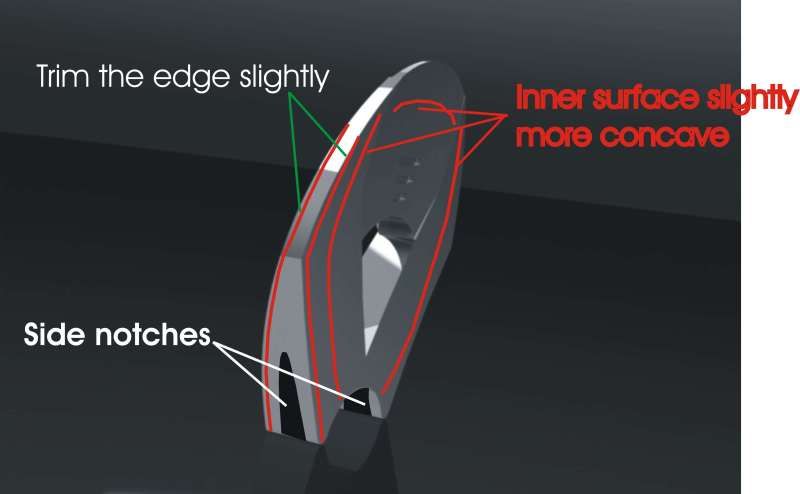
Jay - Based on the model I have I would say just "squish" it down as it needs to be shorter and a little wider. I completely agree with SD regarding the bluetooth device it should be easy to fit. As for the on/off switch I was thinking it could be added by the horizontal spring. That way when you open the phone it would turn on plus it would add resistance to keep the button pushed out. When you end the call just press the button again, then you can manually slide the X peices down.

I'm really looking forward to this ... GREAT Job guys!!
 
Thanks TB. I tried to keep in mind of the Blue Tooth plan, and keep the center free, but I still have no idea how well it would actually work. The double latch I do know will keep the two ends more secure and stable when locked in.
With all of this BT talk, it seems like I'd have to invest alot of time researching switches at the local electronic shop that woud be a good fit, physically for this application. Not having the final design in hand makes my brainstorming harder to do. So with that said, I'm am way past itching to get those pieces to make a full turtorial on how to make a functioning X-Phone. :D

Maybe even actually use it on a daily basis to make my friend's faces melt with jealousy. :love
 
This may not seem like a big update but i fixed the thickness...took way too much trial and error but finally did it. I'm separating the phone into the 3 different parts and making an assembly at the end...each part will probably have 2 sides...so 6 parts in total for the shell. In order to design the inside(clips and holding points) we will have to source parts to stick into it.

render20.jpg
 
Now that that's a DaVinci!

I'll have to trek over to Jan's Electronic across the river to see what I can find that might work in the next week or so. :)
 
I'm amazed at the skill here, and the dedication.
When I started this thread I had no idea we would even get this far.
Jay you have been doing a fantastic job with the 3D modelling.

I was studying the screengrabs and thought a few tweaks to the model you have been working on might bring us a little closer to the prop.
I hope you don't see this as criticism as I couldn't even model a cube in 3D, and you can tell me to get lost, but I drew over the last JPEG you posted with the lines that might get us closer to screen accurate.

x-menmod.jpg


The inner surface of the movie phone looks to be a bit more concave.
 
haha thanks but its far from a daVinci.. but soon! :p..Yeh getting an idea of wat parts will fit in will be a great start to getting this thing working

I shall try RM:)... now that i know a way of manipulating the thickness pretty easily i can make lots of changes as needed. Hopefully i can get this looking perfect tonight. As for the notches, they were just left out until the last step which will be shelling out the piece so we can fit in some ear piece:D
 
Nice job Jay ... I think RM comments nailed it though ... and I especially echo his comment "I couldn't even model a cube in 3D" What you've done here is simply amazing and has even inspired me to try my hand at some 3D modeling myself ... although I'll start with something a tad bit simpler :confused
 
Any updates to the refinement of the 3D model? Not expecting much really, as the holidays are in full swing. :) Just thought I'd check in, and bump the thread because it's so darn awesome. :lol
 
Nope nothin:(.. Just moved into a new place and been flat our all over the hols. BUT thankfully all is sorted now and I plan on doing a bit over the next day or two:).. I actually just whipped out the tablet before i came on here;)
 
Ok..a small update..well it looks small but it meant a lot of changes!:p
I could not get much of a curvature change due to the curve being build into the original shape, which would mean I'd have to restart the whole thing.
BUT..i did squish it a bit, hope its right. Here is the before and after.
I also took a slice off the edge and added the notches..those pics coming soon:)

oh, and here is a shapeways link to a shelled out piece to al access for earpiece. Make sure you view it in 3Dview
http://www.shapeways.com/model/422056/shell2.html?gid=ug
v2upper.jpg

v21upper.jpg
 
Last edited:
I see what you did there. ;)
Looking good!
...but the link said I don't have permission to view. :(
 
Last edited:
Ah it doesnt matter now, I changed it a bit more:p
Here are a few more pics, i changed the side thickness again to get it as close as possible to screen accurate. Also i put in a shelled out version to make it easier to fit the runner assembly and earpiece/speaker.
Im redoing the centre piece too, hopefully i'll have most of that done tomorrow. If you want to hunt down mechanism parts the dimensions are: 55mm wide x 20mm high with a wall thickness of 1.5mm.
side.jpg

shell.jpg

centre.jpg
 
Sorry to be filling this up with pics but... here is a quick assembly to get an idea of fits etc. This is the first time i have seen all the new pieces together. Let me know what ye think. And if anyone can get a movie still of a perfect(ish) sideview shot that would be awesome. The design of the rubber/plastic sides is pretty ambigious atm.. and to me it doesnt look right...but i have been wrong before

I've left a big gap in the middle until we figure out how to get this thing to open and close. Other then that there isnt much more... unless ye can spot something:)

v22phone.jpg
side-1.jpg

front.jpg
 
I see plenty of things that are accurate on the outside which gave me a nerdgasm...
Those side buttons are friggin' awesome! Any images of the backside? I wanted to doublecheck the hex screw placement. :)

How hard would it to change the thickness of the wall? I'm not sure it matters, but my first thought was that the end would crack/chip if dropped. I always worry about durability of everything...everything. I'm a clutz and when I have one in hand the last thing I would want is it to shatter or be destroyed, especially since this is a complete custom from the ground on up. Upgrade to 2.0 or 2.5mm maybe? Would that create issues in the design?

I'm not familiar with Shapeways either, but would they flock the surface of the two push buttons? If not I'm not too concerned, as I can lightly sand it and paint it flat black, or give it a rubberized coating. Having the buttons in thick solid rubber would ideal though.

I know...wishful thinking. :p


Once we all settle on the final design, I will order one straight away, so I can find the proper sized parts to fit inside. I'd rather not go hunting for anything I can't physically hold in hand, as I'm not a fan of backtracking.

Again, this is top notch work!! I can only imagine how much time and effort (sleepless nights) it must have taken you to come to this point alone. You have set the standard for sure on 3D replicas. :D
 
WOW Jay!!!! What can I say??? That's frickin' AWESOME!!! :love:love:love It looks like you've nailed it! While I'd be excited to get this printed out on Shapeways ... I really think you should consider getting it CNC'd out of aluminum, something this cool should be perfect. Now like SD said perhaps we should get it printed first and work out the mechanism and any tweaking that may need to be done in the real world first but honestly I think at least for me I'd love to see this done in aluminum. I know shapeways have metal finished and would even be up for ordering one to see how it turns out ... who knows it might be OK.

The only thing I see missing is the front of the center section. It's looks basically flat across and has the silver circular piece, I can't remember if it has an LED in the center or not, but if we add bluetooth (which has always been my desire) I'd have the little blue LED that flashes when connected there.

Again Jay you've done such an amazing job with this, Well DONE!!!
 
Agreed on all accounts. Aluminum would be the way to go. But you could alway have these painted to resemble a metallic finish....but deep down I want it in METAL!. :lol

Having to work the mechanisms, I dread messing up the first one, and needing more copies to work with. I think it'd be redundant to have both sides act as a switch. If I can figure out how to nail down the action with the right button to set off both upper and lower at the same time, we should be golden.


This will be 10 X cooler than the Matrix phone idea I had. :D
 
wow thanks guys, I was expecting constructive criticism:).. I will throw up a pic of the backside later, The wall thickness is very easy to change on all the components, it just wont look as good:p.. I'm actually not sure about shapeways doing rubber prints, i'll have a look. I would like the sides rubber too.

Yeh Aluminium is the real goal here, I might see what shapeways are capable off by getting the top piece printed. I'll ask around on their forum.

Titan, I left all the front open for now, I plan on doing a clip in front piece once we sort out the mechanism. There are already 4 holes in the corners of the centre piece to accommodate a pop-on front plate... I will make it today if it keeps you happy:p haha


Actually SD I forgot to put in the small box shape on the side for the button, I must put that in later! And i totally agree about just having one side act as the switch. Having on long bar with a double latch would prob be the easiest thing to sync the sliders.

Well let me know when ye are happy with the design and i will order one of these bad boys:) Titan how much did the first one cost??
 
TB since you complained SO much, here is the front plate:p
front-1.jpg

And a look at the back too
back.jpg

As you can see the top and bottom doesnt quite line up with the centre circle. I'm just going to extend the notches to accommodate the extra distance.. its an easy fix.
And hey have some renders for the hell of it:p

renderfront.jpg

renderback.jpg
 
TB since you complained SO much, here is the front plate:p

Now if I only could get my wife to start doing something when I complain :lol:lol

WOW Just when I think it looks perfect you go ahead and raise the bar again with these latest renders. What the heck are you waiting for let's order this bad boy so we can get started on the latching mech and bluetooth assembly :love

As for what I paid for the original model it was $30.03 shipped. I'm not sure if Shapeways does rubber prints for the side grips but that's something we could easliy cast in rubber from the print itself.

I've run out of superlatives for your work Jay ... it's simply AMAZING!!!
 
Last edited by a moderator:
I've been following this for a while, but not had much to add. I'm no 3-d modeler either, but the renders look FANTASTIC.
I just looked at the list of materials shapeways currently offers. They have a fake aluminum (resin with aluminum powder), but even they say it's pretty weak. What they DO have though is stainless steel. To me, that sounds pretty cool. No need to worry if you drop it, and it would probably feel pretty good in the hand too.

The side parts would probably easy to cast in a dense rubber once you have the shapeways one in hand.

I did have a thought about the side parts:
If it ends up being easier to pour rubber parts for the sides, could you take the 3-d model of those parts and make it into a negative mold to have made at shapeways, and then pour rubber into it, or would it be easier to just do it the old fashioned way of recasting the part in rubber?

-Alex
 
Back
Top