Wonder woman-now finished w/pics!!!

Eveningarwen

Well-Known Member
Edit again with finished pics!!!
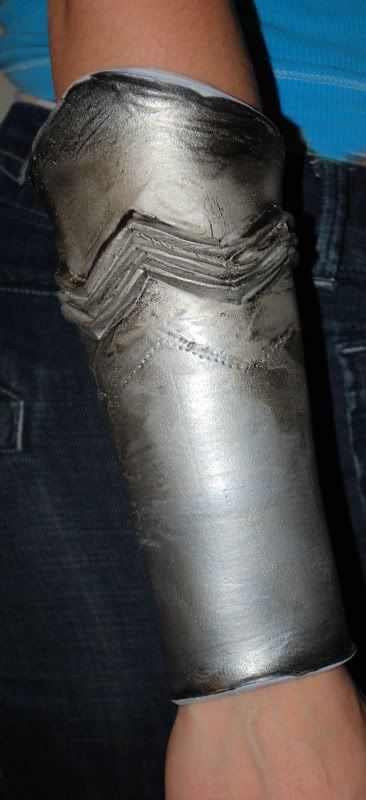
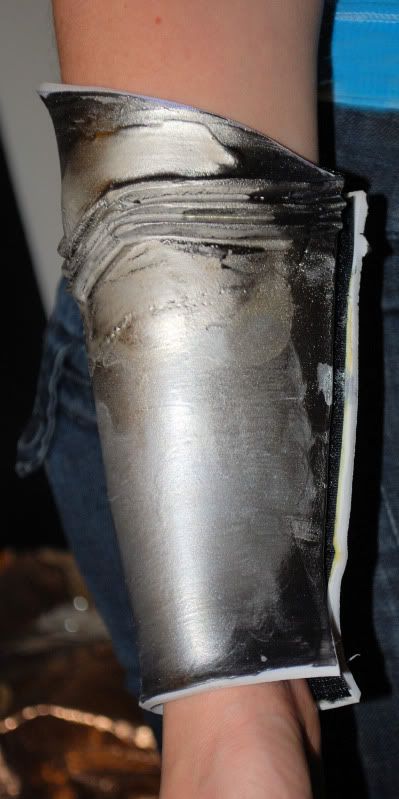
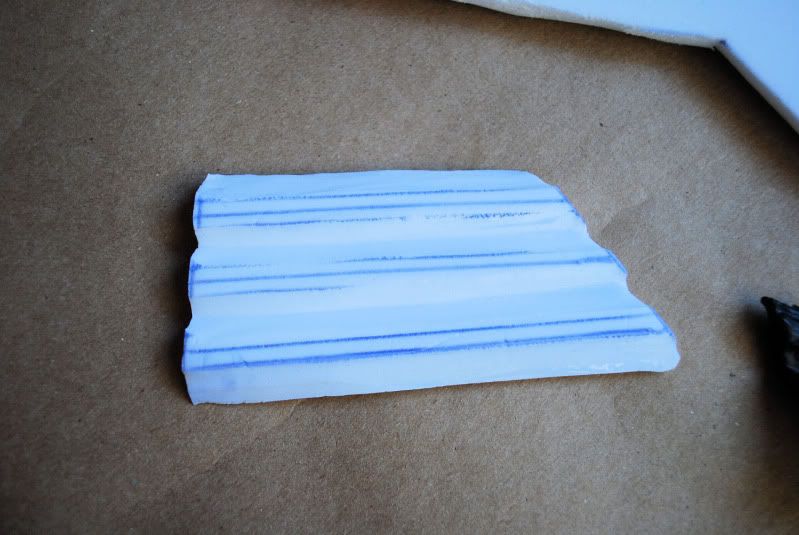
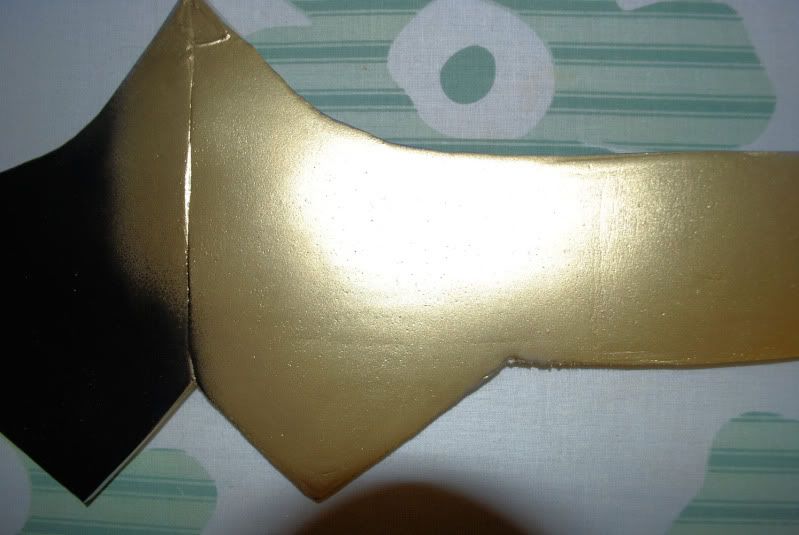
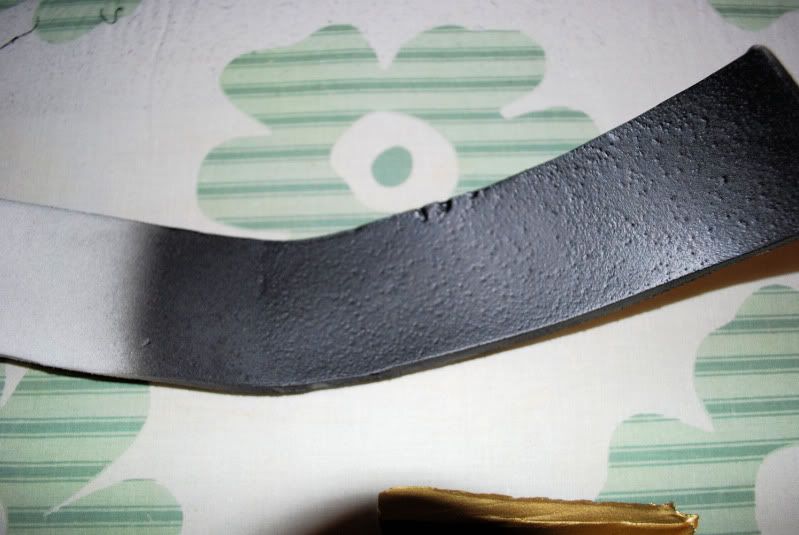
***********************
Some detail shots:
DSC_0511.jpg


DSC_0503.jpg


DSC_0526.jpg


DSC_0522.jpg


DSC_0466.jpg


DSC_0527.jpg


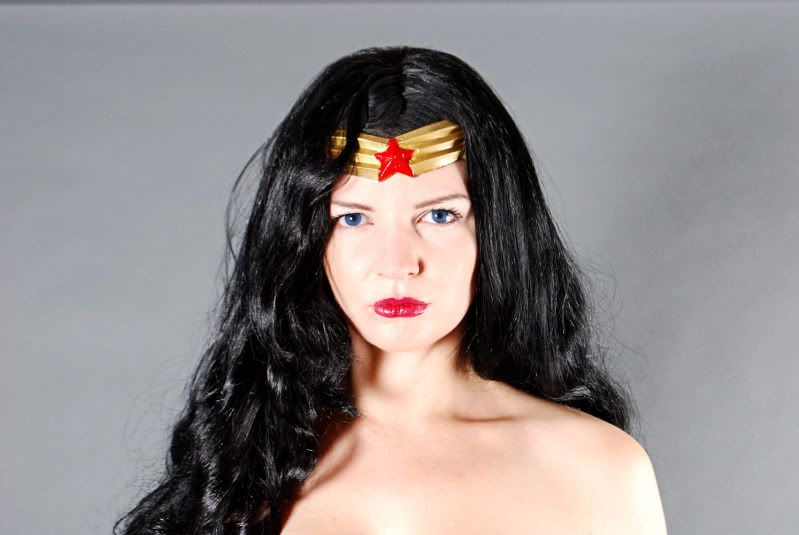
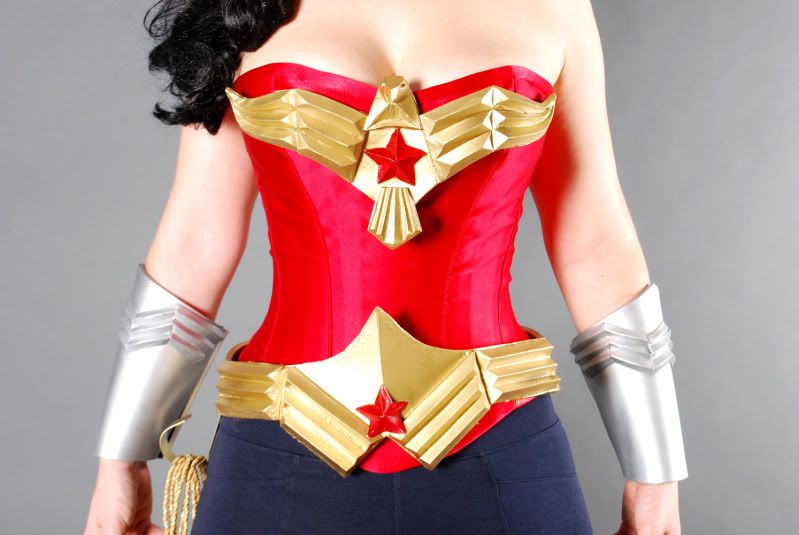
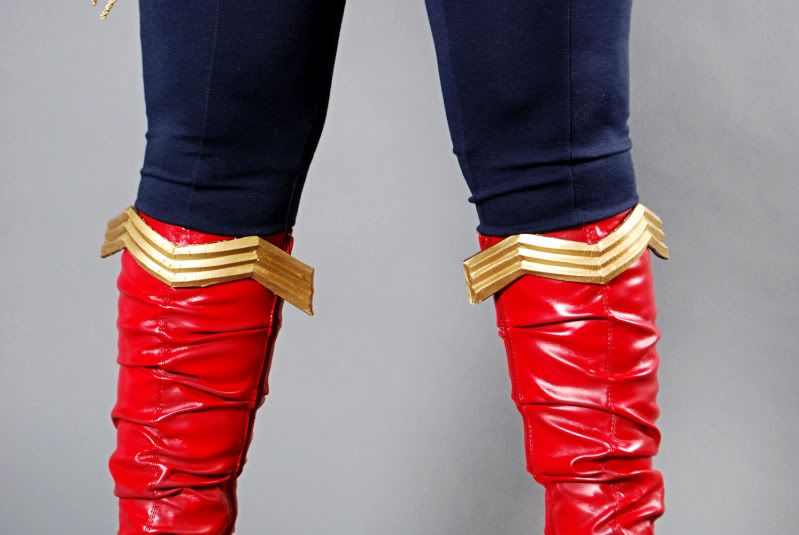
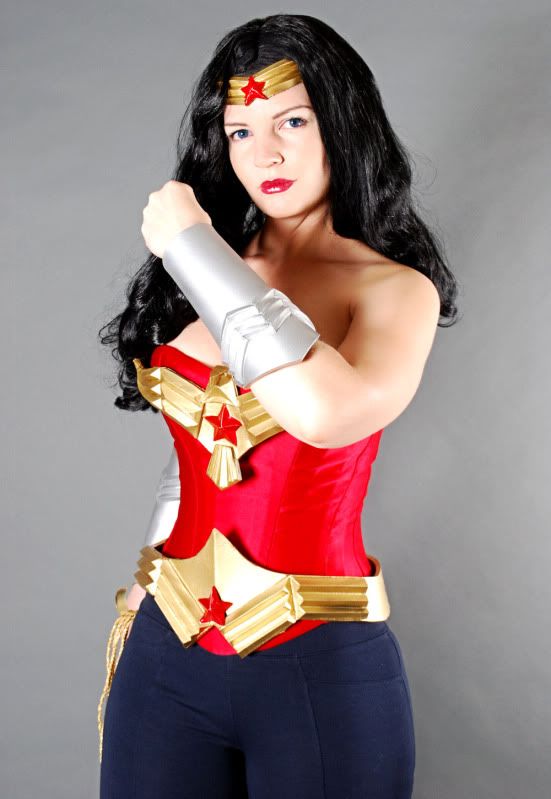
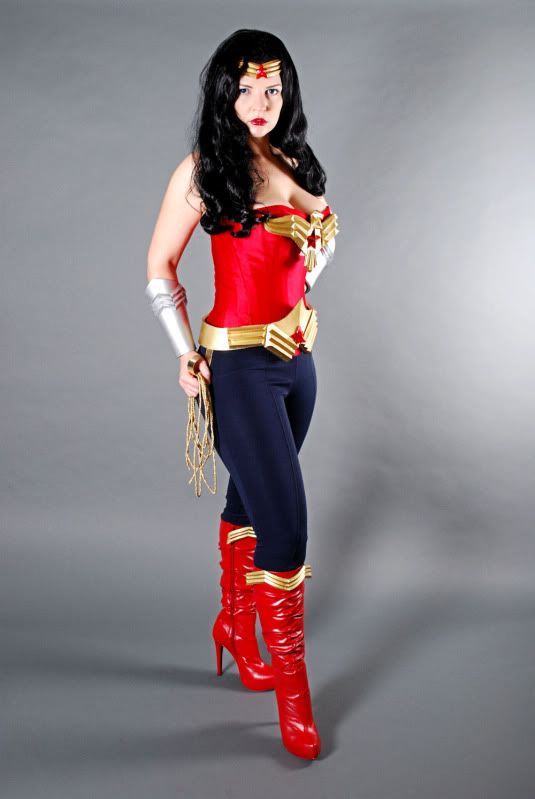
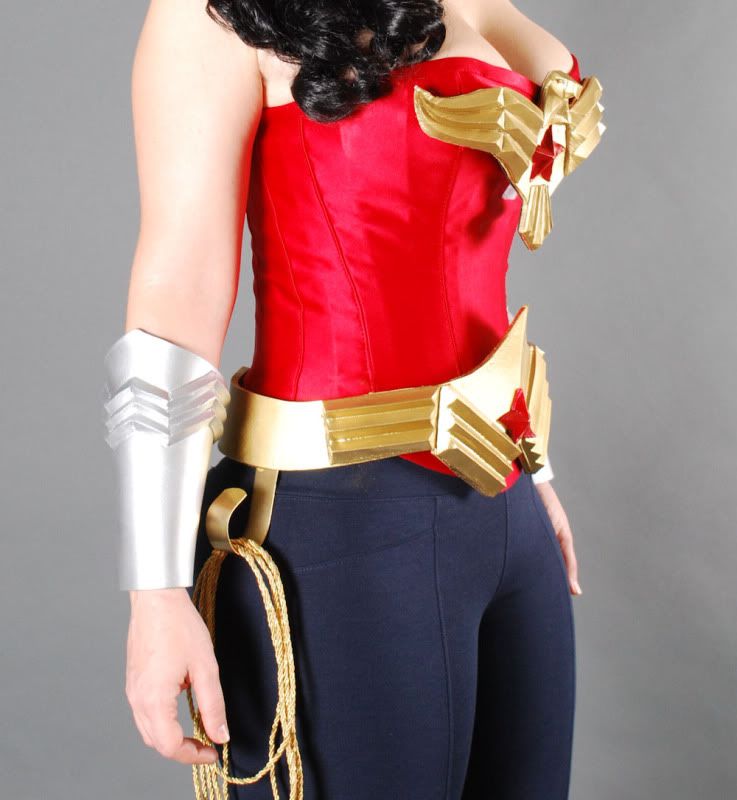
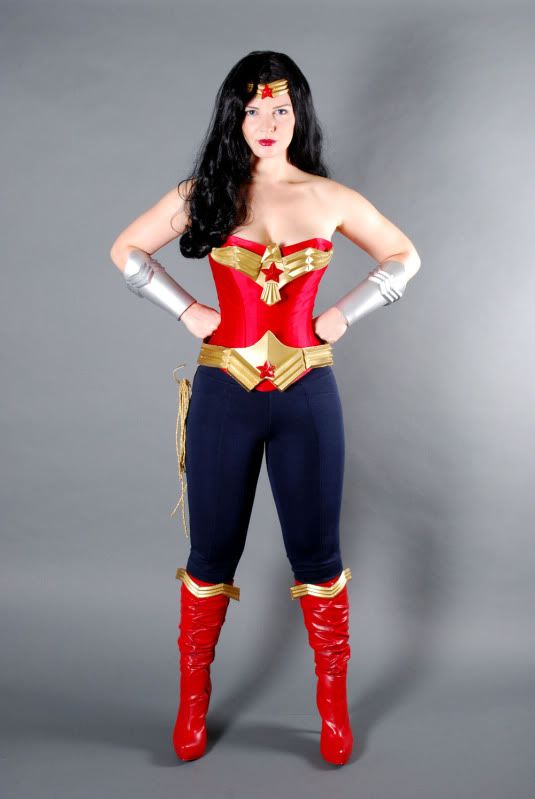
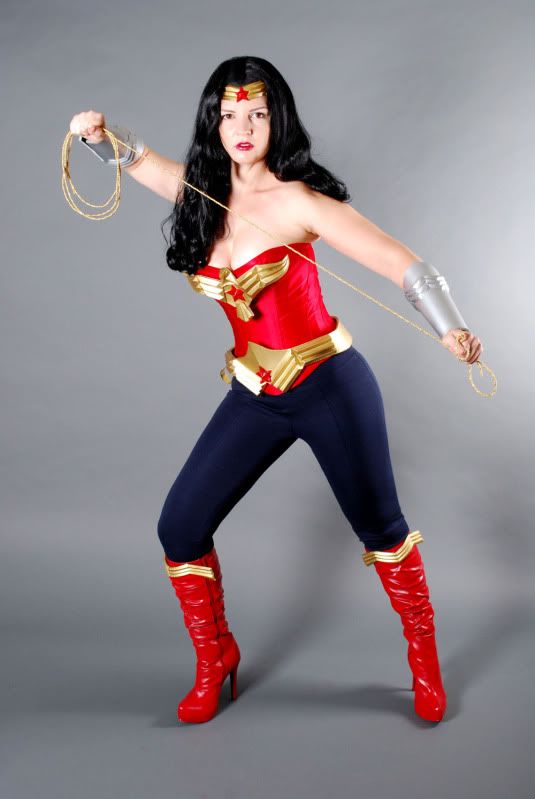
All done and the customer was so kind that she said it was alright if I took photos for myself/portfolio and all that! I'm pretty happy with how it turned out!

blueeye440.jpg

blueeye428.jpg

blueeye385.jpg


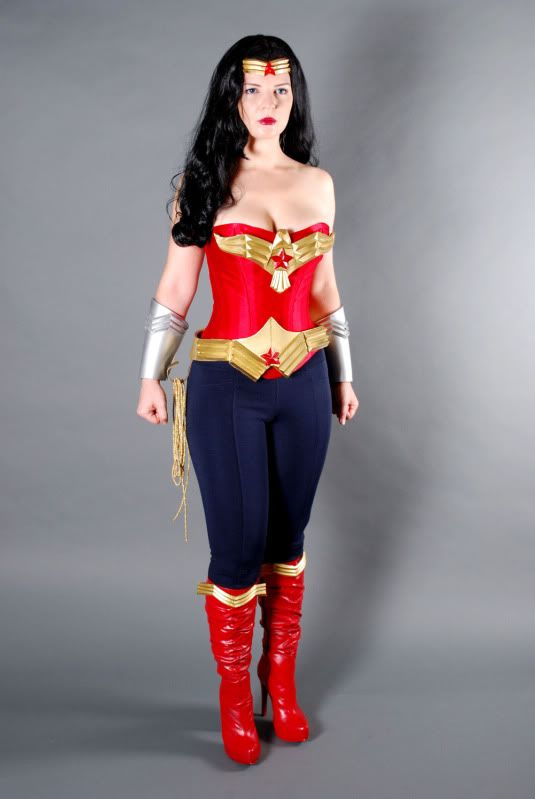
And one that shows what the photo looks like with my natural eye color just cuz:
DSC_0440.jpg


I'll post some more detail pics soon but for now this is what I have time to upload and resize etc etc.


Edit
***********
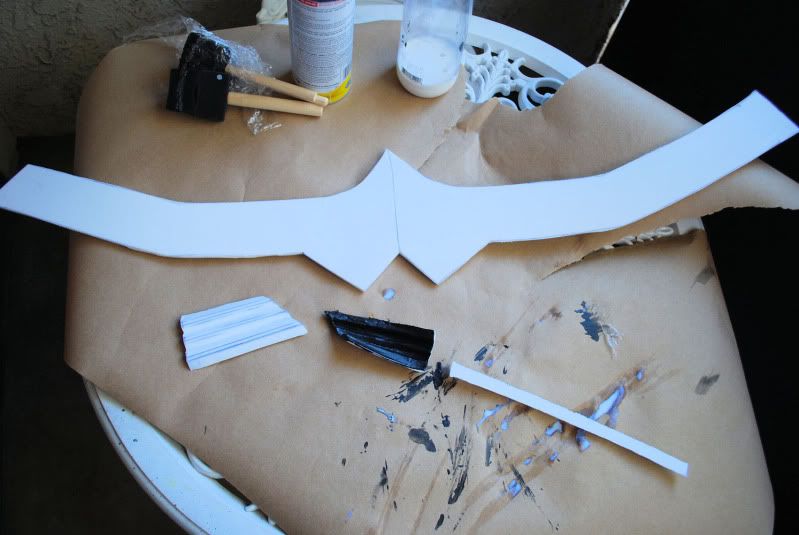
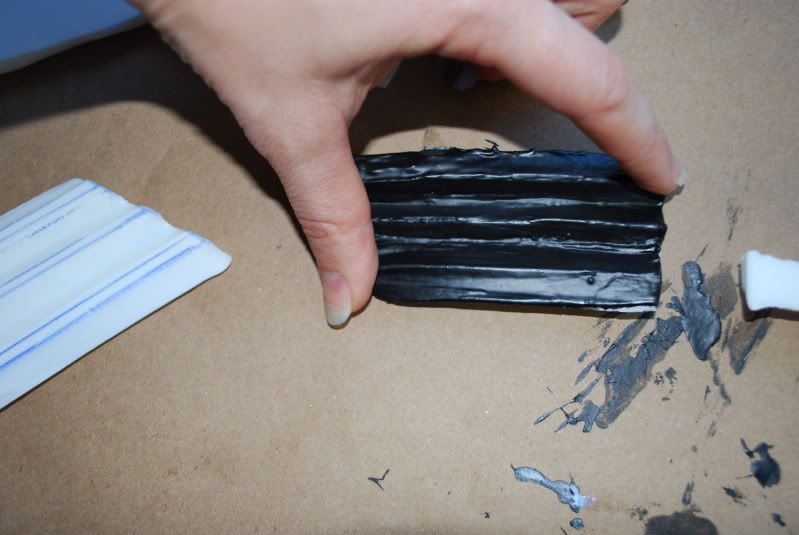
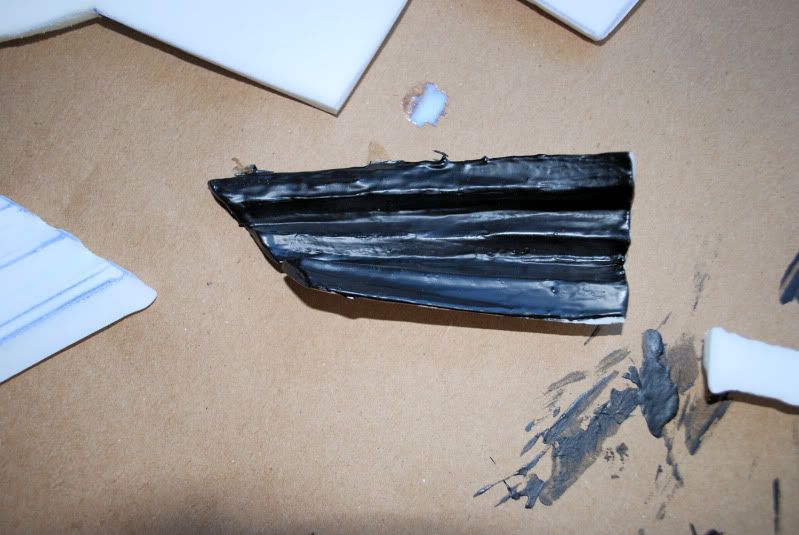
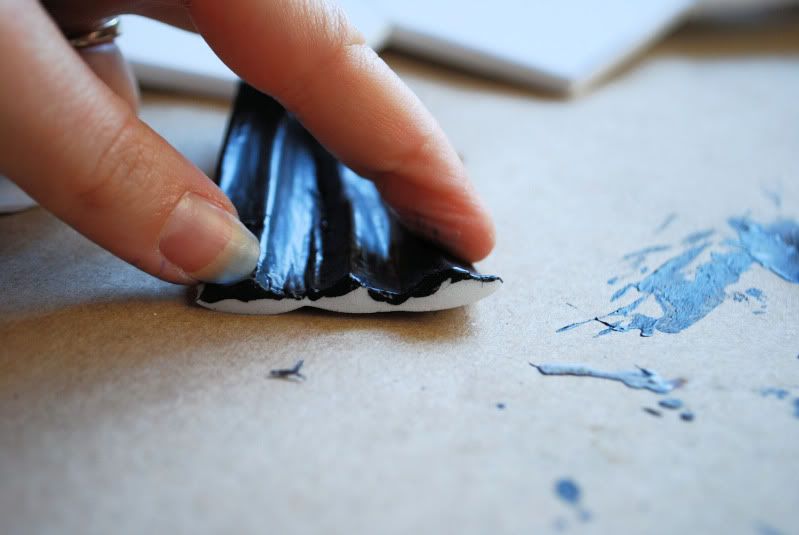
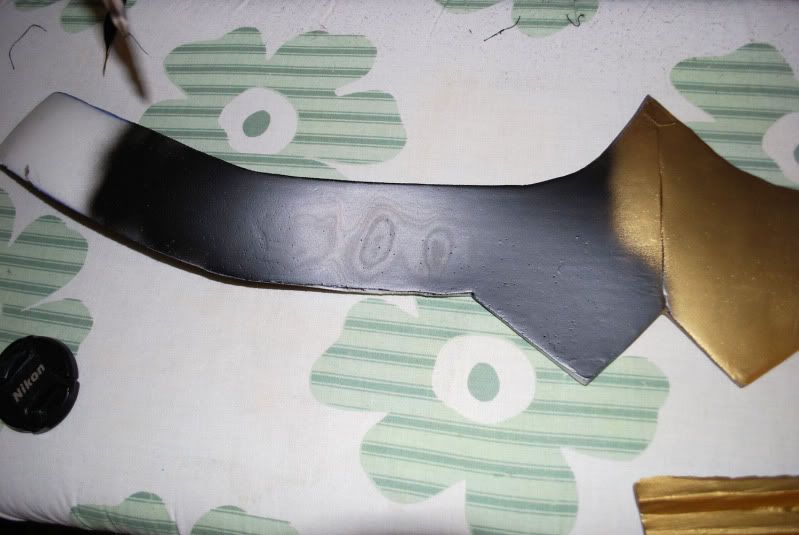
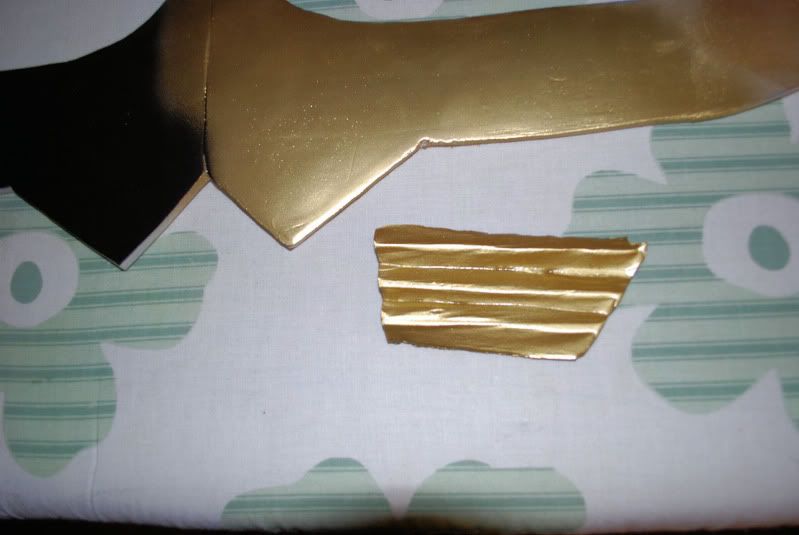
So initially I was looking for someone else to do this but didn't get much response and decided to do it myself. I've decided to do the foam armor route and....well......I've been having to do A LOT of trial and error lol. Then I thought, you know, not many people post their failures on here and I figured I would. Obviously I'm still working on this as it's for a client and I'm slowly getting to the point where I'm seeing things I like so I'll post those pics as well. (I should point out that I hate showing these pics because it makes me feel like a crappy costumer which I'm not lol!) Even if the tv costume was awful and you hated it or aren't a fan of wonder woman maybe you'll still be able to take something away from this project if you're thinking of doing your own foam construction.

If you have any tips or info on what I can do to make it better then I'd love to hear them!

adrianne_palicki_wonder_woman4_lg.jpg

*******************************


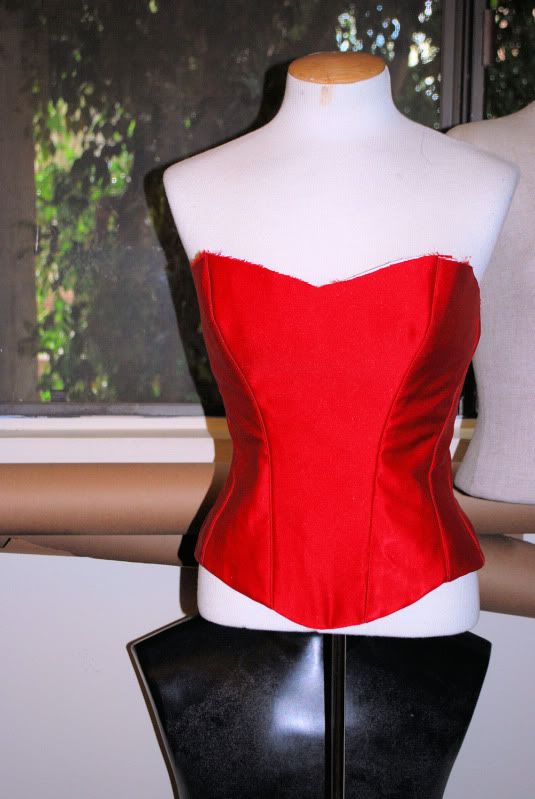
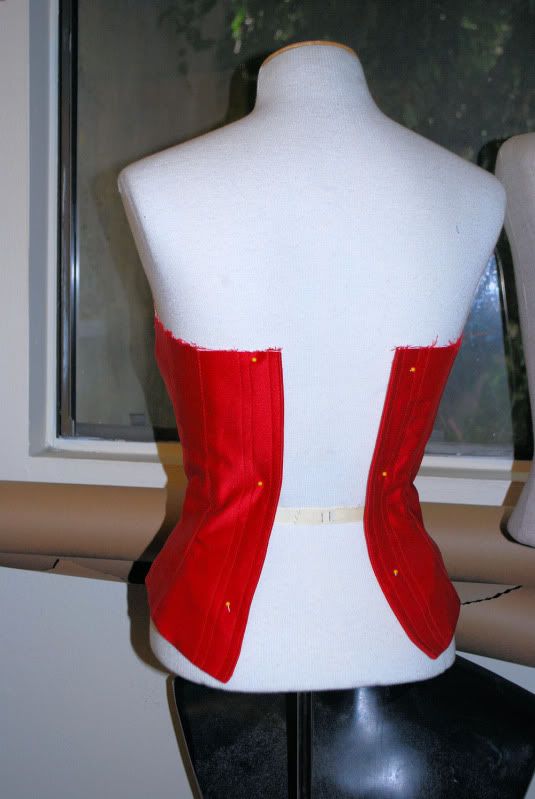
I have a customer who really wants the TV version of the Wonder Woman corset, belt and head piece but slightly modified. My biggest issue is I don't do vacuum forming or anything like that so if I were to make these pieces it would probably be from wonderflex covered in either gesso or friendly plastic. But that is way expensive and time consuming. Does anyone know of any other way to make these pieces where they'll still look like........well I think it was supposed to look like metal and not crap plastic but......ya.

I know it's a pretty bad costume lol but either way I'd really appreciate some ideas. I know there is craft foam and all that but I just have no idea how I would do some of the ridges like in the eagle wings and then make it hard enough and shiny enough to look like plastic/metal.

Would anyone here be able to create these pieces and tell me how much you would charge?? I'm wondering if it would be cheaper to have someone else do the eagle, belt and head piece who actually works with things like vacuum forming or if it's cheaper for me to try a "unique" way of doing it at home.
 
Last edited:
Re: foam wonder woman-learn from my mistakes

So first I started with the bracers. Mind you I did these really fast without allowing for proper dry time because I just wanted to get the gist of it. I took a class at costume con here in woodland hills, CA and there was a foam construction class by member here wondersquid. While I learned a lot from him I've had to alter my own technique because I'm not good enough to use his technique lol. But it was great to learn of all the materials used and sources. The foam is L-2OO foam from foammart.com. I got 1/4" thick and 1/2" thick. The bracers I'm using 1/4" and just basic razor blades to cut it.

First off: the foam is really unforgiving. Even a slight error in the slice and you're screwed when you go to cover it. My first attempts have all been choppy and this is what choppy looks like:

DSC_0002-2.jpg


DSC_0003-2.jpg


the W section was also not long enough so that will have to be altered. Initially I tried to leave it one big block section and just V cut it out but I failed so I instead I cut out each W with an angle on each side and then line them up together

I'm not really a huge fan of that but....it kinda works.

Then I painted some plasti dip on it (in black because Im just playing around first and that is what home depot carried) Then I sprayed some silver spray paint. Yeah....rough lol. I found the painting the plasti dip made it really hard to get even. The paint also started to crack but I think that's because of not allowing for proper drying time and it puddled in some areas. I'm also noticing that the plasti dip, as you get more layers, starts to curl the foam. Oh and I also rubbed some silver rub n buff to see if that could help with the shine. I got that from another tutorial which I will post later.
 
Re: foam wonder woman-learn from my mistakes

so the bracers were starting to make me disgruntled as I kept trying to perfect the W area so I moved onto the belt because the thicker foam was easier to cut. The actual belt part was easy to cut out and glue together with barge all purpose cement glue. It was suggested to use the yellow tube but I used the blue and had no issues with it.

DSC_0004-1.jpg


You can also see in that image that one of the v cut sections of the belt that is covered in plasti dip was majorly curling (which wouldn't have mattered because it was going to get glued to a flat surface) and also really uneven in it's coating. I decided I wasn't liking the sealing the foam with plasti dip.......

DSC_0007.jpg

DSC_0008-2.jpg

DSC_0009-1.jpg


so I started trying another sealant which was basically white glue, stretchy fabric glue and water. This process came from this tutorial:

Craft Foam Armor Tutorial

I was finding that this process was working much nicer for me.

DSC_0005-1.jpg


Until I let the glue puddle at the top of the belt and was basically forced to start over. But....I decided to go ahead and use this piece as a tester as well since I still wasn't sure of the sealing process. (I find when things are going well I'll decide to use it as the real go...so when it fails I feel like I've taken 3 steps back because I let my impatience get the better of me)

DSC_0022.jpg


So then I sprayed it in gold to see what the effect was going to be so far. I did one more layer of glue on the picture right side of the belt that was a bit thicker first. There are still holes though so it looks like weathered "300" armor as opposed to the pictured smooth perfect armor that she has.

So then I went to get the plasti dip in a can. I know it more costly in the long run because there isn't as much in the can but it goes on so much more smoothly. At first I just sprayed 3 layers on an unsealed section of foam:
DSC_0025-1.jpg


but it's not filling in the holes....so I sprayed it on the other side that was coated in about 5 layers of thinned down glue:

DSC_0023-1.jpg


which is better but still not perfect. I think it's the way to go though. I used one of my rough cut V cut sections that was only coated with 2 layers of glue and then 2 layers of spray plasti dip and then gold spray paint and then a layer of clear coat spray:
DSC_0024.jpg


and if it wasn't such rough cut foam I think it would have come out looking quite nice.

We shall see as tomorrow is more experiments!
 
Re: foam wonder woman-learn from my mistakes

Hey Arwen, I PM'd you, I can help on this, I made a wonder woman already for someone else. The V cut method is the right way, it just takes a serious amount of patience and practice. If it will help I might be able to cut the detail pieces for you and you can glue them together? My only other alternative is to try a video tutorial, only issue is time.
 
Re: foam wonder woman-learn from my mistakes

I am having the same dilema on my iron man costume, it's got to the point where I think I might have to go down the bono route and time is running out. Thanks for detailing your sealing efforts, my issue is there are so many joins due to me using straight pepakura files and foam and not simplifying them. I only did this because looking at the costumes where people had used less pieces they looked lacking in detail.

I might have bitten off far more than I can chew trying Iron man for my very first foam build and it being so close to halloween :cry worst case scenario I will just wear my Biker Scout costume.
 
Re: foam wonder woman-learn from my mistakes

So I did this on Monday in about a half an hour. I tried to film me doing it for a tutorial, but my camera work leaves a lot to be desired. I'm going to make another one and try making the tutorial again, keep your fingers crossed and I'll post it soon.
 
Re: foam wonder woman-learn from my mistakes

So I did this on Monday in about a half an hour. I tried to film me doing it for a tutorial, but my camera work leaves a lot to be desired. I'm going to make another one and try making the tutorial again, keep your fingers crossed and I'll post it soon.

You make it look so EASY!!!!!! Where is the emoticon of someone pulling out their hair????? Lol!!

PM sent by the way!

Also thanks so much for doing what you can to help out, you have no idea how much I appreciate it!
 
Re: foam wonder woman-learn from my mistakes

So I did this on Monday in about a half an hour. I tried to film me doing it for a tutorial, but my camera work leaves a lot to be desired. I'm going to make another one and try making the tutorial again, keep your fingers crossed and I'll post it soon.


Ah... Did you take a rectangluar piec and cut it in half corner to corner to leave you with 2 triangle pieces? Like a letter N if you looked end on?
 
Well... that must be the first "depressing" thread I see here on foam... everyone seems to like working with foam and I find that it's a very forgiving material to work with (that may be a bad semantic though, because foam is not that "forgiving"... but I actually don't mind throwing a piece away if it's bad and starting over since it's so cheap :) ).

Anyhow ... I don't know what was exchanged by PM - sorry if I'm repeating information you've already got from Wondersquid - but I want to say that you're doing it right... and it's very cool to see all that experimenting you did with the different way of sealing/treating the foam before paint.

However, a crucial advise that I haven't seen here is: Keep your blade sharp!

This makes a world of difference when working on something like the v-sections you're doing. For some reason cutting foam will dull any blade like there's no tomorrow... so it's important that you change blades very often regardless of the cutting tool you're using. You'll find it's easier to do those "angled cuts" and get a very smooth finish right off the foam (again depending on the foam you're using)... which should make the sealing less of a hassle.

Also a trick I found out lately is that when doing angled cuts like this, a very sharp blade helps, but having a "guide" makes things perfect everytime. What I mean by "guide", is a piece of something on which your blade can "sit on" and will keep alway the same angle when cutting. I've been using those engineering triangle ruler lately to do just that... and if you're using and exacto knife, you can even easily play with how deep you want that cut to be (with how long you're letting the blade out of the handle). It's not good for the actual ruler (it will scrape off some of the markings) but it works very well.
 
Re: foam wonder woman-learn from my mistakes

However, a crucial advise that I haven't seen here is: Keep your blade sharp!

Hey fullmetalsam you are correct! I am making a little video tutorial on making this piece and yes I used about 7 single edge razor blades to accomplish all the v-cutting. almost changed the blades for every cut.

Ah... Did you take a rectangluar piec and cut it in half corner to corner to leave you with 2 triangle pieces? Like a letter N if you looked end on?

Hey Barcrest, I didn't cut it that way. The v-cutting method is simply cutting at a 45 degree angle one way, then flipping the foam around and doing the same thing again, both 45 degree cuts meet below the surface of the foam and create a "v" cut in the surface. You pull out the chunk of foam and it leaves the what looks like a beveled cut in the surface.

Patience please, I am trying to find the time to make the video right and I will answer most if not all of these questions in it, ok?
 
Re: foam wonder woman-learn from my mistakes

Lol! Oh well I am definitely enjoying the process. I've wanted to do some foam armor for a while and this order was the perfect excuse. My client is great because we spoke about how this is my first time and I would need to do all this trial and error and she was definitely cool with it.

About the sharp blade....sigh I thought I was using a sharp blade lol! I'd say I would make about...mmm.....10-15 cuts before switching blades but apparently that isn't enough after reading wondersquids comment below about switching after every couple of slices. So that definitely is one of my problems. Also my hand isn't quite steady yet, it's getting better but I still need more practice.

Yeah you get a lot of foam for a decent price which is why I've been doing so many trial pieces. I guess the foam is unforgiving in the sense that if you do one errant slice or if the blade gets dull and ripples/crumbles your slice then you basically have to start from the beginning again.

A guide would definitely be helpful! i tried one of those matt cutters that already angle the blade at 45 degrees but the blade wasn't adjustable and didn't go down far enough. And I didn't have the money for a really nice matt cutter.

Definitely a learning experience hahaha! I'm mostly a soft costume maker so this whole armor thing is allllll new to me!


Well... that must be the first "depressing" thread I see here on foam... everyone seems to like working with foam and I find that it's a very forgiving material to work with (that may be a bad semantic though, because foam is not that "forgiving"... but I actually don't mind throwing a piece away if it's bad and starting over since it's so cheap :) ).

Anyhow ... I don't know what was exchanged by PM - sorry if I'm repeating information you've already got from Wondersquid - but I want to say that you're doing it right... and it's very cool to see all that experimenting you did with the different way of sealing/treating the foam before paint.

However, a crucial advise that I haven't seen here is: Keep your blade sharp!

This makes a world of difference when working on something like the v-sections you're doing. For some reason cutting foam will dull any blade like there's no tomorrow... so it's important that you change blades very often regardless of the cutting tool you're using. You'll find it's easier to do those "angled cuts" and get a very smooth finish right off the foam (again depending on the foam you're using)... which should make the sealing less of a hassle.

Also a trick I found out lately is that when doing angled cuts like this, a very sharp blade helps, but having a "guide" makes things perfect everytime. What I mean by "guide", is a piece of something on which your blade can "sit on" and will keep alway the same angle when cutting. I've been using those engineering triangle ruler lately to do just that... and if you're using and exacto knife, you can even easily play with how deep you want that cut to be (with how long you're letting the blade out of the handle). It's not good for the actual ruler (it will scrape off some of the markings) but it works very well.
 
@EveningArwen: Just saying you're not the only one enjoying the process... I really like seing the experiments you did and how you documented them. For some reason I never took the time experimenting like this or just had luck with the things I finally decided on using and never had to find something better or different.

On the blade sharpness - I guess this must come from experience in working with foam. : ) - but you'll know when it's time to change. Using a sharp blade makes it "easier", once the blade is too dull, the cuts are les precise, requires more "force" ... Then it's time to change that blade.

Something that I use as well to get a better finish (or salvage something that's not bad enough I have to start over) is sandpaper. Depending on the density of the foam you're using, you can sand it to get rid of little crumples of foam from a cut with a dull blade for example. :). Something that's similar to foamies or anti-fatigue EVA foam mats are 2 types of foam that sands very well.

@Wondersquid: I'd love to see a video tutorial from you ... I loved what you did with that WarMachine or with the Wonder Woman you posted earlier in this thread.
 
Re: foam wonder woman-learn from my mistakes

A guide would definitely be helpful! i tried one of those matt cutters that already angle the blade at 45 degrees but the blade wasn't adjustable and didn't go down far enough. And I didn't have the money for a really nice matt cutter.

When I started working with foam a while back, one of the first things I bought was an X-acto Matt Cutter like this:
70205.jpg


along with a LOT of blades. It takes a little getting use to to cut on curves but otherwise a very easy tool.
 
Re: foam wonder woman-learn from my mistakes

@EveningArwen: Just saying you're not the only one enjoying the process... I really like seing the experiments you did and how you documented them. For some reason I never took the time experimenting like this or just had luck with the things I finally decided on using and never had to find something better or different.

I guess that's one reason why I decided to post what I did lol. I haven't really seen to many posts where people show the "process AND it's failures". It's always here's the good pics or I didn't post any pics because everything fell apart. But I know I personally learn a lot from seeing when things go wrong. Or when things just don't work out. That's what takes the longest time is the experimenting to see what works and what happens with certain methods. Also I usually have that luck of everything just working out with my soft costumes. But with more crafty costumes like this I have to do loads of experiments lol.

When I started working with foam a while back, one of the first things I bought was an X-acto Matt Cutter like this:
70205.jpg


along with a LOT of blades. It takes a little getting use to to cut on curves but otherwise a very easy tool.

I'll definitely try that one out! I saw it but didn't want to wait for it to arrive via online so I just bought some cheap thing at Micheals that didn't work at all.

So it's been a while since I've updated but I put the project on hold while I dealt with some other stuff and also because wondersquid is being gracious enough to help me so we are trying to coincide our schedules. But here is the beginning of the corset. There is no boning or anything in it so it's a bit droopy but you get the picture. And I purposefully directed her to a more natural wonder woman red/material as opposed to the weird burgundy vinyl.

DSC_0039.jpg


DSC_0040-1.jpg
 
Re: foam wonder woman-learn from my mistakes

good choice on fabric and not that shiny cheap looking vinyl.

I really hope you finish this. Even though I'm a guy.
I'm a wonder woman fan , she's a bad ass.
 
Re: foam wonder woman-learn from my mistakes

Thank you for posting this.
It really helps those of us who are new at it and feel like we must be dunces because we can't get it to work right away.

Forgive me if I am asking a silly question, but is the foam you are using eva foam or something different?
I am planning to start working on my very first eva foam armor in november.
 
Re: foam wonder woman-learn from my mistakes

good choice on fabric and not that shiny cheap looking vinyl.

I really hope you finish this. Even though I'm a guy.
I'm a wonder woman fan , she's a bad ass.

I it has to be finished lol! It's for a customer. :lol I'm hoping that once it is finished I can get her to take pics in it.

Thank you for posting this.
It really helps those of us who are new at it and feel like we must be dunces because we can't get it to work right away.

Forgive me if I am asking a silly question, but is the foam you are using eva foam or something different?
I am planning to start working on my very first eva foam armor in november.

Yep it is EVA foam I believe. Although it is also called L-200 so I don't know if that is exactly the same or not.
 
This thread is more than 12 years old.

Your message may be considered spam for the following reasons:

  1. This thread hasn't been active in some time. A new post in this thread might not contribute constructively to this discussion after so long.
If you wish to reply despite these issues, check the box below before replying.
Be aware that malicious compliance may result in more severe penalties.
Back
Top