You are using an out of date browser. It may not display this or other websites correctly.
You should upgrade or use an alternative browser.
You should upgrade or use an alternative browser.
Will Turner impersonation cosplay costume, Orlando Bloom impersonation cosplay costume
- Thread starter greenmachines
- Start date
-
- Tags
- orlando bloom impersonation cosplay costume orlando bloom impersonator cosplay costume pirates of the caribbean cosplay costume will turner bandana will turner coat will turner cosplay will turner costume will turner impersonation cosplay costume will turner impersonator william turner impersonation cosplay costume
I grabbed a rubbed oil bronze as my finish coat. Because this scene costume has heavy color grading and some costume incontinuity from previous, I want to get full pose shots with the full black buttons and another set when I add the brown you described as it will then be a match for the previous movies in full sun, like the following:I think that, when painted in a old copper brownish color, they'll do the trick")
Then I will have a higher likeihood of an onscreen match with having two sets of colors and lighting.
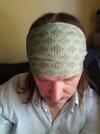
A little stop on the way to bandanaland. I finally found some really good close up pics of the bandana pattern with fresh prints. Now let's discuss color grading, aging and products made as "screen match" items. The bandana in real life is a light olive green but very muted. As a swatch color, it would be Pantone 5777 uncoated.
This varies from picture to picture. It is then highly drained of the olive hue onscreen and presents as a light gray, somewhat darker when wet. Represented as a screen match, it is far more likely to call it dingy gray. (correction: due to inconsistent digital color grading the same bandana in the same lighting and same scene shows as gray then green then gray, within seconds of each other)

As for pattern, the early movies are weathered and the pattern is faint and broken. This is what was used to create the Max Cady version available online.
 The following pic is a super hi res of his later appearances, when the pattern is clear and solid. In the potc5 reunion scene, the bandana looks new off the production line, no weathering.

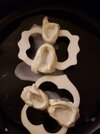
There are two diamonds made of two sets of shapes. In the clearer pics it can be seen that one is a set of circles with a vertical bar clipped out. The second set is ovals with three horizontal bars clipped out. All very geometric and precise. I have recreated these in an illustrator file that I will upload after testing. Because any print or stamp type can bleed, I need to practice to see how big the clipped bars need to be to not close completely after print bleed. A pic of my setup is here, not yet tested on cloth.

This varies from picture to picture. It is then highly drained of the olive hue onscreen and presents as a light gray, somewhat darker when wet. Represented as a screen match, it is far more likely to call it dingy gray. (correction: due to inconsistent digital color grading the same bandana in the same lighting and same scene shows as gray then green then gray, within seconds of each other)
As for pattern, the early movies are weathered and the pattern is faint and broken. This is what was used to create the Max Cady version available online.
There are two diamonds made of two sets of shapes. In the clearer pics it can be seen that one is a set of circles with a vertical bar clipped out. The second set is ovals with three horizontal bars clipped out. All very geometric and precise. I have recreated these in an illustrator file that I will upload after testing. Because any print or stamp type can bleed, I need to practice to see how big the clipped bars need to be to not close completely after print bleed. A pic of my setup is here, not yet tested on cloth.
Last edited:
(Update 10-17-22 Note: Final size was 10x60) Here are the png/jpg for anyone wanting to make a stamp. One for the circles and one for the ovals. I will upload the Illustrator files as well. The Max Cady version reports to be 27.5 inch by 60 inch. I have not tested length yet but width at most is 12 inches. It only ever covers from his eyebrows to the crown of his head. It never covers the back of his head and does not look to be doubled up in any shots (if it is 24 and triple section folded, it would be screen correct) The material in the movie would be far more similar to a sash than a standard bandana. I will do some cutting and measuring tomorrow with old bedsheets and will post the results. If my measurements come back with near 11, these can be printed and ironed by chaining several 8.5x11 tshirt transfer prints of the pattern onto the sash length. my guess is the total length is nowhere near 60 as in the advertised version. One pack of tshirt prints for 10 sheets is 10 dollars. That is enough to do a transfer of 11x80 after cutting and fitting the ends together. The transfers would need to have the locking edges cut and locked together to avoid double printing over any of the edge portions. I think any double printing or double transfer would stand out as a darker row. It would be better to cut the pattern to fit together with no duplicates laying over one another. And I just walked into the other room and cut a test strip of 9 by 42 after doing some measurements and inserting 42 as a given.... So it fits nearly exact to the length shown in his picture and I have a big head so it is likely smaller than this (correction, 42 in the one scene but in potc5 it is much longer and could be 60). With an 8 by 42 and printing the pattern landscape (do not tip the pattern as it does have a direction) on 8.5 x 11, it would only take 4 prints on tshirt transfers to print the entire bandana. So this means I will certainly upload a landscape version with the pattern laying correctly for landscape 11x8.5 printing. If after printing you get a partial pattern on the edge, you can either cut it out to show only completed diamonds or you can tuck the edge under (I would rather cut it off the print and not have to hassle with tucking the edges). !!NOTE: Final size was 10x60.!!

and mine (for size comparison only, this is scrap material)

(downloadables removed and updated for size, please see lower/later post for printable patterns)
So it fits nearly exact to the length shown in his picture and I have a big head so it is likely smaller than this (correction, 42 in the one scene but in potc5 it is much longer and could be 60). With an 8 by 42 and printing the pattern landscape (do not tip the pattern as it does have a direction) on 8.5 x 11, it would only take 4 prints on tshirt transfers to print the entire bandana. So this means I will certainly upload a landscape version with the pattern laying correctly for landscape 11x8.5 printing. If after printing you get a partial pattern on the edge, you can either cut it out to show only completed diamonds or you can tuck the edge under (I would rather cut it off the print and not have to hassle with tucking the edges). !!NOTE: Final size was 10x60.!!and mine (for size comparison only, this is scrap material)
(downloadables removed and updated for size, please see lower/later post for printable patterns)
Last edited:
As for Adobe Illustrator files, I can't seem to upload them. Anyone have some RPF tips on how to upload AI files? This one is important for the value of this thread. What can I do to offer my pattern files so they can be useful?
Last edited:
More obsessing about the bandana led to resizing the pattern, multiple dye processes, hand crafted rubber stamps, computer printed self inking stamps and a final attempt that I am happy with. I will replace the dowloadables above with my newest. After printing my previous illustrator drawings using tshirt transfer, I was very disappointed with the dark shiny coating that comes with the transfer.

So, I also noticed the spacing and sizing of the pattern was far too large. I resized my art and printed the pattern to make a hand stamp. I used the tubes from a telescoping mirror tool to cut the circles. I was not impressed with my ouput..


So I sent the file to our local package store to make a computer printed self inking stamp. We found that in order to have a truly clear background the file needed to be two layer photoshop with second layer transparency, exported as a png with transparency retained...

416 separate stampings for 832 diamonds of 9 dots each. I then gave it a day to dry and then placed another blank bandana over it and ironed it to set the water based inks....


It is difficult to show because the sizes and colors distort with camera angle but I am calling it finished. I will load the files and sizing info in my next post.
So, I also noticed the spacing and sizing of the pattern was far too large. I resized my art and printed the pattern to make a hand stamp. I used the tubes from a telescoping mirror tool to cut the circles. I was not impressed with my ouput..
So I sent the file to our local package store to make a computer printed self inking stamp. We found that in order to have a truly clear background the file needed to be two layer photoshop with second layer transparency, exported as a png with transparency retained...
416 separate stampings for 832 diamonds of 9 dots each. I then gave it a day to dry and then placed another blank bandana over it and ironed it to set the water based inks....
It is difficult to show because the sizes and colors distort with camera angle but I am calling it finished. I will load the files and sizing info in my next post.
Attachments
Last edited:
Here is the 8.5x11 pattern and the two diamond rubber stamper version, both transparent background.


The stamp image is 1.5357 inches wide by 1.1663 inches tall, 300 dpi. When the image is jumped in the pattern, group the two diamonds above and repeat the group at 1.2624 inches horizontal and 1.2247 inches vertical. But the edge of your stamp body/case will be determined by what you make it with. Make sure to use a rectangular body stamp with your image aligned with the stamp case. You will be using the case to keep alignment while stamping as you cannot see your image.
Each stamp case will be different by brand so you will need to figure out how to jump your pattern correctly using the outside of the stamp case as your guide. I tested until I knew exactly where to line it up with the previous stamp and continued in a straight line to the right. Then I figured out through testing just how far to stagger the second row and completed that row and so on. Do not attempt to test or guess on your final fabric. You must have your stagger distances horizontal and vertical predetermined on a test paper or fabric or your final will have twisted or misaligned patterns.
Last edited:
as technology would have it, my phone camera died. I have completed my breeches and shirt but cannot load until I get my new phone. The breeches were intended to be made from a thrift coat I purchased but I then modified the coat and I like it too much to trash it, so I purchased a pair of hilfiger corduroy and tweaked them to a passible breeches copy. The shirt is the original thrift shirt I posted above. Hope to get pics up soon. I skimped on replica match and settled for screen match as only the parts that show in the pics are my goal for his build. Too many projects and the pics are what count for me since I do not intend to sell my initial build parts. The breeches will not have the pegged bottom leg but will work when wearing the high boots. (Update 10-17-22: adding one more picture of another actor wearing these breeches for a clear view of pattern: from Poldark)


Last edited:
Work on the sword belt and frog was intense, using many online sources to come up with a pattern I liked. After much ado, I decided that the belt was in fact straight. I found many patterns and opinions showing curved cuts and it is likely true but after testing a straight belt with a slightly lopsided frog, it fit like the onscreen so I am calling it straight. I will load sizes when I am not laxing on the couch (Update with sizes in 10-17-22 post far far below in convo). I first cut my test belt from my stock of conveyor belt material and punched and bolted it together. I continued to cut it down from oversized, which I had started with on purpose, until it fit like the onscreen version. I then transferred the shape to vinyl upholstery in a cream tan. Knowing that leather would be the preferred way to have an inconsistently worn and weathered brown but to cheap to buy it, I had to start with light color vinyl as vinyl does not weather or fade being a chemical color. You must start with lighter color, then color it darker and then weather the added color to expose the original lighter brown. Onscreen pics first:


Conveyor material for the pattern:


First cut was the same size as the conveyor material followed by a second with enough edging to fold over and sew faces out for a two sided leather look:


Now I am working on carving and casting the custom rivets, and the buckle.
Conveyor material for the pattern:
First cut was the same size as the conveyor material followed by a second with enough edging to fold over and sew faces out for a two sided leather look:
Now I am working on carving and casting the custom rivets, and the buckle.
Last edited:
The boot covers were my first major pull back from full screen accurate because they were not going to appear in my main poses. They are a simple lampshade round on a tube leg. Not far from the onscreen version but not as long in the cuff for some poses and matching in others. I noticed later that many of Will Turner's scenes have his pants opened onto his boots making the cuff seem shorter. His boots in promo poses have a longer front cuff and a clear fold in front and back but in several in movie scenes is perfectly round and equal length all the way around... aka lampshade on a stovepipe. So I chose the in scene version. They will not look impressive lying flat and I do intend to place a stiff retainer to bell them out. First his onscreen pic then my current rendition as a slip on cover. Actually, that is on my other phone.... ok, I will fix this in a few minutes.


I do have the feeling I will purchase good boots from caboots.com (they advertise a purpose built Will Turner boot and will size to your shoe size) if I wear this to an event, it just isn't needed for my pose pictures. This was six dollar per yard at walmart.
I do have the feeling I will purchase good boots from caboots.com (they advertise a purpose built Will Turner boot and will size to your shoe size) if I wear this to an event, it just isn't needed for my pose pictures. This was six dollar per yard at walmart.
Last edited:
Buckles, one on the waist and one for the sword. Onscreen pic was available, nearly flat, for the swordbelt buckle. I printed it, cut it, laid it on my clay and started my sculpt. Several online sources reported this to be 5 inches long. As with all my projects, I realized it was not symmetrical, after the fact, and would like to do a full restart but not for this current build.


BIG WARNING: DO NOT USE ALGINATE WHEN THEN CASTING TO TWO PART EPOXY. Water and epoxy are not friendly and bubbling goes wild. Alginate is never dry. I had to recast the mold in stone plaster casting material. However, this forces you to lift the cast early or it will be permanently in the mold, 8 minutes maximum and the be careful not to tear or deform it. Two part silicone pour for the mold would be the correct method, followed by the correct epoxy mix for the final cast. With either, brush paint the mixture lightly to the clay sculpt to eliminate air bubbles, then pour to fill. Repeat that paint first process when pouring in the epoxy for the final cast part.

The second buckle was purely sculpted from the picture.


First paint coat was gold and touches of stain were added with furniture touchup stain pens from Dollar Tree. Black in the middle and mahogany for the edging.


These stains reliquify with rubbing alcohol and can then be "painted" in place using a small brush with a stippling action. Be patient as you will be moving it until you like it and then you must hold still and wait for the alcohol to evaporate or it will run and move your color.

Still working on aging but that all depends on final lighting. Some in-movie shots show a very silver but tarnished finish and others show dark aged copper and brass. The fight against digital color grading has no end in sight.
BIG WARNING: DO NOT USE ALGINATE WHEN THEN CASTING TO TWO PART EPOXY. Water and epoxy are not friendly and bubbling goes wild. Alginate is never dry. I had to recast the mold in stone plaster casting material. However, this forces you to lift the cast early or it will be permanently in the mold, 8 minutes maximum and the be careful not to tear or deform it. Two part silicone pour for the mold would be the correct method, followed by the correct epoxy mix for the final cast. With either, brush paint the mixture lightly to the clay sculpt to eliminate air bubbles, then pour to fill. Repeat that paint first process when pouring in the epoxy for the final cast part.
The second buckle was purely sculpted from the picture.
First paint coat was gold and touches of stain were added with furniture touchup stain pens from Dollar Tree. Black in the middle and mahogany for the edging.
These stains reliquify with rubbing alcohol and can then be "painted" in place using a small brush with a stippling action. Be patient as you will be moving it until you like it and then you must hold still and wait for the alcohol to evaporate or it will run and move your color.
Still working on aging but that all depends on final lighting. Some in-movie shots show a very silver but tarnished finish and others show dark aged copper and brass. The fight against digital color grading has no end in sight.
Attachments
Last edited:
OK more obsesssing... I redid one of the buckles after I noticed too late that my sculpture had twisted during casting. Really not sure how I didn't see it while painting but here is my new sculpt and I am out of resin, so my next update will be the re-pouring. I almost did it again this time. So my major malfunction is the wood is not aggressively holding the clay. While building the mold retaining walls, I was bumping the sculpture. It can loosen under one section and twist but not break loose entirely so i wasn't noticing it had shifted. Time to slow down.

Need some help. What animal would have this tortoise back pattern like Will Turner's lower belt in POTC5?

I thought the same but couldn't find any pics of older ones. Odd choice for the costume department to even go that route.Seems to me that they got hold of an old turtle leather belt
Never seen one again since. Turtles are protected and it would be difficult to make another one using turtle skin.
joberg
Legendary Member
Why not; lots of stuff were made with tortoise shells/skin and being sailors, it makes sense to use a skin that'll be stronger resisting the salt of the ocean. I'm not teaching you anything new by saying that salt was the enemy no1 at sea.I thought the same but couldn't find any pics of older ones. Odd choice for the costume department to even go that route.
I still have weathering to do and my rivet heads are bigger than screencap by about 15% but I will wander away to work on the sash and get some fresh perspective before dissecting the baldric again.
From scene:
Last edited:
Similar threads
- Replies
- 87
- Views
- 3,955
- Replies
- 15
- Views
- 312
- Replies
- 37
- Views
- 2,334
- Replies
- 0
- Views
- 899
- Replies
- 503
- Views
- 51,193