Was Avengers, Now Stealth Captain America w/ Magnetic shield

Hey I was in a post lol. It all looks good. (Not just because of my sexy forearms either lol)

For those of you who are confused by the forearms comment, user addamisk1 has been lending me a hand (and forearms) in the shield construction. Seen in the 4th picture of post #20
 
Hey :)

Awesome build here ! Really impressive work on the helmet.

Did you make any progress on converting the rubber helmet to look like the WTS one ?
 
I'M BACK
Sorry for the extended absence, College... Ugh...

Anyways, got a few updates now that I've been working on some stuff so lets dive in.
First off, Sorry for the assortment of picture sizes... Im not sure why but I'm unable to change them back to smaller sizes

SHIELD:
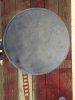
"Ehh.... It's being stubborn.." Is what I would say when people asked about it. I was having a big problem with the overall curve and the mini dents and divots created by the satellite dish. After many sessions of heating small areas and trying to adjust them by hand, then getting frustrated because I'm not a computer.... The surface was getting messy and it was difficult to distinguish so we put a light coat of primer to get a good even look.
attachment.php

A while ago I had an idea to 3D print an entire shield, now that idea has grown in my mind and will probably become reality.
IMG_6115.JPG
As I get closer and closer to my deadline for this costume I became more and more Okay with the fact of having a battle damaged shield from this one, and a better looking shield from the 3D printer... Wonderflex is an awesome material and, with more time and money, could be great for this project. Unfortunately, I'm running out of both so I'll have to settle for now.

Going with the damaged shield, I've decided to paint the 'stealth' colors of silver with light and dark blue. If anyone has suggestions on paint thats best match for the film please let me know.
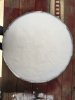
Last thing done to the shield was a few coats of gesso and a final coat of Elmers glue:
attachment.php

Then a quick laugh on snapchat:
IMG_6284.JPG
More on the shield soon.

FITNESS:
uuuhhhhhhhhhhh......... Remember when I said "College"? Well, yeah... Sadly had to neglect the gym for a while to crack down on school and I lost a total of 15 pounds :(... Now that I'm out, I've been trying (and kinda failing) to go back everyday... We'll see how that goes..
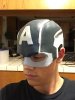

HELMET:
Got quite a bit done on this.
I removed the ear pucks and started to draw on the pattern of the stealth helmet. Here are some reference pictures I'm using for anyone who is interested:
helmet.jpghelmet1.jpg

My steps for each rough section were as follows:
Draw basic shape
Cut out shape
Trace onto wonderflex (Rough side out)
Cut shape out
Glue/tape into place

Drawing:IMG_5988.jpg Cutting/Tracing/Cutting:IMG_5990.jpg Then attaching: IMG_6312.jpg

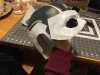
Did that for the two big sections on either side and the giant skinny U shape on top. For the nose bridge I had to change it up a bit. The nose bridge has many rounded corners and weird angles so I wanted to capture as much as I could from the original piece. I started with the Helmet on my dummy head and molded a scrap of wonderflex on top of the nose bridge. From the inside of the helmet, I traced the eye holes onto the plastic and trimmed them away. Then, I started a process of heating and putting the helmet on and molding right to my face (With the rubber helmet in between my skin and the hot plastic). I made sure to press the plastic against the geometry of the helmets to preserve all the curves and angles:
attachment.php
IMG_6306.JPGIMG_6304.jpg
Through more repeats of heating and forming, I started trimming away more plastic and fitting it more to my face. When I got close enough, I drew on the shape from the film and cut away the unneeded plastic and rubber:
attachment.php

Still needs some trimming and details but not to bad so far:
attachment.php


3D PRINTS:
I printed up my first version of the back bracket. Turned out pretty awesome:
attachment.php

But, in my phase of showing off my work, I figured I would give a stress test demonstration to my mother.... Turns out I had more strength then I realized:
IMG_6231.jpgOops...
But breaking it also made me realize that my design is not as accurate as I thought it to be (from the film):
IMG_6229.jpg
Looks like the 'Middle section of mine is a bit disproportionate compared to the film. And now that mine was broken, Perfect time to correct myself. I know that I need to strengthen the blue and correct the red:
IMG_6232.JPG

I've also Modeled out the chest star and will be printing out a size template to compare with the whole suit soon:
IMG_6253.JPG
More on those soon

Well, thats all for now folks. Being out of school, I plan to be working as much as I can and will upload more when I can. My deadline is coming up soon so I hope I can finish in time! Take care y'all
 

Attachments

  • IMG_6280.jpg
    IMG_6280.jpg
    2.6 MB · Views: 1,220
  • IMG_6283.jpg
    IMG_6283.jpg
    2.2 MB · Views: 1,208
  • IMG_6307.JPG
    IMG_6307.JPG
    2 MB · Views: 1,187
  • IMG_6308.jpg
    IMG_6308.jpg
    2 MB · Views: 1,226
  • IMG_6313.jpg
    IMG_6313.jpg
    317.5 KB · Views: 1,135
  • IMG_6230.jpg
    IMG_6230.jpg
    1.9 MB · Views: 1,171
Just found your thread and it looks really good so far! Subbing and looking forward to following your progress. So far, it seems you've been mainly focused on the helmet and shield. Not sure if you've launched into the suit yet, but I wanted to toss in on that.

You mentioned earlier about using a duct tape dummy to pattern. It's a good idea. I've used them for several projects including a Playboy bunny version of Harley Quinn (the client made the duct tape form of herself, folded it up and mailed it to me and it worked perfectly) and the other was a Cap project I recently completed - info on that here: http://www.therpf.com/f78/new-captain-america-project-wip-pic-heavy-224691/

Also, duck is a solid choice but incorporate some stretch fabric into it. You'll be so much more comfortable and be able to get better poses.

Cheers!
 
Wow! I love the concept of the magnets; it looks just like the movie. Do you mind if I steal the idea for my own suit?

Kind regards, The14thDr
 
I'm getting down to the line...

Updates so far:


3D prints:​
2015-01-06_17-11-52.JPG
Heres a picture of all the 3D printed parts I've got so far. As of posting this they are painted and drying (look below).

The chest star has the rounded shelf on the bottom to attch to the suit. I plan to cut a star in the suit and have velcro on the surrounding area (inside frame) and on the shelf to hold the star in place.
2015-01-02_11-47-52.JPG


Suit:​
Got some work done on the chest stripes. They are layered strips of wonderflex that I drew, cut, and assembled by hand. Also have been painted and can bee seen below.
2015-01-04_01-01-31.JPG2015-01-04_01-01-35.JPG
If anyone wants the templates for this let me know and I'll make a pdf for them.

Most of the tailoring on the suit is done. I have a few more places to work with before I can wear it with the magnet and boots but heres a quick look:
(Sorry they are sideways and blurry)
2015-01-06_23-31-47.JPG2015-01-06_23-31-22.JPG


Paint:​
Last night I painted the pieces that were ready and the finish turned out pretty nice. The pictures aren't the final product but they give a good idea of it. I used a valspar matte metallic spray with a valspar clear plastic primer.
2015-01-06_20-14-55.JPG2015-01-06_20-15-12.JPG2015-01-06_20-15-40.JPG2015-01-06_20-15-49.JPG
 
Just found your thread and it looks really good so far! Subbing and looking forward to following your progress. So far, it seems you've been mainly focused on the helmet and shield. Not sure if you've launched into the suit yet, but I wanted to toss in on that.


You mentioned earlier about using a duct tape dummy to pattern. It's a good idea. I've used them for several projects including a Playboy bunny version of Harley Quinn (the client made the duct tape form of herself, folded it up and mailed it to me and it worked perfectly) and the other was a Cap project I recently completed - info on that here: http://www.therpf.com/f78/new-captain-america-project-wip-pic-heavy-224691/


Also, duck is a solid choice but incorporate some stretch fabric into it. You'll be so much more comfortable and be able to get better poses.


Cheers!


Thanks for the advice! I'll definitely be using duct tape dummys in the future.
For this suit, I had to go in and replace some of the sections so they would stretch more. With the fabric it came with, I felt kind of like a piece of cardboard...


Wow! I love the concept of the magnets; it looks just like the movie. Do you mind if I steal the idea for my own suit?


Kind regards, The14thDr


No problem dude! Magnets are they way to go! just make sure you've got one to hold all the weight of the shield and more (forces acting on it)... I've also discovered the fabric in-between the magnet and shield matters as well... Rough works well while shiny, slick fabrics will just make it slip off.
 
SO MUCH HAS HAPPENED IN SO LITTLE TIME...
Had my first con of the year this past weekend so of course Wednesday, Thursday, and Friday before I was going insane... But I was able to throw things together and wear the suit! Lets look at what did:

Shield:
I knew that in my limited time, The shield wasn't going to magically become perfectly smooth... Battle damaged it is!

Started with trimming the edge off:
2015-01-07_16-58-00.JPG

I sprayed some silver on the front to get a better idea of the topography of the dish:
2015-01-07_17-40-26.JPG
Its pretty awful, and not the battle damage I was looking for, but since this shield was a proof of concept anyways, I'll just have to live with it...
(*Remember, possible 3D printed shield coming soon....*)

Before spraying the inside, I attached some bracket shaped pieces and also a pin for the shield mount. I know many people were looking forward to the shield magnet system but unfortunately the fabric I used for the suit is to slippery for the shield to be held with even the force of something small, like walking, acting on it. The magnet on the arm still works and is how I use the shield for arm carry, but as for my back, I had to go with using the mount already apart of the costumes' design.
2015-01-07_17-53-21.JPG 2015-01-07_17-53-26.JPG
Then I sprayed the inside silver:
2015-01-07_18-35-04.JPG

Flipped it over and did some sanding on the exceptionally high areas (all the white marks) anf then made a compass out of string, then marked and cut the rings:
2015-01-07_20-07-10.JPG

The ratio I used for the rings goes as follows:
1/3*radius= radius of inner circle
(remaining 2/3 of surface)/3= marks for each remaining ring​

2015-01-07_21-25-26.JPG
Quick size check...

We then sprayed some silver and taped of major divots for the battle damage:
2015-01-07_23-16-08.JPG

next was taping off the inner and middle rings then the lighter blue spray:
2015-01-08_01-30-29.JPG 2015-01-08_01-54-14.JPG The blue looks different because we sprayed it way outside the limits of good painting temperature... It looked better over the weekend.


Suit:
Finished up some of the detail parts and the tailoring. Started to get the belts together and fitting correctly:
2015-01-08_20-51-34.JPG

I had originally planned to have the star velcro off from the inside. When I tried to do that, It wasnt working well at all... So i ended up just hot glueing it into place. The wonderflex chest stripes were sewn right into the fabric which was very difficult due to the curves and size of the stripes and suit... but it turned out ok:
2015-01-09_00-25-42.JPG


Helmet:​
I had the chance to color in the wonderflex on the helmet for a black/almost dark bronze look:
2015-01-07_18-25-03.JPG 2015-01-07_18-34-58.JPG

All it needed was the chin strap and it would've been great. I had planned to finish it in the hotel room but...... I COMPLETELY FORGOT IT AT HOME... Darn it......

Im missing some pictures of other things but ill upload more in the coming days. The con was great, and the suit was a hit! Very, very, hot... but good hahaha
2015-01-10_13-06-35.JPG2015-01-11_13-51-18.JPG2015-01-11_10-56-04.JPG

I'll still be working on the suit for my next event and uploading here. I'll also upload some pictures from the things I powered through in my final build days... Stay tuned!
 
Last edited:
This thread is more than 9 years old.

Your message may be considered spam for the following reasons:

  1. This thread hasn't been active in some time. A new post in this thread might not contribute constructively to this discussion after so long.
If you wish to reply despite these issues, check the box below before replying.
Be aware that malicious compliance may result in more severe penalties.
Back
Top