You are using an out of date browser. It may not display this or other websites correctly.
You should upgrade or use an alternative browser.
You should upgrade or use an alternative browser.
WannaWanga ANH Graflex Configuration
- Thread starter roygilsing
- Start date
That looks exactly as intended. Thanks for sharing!D-Ring clip upgrade 3.2, thank you Roy!
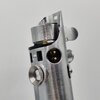
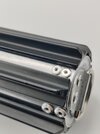
Awright, I just picked a bottom orientation and went with it. I’m not 100% happy with the rivet placement, and an obnoxiously-wandering drill bit resulted in a few tiny nicks in the plating, but, along with Roy’s stamped sidebar and new bubblestrip, this is as accurate as it gets.


Looks great buddy!Awright, I just picked a bottom orientation and went with it. I’m not 100% happy with the rivet placement, and an obnoxiously-wandering drill bit resulted in a few tiny nicks in the plating, but, along with Roy’s stamped sidebar and new bubblestrip, this is as accurate as it gets.
View attachment 1476233View attachment 1476234View attachment 1476235
I fully expect more information to come out, requiring yet more tweaks and/or a new bottom. This build has gone through numerous iterations, already. Always in motion is the ANH hero.
I remember the good old days, when we thought there were six grips, aluminum tape behind the bubblestrip, etc.
I remember the good old days, when we thought there were six grips, aluminum tape behind the bubblestrip, etc.
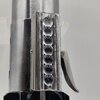
I also finally re-did my ANH Graflex this past weekend using Roy's parts. I went over the replica stamped sidebar with a Scotchbrite pad, as the surface finish didn't match the original vintage Folmer bar. It's not exact, but it's definitely better now. I had considered sending Roy the original for stamping, but I'm kinda' worried about it getting lost in transit on either the way over or the way back. I still may do it eventually.
I also changed my mind and went with the symmetrical/idealized D-ring clip. I wanted to use the new 3D printed grip guide though, so that required some modification (grinding) to the end face, since the rivet placement is obviously different. Unfortunately the mandrels on Roy's rivets would jam in my pop rivet gun for some reason, and clearing them was a time-consuming PITA. So after the two in the D-ring clip, I really didn't relish the idea of having to go through that 4 more times, so I clipped the heads off of the side rivets and stuck them on with wee dollops of JB Kwik. Not ideal, but it is what it is.
Anyway, thanks for the great parts Roy!")


I also changed my mind and went with the symmetrical/idealized D-ring clip. I wanted to use the new 3D printed grip guide though, so that required some modification (grinding) to the end face, since the rivet placement is obviously different. Unfortunately the mandrels on Roy's rivets would jam in my pop rivet gun for some reason, and clearing them was a time-consuming PITA. So after the two in the D-ring clip, I really didn't relish the idea of having to go through that 4 more times, so I clipped the heads off of the side rivets and stuck them on with wee dollops of JB Kwik. Not ideal, but it is what it is.
Anyway, thanks for the great parts Roy!
Sa1yan5pirit
Active Member
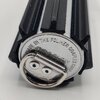
Some shots of my Replica.

- KR Sabers Graflex 3 Cell Flashgun Replica Gen 2
- Roman Props Folmer Glasseye
- Roman Props Non Patent Folmer Bottom
- Wanna Wanga pinched bubble strip
- Wanna Wanga wonky D-ring
- Wanna Wanga Grips
- Accurate sidebar stamped by Roy
- TGS Red Button (Satin)
- TGS Brass Pins (aged)
Attachments
Sabs
Active Member
Does anyone have a reliable way to drill these tubes without having the finish flake off? On the base the D ring covers it, but now I'm nervous to drill for the 4 side rivets because that could get really messy without the chance to cover it with a nice large bit of aluminum.
-sabs
-sabs
Sa1yan5pirit
Active Member
Is it a KR flashgun? I experienced some chipping on the DV6 while building but the drilling was no problem at all. Just predrill with a smaller drill bit.Does anyone have a reliable way to drill these tubes without having the finish flake off? On the base the D ring covers it, but now I'm nervous to drill for the 4 side rivets because that could get really messy without the chance to cover it with a nice large bit of aluminum.
-sabs
AnubisGuard
Master Member
Just predrill with a smaller drill bit.
This. Start with your smallest bit and work up.
A little cutting oil couldn’t hurt too. I use Rapid Tap but technically WD-40 would work too right?
I would lock the flash in a vise and use a little bench top drill press
OR
Lock it in a vise. Dremel - use a little ball cutting bit to make a dimple where you want to drill. Use a nice hand drill to run a smaller hole and then the size you want.
I would lock the flash in a vise and use a little bench top drill press
OR
Lock it in a vise. Dremel - use a little ball cutting bit to make a dimple where you want to drill. Use a nice hand drill to run a smaller hole and then the size you want.
A little cutting oil couldn’t hurt too. I use Rapid Tap but technically WD-40 would work too right?
I would lock the flash in a vise and use a little bench top drill press
OR
Lock it in a vise. Dremel - use a little ball cutting bit to make a dimple where you want to drill. Use a nice hand drill to run a smaller hole and then the size you want.
The Dremel ball-bit is exactly what I've used. Works very well to create pilot holes/divots.
Oh, in case you’re new to drilling (ignore me if you’re not) there is a sweet spot when it comes to pressure and speed.
If you bear down hard on the brass/nickel with a high speed it might just spin in place. The softer metal will do well with a slower speed, and I would hold your drill up with your arm and add pressure in little bits. It will start biting and bring up curly swarf, just stay there and it will eat through smoothly lol
Sometimes I use a high speed to start a hole when I might wander or something, to lessen the time I have to screw up the start of a hole lol
What guide do you guys use to angle the grips unevenly?
WannaWanga’s guide is great for uneven placement of the grips, but the best way to angle the edges is to eyeball them, matching the reference images.
Alright. Yes I received the grip guide for the placement, I suspected I would have to eyeball the edges. Do you have experience removing the washer from the clamp? My Roman's one is super tight, and I don't want to snap anything haha.WannaWanga’s guide is great for uneven placement of the grips, but the best way to angle the edges is to eyeball them, matching the reference images.
Alright. Yes I received the grip guide for the placement, I suspected I would have to eyeball the edges. Do you have experience removing the washer from the clamp? My Roman's one is super tight, and I don't want to snap anything haha.
Remove the clamp from the upper and lower halves of the flashgun. Open the clamp lever out, pinch the clamp sidebars together, and unscrew the lever completely. Remove the washer, then reassemble the clamp.
AnubisGuard
Master Member
When I did my grips, I just used an emory board and roughly sanded away at the ends to get a rounded angle. The real prop appears pretty uneven on that front, so I didn't put any effort into consistency.
Similar threads
- Replies
- 6
- Views
- 714
- Replies
- 39
- Views
- 3,877