Veektohr's Half-builds & The Occasional Finished One - Zombie MGCs

Re: Can't beat a GRAFLEX

a word on drill usage; a great many people use too much downward pressure when drilling. not much force is necessary if your drill is sharp.
shouldn't even need a dowel or such but it's generally a good idea.
if you use a center punch first where you want the hole, the drill has less tendency to wander. drilling a smaller hole first before your final hole size is greatly recommended as well.
drill speed is also a factor. it doesn't need to be spinning at a million rpm's. slower is better. let the tool do the work.
to get really handy and preserve cutting tool sharpness, a light oil or cutting fluid is a good idea.
that is all.

your friendly neighborhood hobbysmith guy.
jack of all trades master of none.

if you're distorting the bottom of a graflex drilling, you're pressing too hard

also while i'm at it; if you are distorting your screw slots with the screwdriver you are using too much force....


This is so true, buy a good drill bit and it will cut through it no problem. I used a cheap one to begin with and I found myself having to push and it broke. Replacement bit cost maybe 3x the price (still cheap) and the difference was night and day.

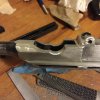
I had a problem with my riveter though, the riveting action warped the bottom plate upwards! But I bashed it down again on a bit of wood :lol
 
Re: Veektohr's Saber / Blaster Log

Well to kill some time waiting on replacement grips for the ESB, I picked up one of these Canon flash units:

ISXV3xs.jpg

There are so many awesome details on these. Lots of OT vibes coming off it.

aHjz2lm.jpg jEvjnR5.jpg

I grabbed a multi-bus from my scrap pile to see if I had any with fingers that would fit the Canon's clamp. The clamp on these has a small spring lever that actually helps hold in whatever is clipped inside, which looks pretty cool.

72WEZIl.jpg 8RtIDbZ.jpg bnbhio5.jpg

Lookin' good so far! Next I started thinking about the emitter. I removed a couple set screws to remove the plastic cap at the end of the flash, and then disassembled the reflector unit that came with the flash and pulled out some pieces that I thought would fit together pretty well.

W6uPMGq.jpg

The shroud fits well into the space I'd pulled the plastic cap out of. Once I drill it, I'll be able to use the same set screws I removed to hold it in place. The outer emitter piece actually snaps into place which is great, but the inner emitter piece I will have to find a way to secure. Here's everything mocked up, though.

GbCB34c.jpg Ze2cIRM.jpg

I really like the direction it's headed!

...on another note I got the scope and hengstler for my E-11 build. Hoping to get a scope rail thrown on there and mount them this weekend. I'm going to have to find another magazine for it since I'm not going to cut down the MGC one. I think I'm going for an ANH-style E-11 with it. I know ROTJ used MGCs, but I just don't like the u-rails as much as the t-track... So it'll probably never be screen accurate, but that's fine since it'll still be awesome :cool This thing is seriously the best. The previous owner installed a custom bolt that allows it to fire the 220 MGC cartridges (and their clones). The action cycles great. I only wish it didn't freak out my neighbors :p. It's loud!

fuTssRQ.jpg lfbPsz9.jpg
 
Re: Veektohr's Saber / Blaster Log

Christmas came a day early it would seem!

wxzuwkO.jpg

Has anybody taken the chrome off these before? I don't know if it's the same model as the green-box MGC but it was a great price so I snagged it. I was going to disassemble it and take it to a shop that does electro-plating to have them strip it. Pretty excited, though. Now I gotta figure which blaster to build first with it...
 
Re: Veektohr's Saber / Blaster Log

Alright, take two on the ESB grips. Didn't go as hog-wild on the weathering this time and I like 'em a lot better. The screws are cut short so they only go into the grips this time.

vyZ1bgj.jpg

I also decided to just use Roy's replica Kobold instead of the original one. I couldn't bring myself to weather the legit one, so it will stay on its flash to display. Here's the d-ring after a good thrashing with some sand paper and files.

uIYwd5g.jpg

Then something horrible happened... I looked at the blueprints, I marked everything out in advance, and I double and triple checked before mounting the d-ring. Popped the rivets in. Took a step back... and saw that I'd mounted it in line with the wrong t-tracks...

Mmkkpae.jpg

It felt like signing a check, but then you look down and you drew a wiener by mistake. So frustrating. After a lot of cursing and beer to ease the pain, I have decided to just blame it on those lousy Ugnauts that dug this thing out of the ventilation ducts of Cloud City. One day I'll probably go back and route a new groove for the clamp to slide into that will allow it to sit in-line with the activation strip, but for now I'm taking a step back from this saber... it's like it knows that I like the ANH more! Anyhow, apart from that I think it looks great. Plus something came in the mail to lift my spirits...

L7a9NZp.jpg

to be continued!
 
Last edited:
Re: Veektohr's Saber / Blaster Log

Then something horrible happened... I looked at the blueprints, I marked everything out in advance, and I double and triple checked before mounting the d-ring. Popped the rivets in. Took a step back... and saw that I'd mounted it in line with the wrong t-tracks...

You're not alone. I did the same thing with an ANH Luke saber build 10+ years ago. Measured it all out, drilled the holes, and discovered when I put the Graflex back together that I'd accidentally set the grips and d-ring at a 90º rotation from their correct orientation. This was back in the time when we all thought the ANH had six grips and 2 holes in the d-ring so it's all wrong anyway, but to this day it's on my shelf with a big hole visible in the wring spot on the bottom. :unsure
 
Re: Veektohr's Saber / Blaster Log

You're not alone. I did the same thing with an ANH Luke saber build 10+ years ago. Measured it all out, drilled the holes, and discovered when I put the Graflex back together that I'd accidentally set the grips and d-ring at a 90º rotation from their correct orientation. This was back in the time when we all thought the ANH had six grips and 2 holes in the d-ring so it's all wrong anyway, but to this day it's on my shelf with a big hole visible in the wring spot on the bottom. :unsure

It stings sooooo bad. If I ever get around to correcting it I'll try to modify the bottom to slot into the clamp in a different spot so that I won't have to do that. This poor flash has been through so much already... : /

- - - Updated - - -

Couldn't help it:
3jhuycA.jpg

While I'm here, does anybody know how to remove this little top shroud thingy above the windvane?

pBUCiil.jpg

I'm treading super carefully with this thing...
 
Re: Veektohr's Saber / Blaster Log

As always there's a third option ... in time just get another G R A F L E X 3 Cell ... re-use that bottom for your ESB and this 'wrong' version for Vader ROTJ G R A F L E X ... which is easier since it doesn't have a real clamp with lips so you can position the clip as it needs be. Now where the heck did you score that grenade ... is what I'd like to know :wacko

Chaim

Hmmm I do have one unconverted 3 cell hanging around... but once I build one Vader saber I will have to build all of them!

I found the grenade in the junkyard. I was pumping gas looking around, and there it was! Good thing pumps lock in place, because I let go of that thing and started typing as fast as my fingers could go. In fact I had just been talking to my girlfriend about how I shouldn't even begin looking for Obi-Wan parts because I would get way to obsessed with them... whoops! :wacko As they say, once you start down this path... forever will it dominate your destiny. Consume me it will!

Carefully unscrewed the windvane and that shroud came right off. Just a little terrifying to feel resistance there...

OBfFjiT.jpg cU2wvzA.jpg

It is intoxicating holding original parts in your hands... what have I started...
 
Last edited:
Re: Veektohr's Saber / Blaster Log

Not much to report here, but I had a few beers and decided I should work on my Canon saber. The emitter is way too cool of a feature to keep hidden all the way inside the flash, so I decided I'd make a booster. Having no ability to lathe anything I walked down to the hardware store with the canon in my pocket to see what I could find. There were wooden dowels... which would work but I wanted to still be able to see into the flash as well. PVC... nah I don't want a big pipe of PVC hanging around. Then I saw 'em: rubber washers! 20 cents a pop.

2CNECBs.jpg

There's a little nub in the flash, so I had to make sure my booster would sit flat around it. Once the epoxy had set up I sanded it down a little bit so that it would fit snug. Behold in all it's hideousness -- my Franken-booster!

w96eznK.jpg

Glued on the emitter, and I was good to go. The rubber is a pretty tight fit, and the bulb release lever actually digs into as well so all in all I'm pretty pleased with this solution.

AtsivMu.jpg IYuYXXy.jpg

I really like having it sit higher! Happy with how this guy is coming together, if maybe a bit slowly.
 
Re: Veektohr's Saber / Blaster Log

So after my little emitter booster adventure, I had Vader-sabers on the brain. When I opened up my first Exactra, I fell in love with the look of the circuit under the bubble-strip. I was going to leave in there for my ANH Luke regardless of accuracy because it looked so cool, but I just couldn't fit it in, even after thinning out the bubbles. But then I thought about the clamp on the Canon. It actually has a little channel in the center like this:

3mw8Qhi.jpg

I slid one of Roy's bubble-strips into the clamp and it fit perfectly width-wise, although it was too long. Since I didn't want to sacrifice an actual Exactra circuit for this experiment, I went to my pile of incorrect bubbles... of which I have many.

mM1bIeD.jpg FUtSjsH.jpg

I bought a lot of 80 of these for like $10 a while ago figuring "well, I'll do SOMETHING with them." Anyhow, so I pulled off the circuit and trimmed it down so that it would fit into that channel. Then I chopped the replica bubbles, and swapped the whole thing out. It fit perfectly! There's even a little spring-loaded pin in the channel that puts pressure back up into the circuit to hold it in place.

dcaKjJP.jpg

It's funny because as a kid I always kind of preferred the circuit activation strip, but as I grew up I shifted more and more into the bubbles camp. I just love how weird (and dare-I-say kinda silly) they are. That said: bubbles+circuit is the winner hands down. The way the lenses magnify and distort everything is so cool. The exactra bubbles don't quite line up with my generic LED circuit, but it's fine for a hobby-saber. I'll be honest, though, it makes me want to build a Vader ESB really bad!
 
Re: Veektohr's Saber / Blaster Log

REALLY great solution! Very impressed over here. :lol

Thanks! I try to err on the side of my learning curve [emoji16] one day I will learn how to lathe and make custom parts...


Sent from my iPhone using Tapatalk
 
Re: Veektohr's Saber / Blaster Log

Those are the 'modern' variants ... so don't expect them to open up into 4 parts as the originals on OB1's lightsaber, however they can be used just the same for the pommel section ... only be very careful when drilling a hole for the D-ring here's a helpful visual tutorial : http://www.therpf.com/showthread.php?t=113901

Chaim
 
Re: Veektohr's Saber / Blaster Log

Yeah, I'm going to hold off on drilling for now... one day I'll take them to my friend with a drill press and we'll tackle it. Definitely not going to do it by hand :unsure For $25, they will tide me over until I can scrounge up the older ones!

Those are the 'modern' variants ... so don't expect them to open up into 4 parts as the originals on OB1's lightsaber, however they can be used just the same for the pommel section ... only be very careful when drilling a hole for the D-ring here's a helpful visual tutorial : http://www.therpf.com/showthread.php?t=113901

Chaim
 
Re: Veektohr's Saber / Blaster Log

Since I have a habit of making mistakes, I was going to do a dry run on a Denix before messing around with the MGC. Happened to snag a machined scope assembly from DEC that popped up on his website along with an aluminum BB and flashhider. Exciting! I thought I was going to have to wait for his next run to snag those. Anyhow: Denix. Well since I've become obsessed with MattyMatt's Uber-Denix I decided - "Hey I've got files, why not go for it?" So I did. And it was really challenging, but kind of Zen at the same time.

I worked on the upper today, and mostly followed in Matt's very well documented footsteps. Focus was on sharpening up some things, getting rid of stuff that shouldn't be there.

bw64It1.jpg 30YzZyY.jpg 31FSL4r.jpg

I focused on the butt of the upper a lot. It's just grossly misshapen. I scalloped the bottom (used a round file for the first time... there's a learning curve there for sure) and angled some stuff that needed angles. Then I did a general chamfer pass on some stuff.

ZP9I5nF.jpg

Whoops, angled the non-safety side too :wacko . Like I said: I make a lot of mistakes. Still better than stock.

That's it for today. Still needs a lot of cleanup, but I'll be honest this is a really fun thing to do and I think in the end - no matter what happens - it'll be fun to have a blaster that I've put so much effort into. Thanks Matt for the inspiration!
 

Attachments

  • FSQeEhC.jpg
    FSQeEhC.jpg
    490.1 KB · Views: 84
Last edited:
Re: Veektohr's Saber / Blaster Log

Nice! It's looking much better already. Looking forward to seeing your progress on this and your other builds.
 
This thread is more than 6 years old.

Your message may be considered spam for the following reasons:

  1. This thread hasn't been active in some time. A new post in this thread might not contribute constructively to this discussion after so long.
If you wish to reply despite these issues, check the box below before replying.
Be aware that malicious compliance may result in more severe penalties.
Back
Top