Hello builders and makers!
After my Robocop was finished about 8 months ago (and some afterfixes) I have been on the fence as to what to make next.
On one hand, it would be fun to make a Buzz Lightyear (a lot easier now after the movie and a very detailed 3d print version is out there), but not as fun as it would have been if there never was a movie..
So, After going back and forth, I've decided to make something that is way, WAY over the skill level of things I've attempted in the past.
Varok Saurfang from World of Warcraft.
This project will require 3d design, foam building, muscle suit, mechanics, animatronics, sculpting, making a silicone mask and silicone painting.
I have naturally read up on SKS props excellent Warcraft Orc build, and AlphaTech686's VERY detailed and brilliant Grommash build. In fact, if it hadn't been for t hese, I would never attempt such a thing.
I am going to make the version of Saurfang that is towards the end of his life.

Having NEVER sculpted in my life, I am in for a wild ride.
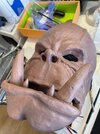
First off, I brought out my small 3d scanner and had a friend help me make a scan of my head, smoothed it out in Meshmixer, popped that in the 3d printer

Resin smoothed it and painted and clear coated the head to have a base to start building the mask on.


Gah! Is my nose really that big?
While being in the digital realm, a place I fel much more confident in, I used the 3d scan to make a face plate to use for attaching the forthcoming (?) silicone mask and animatronics.

My plan is to build the same type of upper lip snarl when opening my mouth as AlphaTech686 has on his Grommash build. Thanks for showing that in so much detail, btw!
I then brought out my really old Super Sculpey and tried to start.

The firm Super Sculpey might be excellent for capturing details, but it was extremely brittle and VERY difficult to work with. Not even my pasta maker could process it.
After a few hours I had at least managed to get some clay on the head. To be honest it looked ... not good.

The problem, I realized, is that Orc physiology in the face is so much different. Where the tip of my (large-ish) nose is, I would need to have the upper lip with the nose ring hanging in front of it. The end of the gray clay on the picture is where Saurfang's own nose would be. I would need to bulk up the face a LOT.
And.. with the extremely hard to work with Suer Sculpey this wasn't going to happen.
So, I ordered two boxes of Monster Clay (soft) and started bulking out.
I started with just testing to make his teeth...

While I can understand this is a tad too soft to make the actual outermost skin layer for details on (just touching it would break any detail I have put in), it was a LOT easier to at least block out the general shape.
After sitting with this for just a little over an hour, I had already come way longer than I had with the 2 hours I spent with the Super Sculpey:


I let that sit over night, and started this morning to block out some more.
After 2 hours more of blocking out, this is where I am:


This is just done from the top of my head. Looking at the Saurfang face now when I am writing this, I see the teeth needs to be wider, as would the mouth. The lower lip needs to cover the middle front teeth, and .. well a ton of detail that I have not even started with yet.,
This is at least a start.
And what makes this a big step for me, is that I have NEVER sculpted anything in my life. Sure, I've watched tons of videos and was enrolled in Stan Winstons online school for years and watched everything I had time for, but to think that I could have managed to even do this rough blocking in a few hours was a lot more than I had hoped for.
Now, my tired fingers needs to take a rest before I continue building his face.
My plan is to at least get a quick estimate of the shape of his face before I remove the teeth and detail them and 3dscan and/or cast them.
After my Robocop was finished about 8 months ago (and some afterfixes) I have been on the fence as to what to make next.
On one hand, it would be fun to make a Buzz Lightyear (a lot easier now after the movie and a very detailed 3d print version is out there), but not as fun as it would have been if there never was a movie..
So, After going back and forth, I've decided to make something that is way, WAY over the skill level of things I've attempted in the past.
Varok Saurfang from World of Warcraft.
This project will require 3d design, foam building, muscle suit, mechanics, animatronics, sculpting, making a silicone mask and silicone painting.
I have naturally read up on SKS props excellent Warcraft Orc build, and AlphaTech686's VERY detailed and brilliant Grommash build. In fact, if it hadn't been for t hese, I would never attempt such a thing.
I am going to make the version of Saurfang that is towards the end of his life.
Having NEVER sculpted in my life, I am in for a wild ride.
First off, I brought out my small 3d scanner and had a friend help me make a scan of my head, smoothed it out in Meshmixer, popped that in the 3d printer
Resin smoothed it and painted and clear coated the head to have a base to start building the mask on.
Gah! Is my nose really that big?
While being in the digital realm, a place I fel much more confident in, I used the 3d scan to make a face plate to use for attaching the forthcoming (?) silicone mask and animatronics.
My plan is to build the same type of upper lip snarl when opening my mouth as AlphaTech686 has on his Grommash build. Thanks for showing that in so much detail, btw!
I then brought out my really old Super Sculpey and tried to start.
The firm Super Sculpey might be excellent for capturing details, but it was extremely brittle and VERY difficult to work with. Not even my pasta maker could process it.
After a few hours I had at least managed to get some clay on the head. To be honest it looked ... not good.
The problem, I realized, is that Orc physiology in the face is so much different. Where the tip of my (large-ish) nose is, I would need to have the upper lip with the nose ring hanging in front of it. The end of the gray clay on the picture is where Saurfang's own nose would be. I would need to bulk up the face a LOT.
And.. with the extremely hard to work with Suer Sculpey this wasn't going to happen.
So, I ordered two boxes of Monster Clay (soft) and started bulking out.
I started with just testing to make his teeth...
While I can understand this is a tad too soft to make the actual outermost skin layer for details on (just touching it would break any detail I have put in), it was a LOT easier to at least block out the general shape.
After sitting with this for just a little over an hour, I had already come way longer than I had with the 2 hours I spent with the Super Sculpey:
I let that sit over night, and started this morning to block out some more.
After 2 hours more of blocking out, this is where I am:
This is just done from the top of my head. Looking at the Saurfang face now when I am writing this, I see the teeth needs to be wider, as would the mouth. The lower lip needs to cover the middle front teeth, and .. well a ton of detail that I have not even started with yet.,
This is at least a start.
And what makes this a big step for me, is that I have NEVER sculpted anything in my life. Sure, I've watched tons of videos and was enrolled in Stan Winstons online school for years and watched everything I had time for, but to think that I could have managed to even do this rough blocking in a few hours was a lot more than I had hoped for.
Now, my tired fingers needs to take a rest before I continue building his face.
My plan is to at least get a quick estimate of the shape of his face before I remove the teeth and detail them and 3dscan and/or cast them.
Last edited: