Type-15 Shuttlepod from Star Trek TNG

I had a missed opportunity to acquire a set of the correct vintage Scat Procar Rally seats. Lt. Washburn spotted them on Craigslist. Unfortunately I did not have the funds available at the time nor the logistics to purchase them in CA and transport them to PA. They were brown with some tears but that could have been fixed. The ad did provide some additional images.

mH7lkUH.jpg


720dsam.jpg


T8OIksr.jpg
 
It's frustrating. I just missed out on the prefect seats on an ebay auction. They were the correct seats in the correct color in pristine condition for an affordable $400 including shipping. Somebody else snapped them up with the buy it now. I've been looking for these for 5 years and am physically ill that I just missed them.

0YkXlTQ.jpg


oJuZhqk.jpg


dVzsxgE.jpg


E9fcygU.jpg


1Ac1dLM.jpg


Nqoh9ds.jpg


hpAKIqe.jpg


On the positive side there were some good close ups of the reclining mechanism so it would be possible to 3D print a non working facsimile. They were never actually used on-screen so they don't need to be functional.
 
Oh man, that sucks. I've had similar missed opportunities and it's hard to get over. I actually had been looking on eBay not that long ago and hadn't seen anything then.

This is a long shot, but you could email the seller and see if they'd be willing to forward a deal to the buyer. Maybe they'd give them up for a small fee, depending on what you'd be willing to pay, of course. The could just reject the idea out of hand (it's technically against eBay's rules as well, I think), but they might go for it, who knows?
 
On the positive side there were some good close ups of the reclining mechanism so it would be possible to 3D print a non working facsimile. They were never actually used on-screen so they don't need to be functional.
They kinda did. I know the seat got flipped forward on at least one occasion, in "Time Squared". I'd have to check for others. You don't need a functional mechanism for that, though, just a pivot with a stop. But they weren't static the entire time they were on TNG...
 
They kinda did. I know the seat got flipped forward on at least one occasion, in "Time Squared". I'd have to check for others. You don't need a functional mechanism for that, though, just a pivot with a stop. But they weren't static the entire time they were on TNG...

You are correct in that approximately 14 minutes into the episode Times Squared, the right seat is shown tilted forward to allow Geordi access to the rear bulkhead. What I meant is that the actual mechanism for doing so was never shown in operation onscreen, so that gives me some artistic license. Naturally I would rather have the real deal.

1585599047222.png
 
Yup. Just making sure you wouldn't make a fixed frame. You're an absolute bear for detail, so I was pretty sure you'd already caught that, as many times as you've gone over the episodes where the things appear, but I didn't want to be wrong and then it be too late.

Also, I realized I forgot to ask: What do you consider a "reasonable" price for the seats? Does that include shipping costs? Etc. I have friends further into automotive restoration and modding than I am who have resources I don't. I've thought of tasking them with keeping an eye out for the seats, but you just missing that pair hurt enough it decided me. I want to expand the number of eyes-on for that, but don't want to throw leads out of your price range at you. That'd hurt just as bad.
 
Also, I realized I forgot to ask: What do you consider a "reasonable" price for the seats? Does that include shipping costs? Etc. I have friends further into automotive restoration and modding than I am who have resources I don't. I've thought of tasking them with keeping an eye out for the seats, but you just missing that pair hurt enough it decided me. I want to expand the number of eyes-on for that, but don't want to throw leads out of your price range at you. That'd hurt just as bad.

Just for reference new seats of the replacement version run about $760 with tax and free shipping and have some cosmetic differences. The set in the eBay auction was $400 with tax and free shipping. I would consider this my high end for used seats, but these seats were PERFECT with no rips, tears or cracks. I'm still kicking myself for missing these.
 
Im new here but have the same project on the table. I already figured out the procar seats. Had them in my 64 beetle when i was a teenager lol. As far as ive seen the new ones still look good. I just priced out the 2 inch square tubing for the frame. Hope to start in the next month. Just finishing up the bridge railings and stands for my screen used costume display. I wanted to give back to the Star Trek committee so i started something called Project Stardate. I will be a mobile display for cons. I have a page on Facebook i started if interested. I used the original drawling to get my dimensions off of but if anyone is willing to share some they have it would be appreciated. Could not find the original interior detail drawling either. Thanks for any help.
 
I used the original drawling to get my dimensions off of but if anyone is willing to share some they have it would be appreciated. Could not find the original interior detail drawling either. Thanks for any help.

Gderr I've posted most of my research materials here including screen cap's, production stills and behind the scenes photos. If you have specific questions about the interior, post them and I will answer them to the best of my ability.
 
I have an ambitious project that I have been pondering for over 20 years to build a full scale replica of the Type-15 Shuttlepod frequently seen in Star Trek The Next Generation. It started when I saw the El-Baz in the episode "Times Squared" in 1989.

It appealed to me in that it was small (relatively) and had simple lines and planar surfaces. It also had a full interior. This was different than the Galileo shuttlecraft from the original series which had a separate interior set that was bigger in the inside than the outside (like a Tardis).

In volume 8 of the Official Star Trek The Next Generation magazine they published some of Rick Sternbachs concept drawings.


These drawings are not true to the actual finished prop, but they do provide the general dimensions and identify some of the materials.

In the same issue they also published some pictures taken during production that were not shown on-air. (Note the cables protruding from the rear of the engine nacelle).


Over the years I have made many sketches and then migrated them onto CAD files and started building a detailed solid model.


Once the series was released on DVD I could finally get some decent screen captures of the details of the shuttlepod. (I photoshopped the actors out whenever possible).


In addition from the information in the pictures I learned the prop was composed of 4 loose pieces.


The main fuselage was on wheels to simplify moving the prop around the set. The engine nacelles were not attached and were simply placed along side of the main fuselage. The wedge under the nose was not in the original concept drawing and I believe it was added as an afterthought to hide the wheels. The stage crew tended to be inconsistent in assembling the prop. The engine nacelles do have left and right hand versions and sometimes they would reverse them. Also the nacelles would sometimes be placed further forward or further back than others. Sometimes the wedge under the nose would be upside down.

I also know there were several re-dresses of both the interior and exterior of the prop for various story lines but I plan to focus on the original El-Baz appearance,

I am still missing some details. I have posted in various Star Trek forums asking for any details on the original prop. I know it had been to some conventions in the 90's and thought some Trekkie might have some pictures, but no results. I contacted Rick Sternbach and asked him about the full set of plans and what became of the original prop. He actually did reply and said the full plans were probably in the hands of Paramount Studios and he has no idea what ever happened to the original prop.

I see there are a lot of Trek fans here who are also model/prop builders so I'm asking if any of you may be able to help with the following..


  • Any behind the scenes pictures of the original prop?
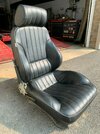
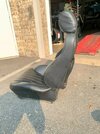
  • What is the source of the bucket seats used in the shuttle?
  • What is on the LCARS (Okudagrams) panels on the dash and rear bulkhead areas? I tried to contact Mike Okuda about this via his facebook page but have not yet received a reply. Anyone have his email address? How about his snail mail address?

This is still in the design stage and would be my most ambitious build yet, but I keep thinking how cool it would look in my driveway.
 
One down, one to go. I just picked this passenger seat up for $150. It has some issues, missing cover, damaged leaver, some scuffs, but overall in good condition for the vintage.

A special shout out to Liam for transporting this find to me. I owe you one. (y)
s-l1600 (12).jpg
s-l1600 (15).jpg
s-l1600 (16).jpg
s-l1600 (17).jpg
s-l1600 (14).jpg
 

Attachments

  • s-l1600 (7).jpg
    s-l1600 (7).jpg
    370.4 KB · Views: 67
  • s-l1600 (8).jpg
    s-l1600 (8).jpg
    411 KB · Views: 61
Last edited:
Update:

The guy that sold me the passenger seat now has the matching drivers seat. It is in similar condition to the passenger seat, missing the cover and with a little more scuffing on the headrest. Still a good deal at $150. If all goes well I should be getting it this week. There was a delay because of all the flooding last weekend.

s-l1600 (1).jpg


s-l1600.jpg


s-l1600 (2).jpg


s-l1600 (3).jpg


In the meantime I had the passenger seat scanned for inclusion in my 3D model and to re-create the missing parts from the scanned geometry,
1631118887510.png
 
I have the seats. My collection of found items is growing.

20211102_092646-a.jpg


I have noticed however there is a slight variation in the design of the reclining mechanism. The variation I have is not the same as that used on-screen. I do believe I can modify the orientation of the release leaver and cover to match that of the screen used version.

timesquared_hd_420-a.jpg

IMG_20170722_115559.thumb.jpg.1eb339d117563060861b922f2af74b44-a.jpg
s-l1600 (12)-a.jpg
 
Last edited:
Built by a different Starfleet-contracted facility? Or, a la real world, it's an earlier or later revision? If you can't rationalize conflicting data, are you even a Trekkie? ;) *lol*
 
Update: This project is not dead yet. I had been focused on some of the interior dressing. Sonex One acoustical foam was used to line the interior of the lower fuselage.
1646159166637.png

1646159200580.png

1646159337034.png

1646159550056.png


This foam is still manufactured but it isn't cheap. It costs about $42 for a 24" X 48" X 2" sheet, but they only sell it by the case of 8 for $377.

1646160076778.png


I only need one sheet. I managed to get some free 6" X 6" samples.

1646160115409.png
1646160494604.png


I had the samples 3D scanned and was able to extrapolate the pattern and create a 3D model.

1646160916681.png


Since I don't care about the acoustic properties, I can fabricate panels out of more durable materials. I've joined a maker space and now have access to a CNC router with a 48" X 48" table. I also have access to a vacuum former that should have the capacity to form the panels in their final sizes.
 
Continuing on the interior dressing, the rear interior of the upper fuselage was lined with 4" box rib steel siding.

1646323519690.png


1646323460592.png


The siding is not symmetrical in that the chord lengths for the peaks and valleys differ on each side, 1-3/8" vs 1-5/8".
1646323647032.png

As such the sheeting could be installed in the standard orientation, with the 1-5/8" chord on top, or in the reversed orientation, with the 1-3/8" chord on top.
1646323681215.png

In this case, based on the visible edges, the sheets were installed in the reversed orientation.
1646324165003.png

While these sheets are available in various materials, these were made of steel. You can see what appears to be a bead of weld where the sheet was attached to the 2" square tubing of the horizontal metal frame.
1646324458633.png

There may also tack welds on the vertical frame members at ribs #7 on both sides.
1646324738538.png

1646324814377.png


If so, they apparently tried to hide them with gaffer tape.
1646324987432.png


There might also be a sloppy tack weld at rib #4
1646325098398.png

1646325143467.png


These panels ran from the rear vertical member of the door frames, past the rear bulkhead, and probably ended at the next vertical frame member.
1646326219803.png


While I can find sources for this material, they typically require you to order in bulk. I'm looking for a local source that would sell small quantities. With the given dimensions, as a back-up I can fabricate panels with the same appearance out of foam, wood, MDF or some other alternative material.
 

Attachments

  • 4”_Box_Rib-Data-Sheets.pdf
    119 KB · Views: 76
Last edited:

Your message may be considered spam for the following reasons:

If you wish to reply despite these issues, check the box below before replying.
Be aware that malicious compliance may result in more severe penalties.
Back
Top