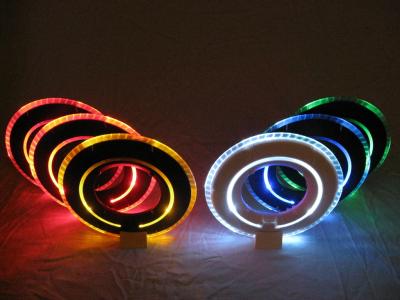
Tron Legacy Deluxe Identity Disc mods?

Umm... never had to wire up a usb port, so I'm not sure. In theory, yes it's possible, although I'm not quite sure as to the specifics. The charger that I use has a slider switch that allows you to select the voltage of the system (in multiples of 3.7). USB AFAIK is a 5V system. Since the voltage of the disc is now 11.1V, I dunno if something special would need to be done. I'm sure someone with more electronics knowledge will chime in at some point with a better answer.
Sorry :confused

You are correct. You could not charge from USB because it'd only 5.25VDC. It's more hassle than it's worth trying to get it to work that way. And depending what and how many you're charging assuming it's <5.25VDC, you're still limited to 500mA of current unless you short the Tx and Rx pins to let the USB know it's a dedicated charging port to allow for 1.8A of current.
 
Do you have any pictures of the inside? How did you get the inner ring to light up so brightly? Did you remove any part of the inside that surrounds the inner ring to expose more of the lights?

Take a look at the left side of the first pic, 6 posts up...
The answer is yes, I removed some of the plastic around the front inner C-ring
(for both the 3mm LED version and also the flexible SMD LED strip version)

-C
 
Take a look at the left side of the first pic, 6 posts up...
The answer is yes, I removed some of the plastic around the front inner C-ring
(for both the 3mm LED version and also the flexible SMD LED strip version)

-C

Thanks. Saw that picture after I posted my question.

Did you use a dremel to do it?
 
You are correct. You could not charge from USB because it'd only 5.25VDC. It's more hassle than it's worth trying to get it to work that way. And depending what and how many you're charging assuming it's <5.25VDC, you're still limited to 500mA of current unless you short the Tx and Rx pins to let the USB know it's a dedicated charging port to allow for 1.8A of current.

Good Info. Thanks!
 
Are you just trying to pop it out? I found that by flexing the disk a bit while pushing from the inside helped it come out quite easily. The only thing I had to watch out for was to pull up both tips evenly. If you pull only one side and move around to the other - you risk snapping it in the middle.
 
I saw that cannibal869 used 10440 battery instead of A23, but has anyone used any others? I am trying to order one ASAP since Halloween is 10 days away. I am using two SMD strips just like cannibal869 and would love some advice. the 10440 are kinda expensive at $4 each plus charger. If I need to I can get these, but another option may help. Thanks!
 
I am using one A23 battery in an N-type batter holder to power the SMD strips in my Sam Flynn Identity Disc. It works rather well, but I have no idea how long it is going to last. Anyone have any rough numbers on this? I have about two feet of LEDs in the disc broken up into four interconnected sections.

For those interested here is what I ended up doing to modify my disc.

First I gutted it. I pulled out all the existing electronics and cut and dremeled out as much of the plastic as I could to make room.

Next, in order to get the inner C-ring to light up better, I tediously used a dremel to cut out notches for the LEDs to sit in (pictures attached). This was a pain in the butt.

Once this was done, I lined as much of the inside of the disc with aluminum foil duct tape. I figured the reflective qualities could only help.

I used E6000 glue to install the N-type battery holder and new switch (using the slot from the original switch). I also used the E6000 to glue the piece that was used to press the button in the original setup so that I did not have a hole in my disc.

Lastly, I installed the strips of LEDs, taped as much of the wires down as I could (using the aluminum tape) and closed the sucker up.

I must say that I am quite pleased with the results.

Big thanks to fireslayer26, vew, Tim, cannibal569 and everyone else on here that has contributed information for their help and support during this process.

Now it's time to finish up the suit.
 
Last edited:
Hey guys! This will be my first real DIY project. I'll be using the youtube video 'Tron Disc Modification' 1-3 as my inspiration with a few little changes.

All the parts to make my own custom modded Sam Deluxe Tron Disc from scratch like in the vid will have arrived by Thursday, minus the lighting on the outer blade. Didn't know what length I'd be needing but it looks like 3 feet is fine for the outer portion.

I'll be going with an all EL Wire mod to show the benefits of it VS the LED versions I've seen out there.

With the inner ring el wire that I already have, I'll be sizing up the guts of the outer ring part as an example to see if it'll fit nicely and will report my findings when I get the chance. I'm a little iffy that the 5mm el wire will squeeze in along the edges nicely and reflect a good glow against the rubber blade/fins, though.

Thinking about going with a Soulintertia mod kit if this doesn't work out, though. Those outer rings look so perfect. If I do, I'll still have left over parts to make outfits or accessories (shoe mods?) when I design the costume part. Definitely a win-win so long as I don't permanently add anything until I make up my mind.

Parts bought so far:

Sam Deluxe Identity Disc
2 feet of 5mm diameter 'quick connect' EL wire
10 neodymium magnets
2 mini inverters (CL-IPTC-3v-3-7FT) be here on Thursday
2 AAA battery compartments
2 non heavy duty single pull, double throw switches. (Heavy duty was out of stock.)
 
I'd love to get a set like this sometime. The mods you've done look awesome. Great work. The different levels of colors really set it off.

I finally finished my set of discs. Not screen accurate, but I think they are reasonbly impressive when taken as a set.

In addition, they have custom stands (much more solid than the cheap ones included with the toy), an always-on light mode, and ALL the original sounds & lighting effects:

701.jpg
801.jpg


a002.jpg


More pics here:
custom TRON Identity Discs
 
Back
Top