Tron Legacy Deluxe Identity Disc mods?

I hesitate to say in the first pic of a successful job your wires are striped right up to the point of solder where in the other two you have allot of extra unprotected wire. This can cause unexpected shorts bypass needed resistors and the like If anything I would try only exposing just enough wire for the job. also the one solder joint on the right side of the green board looks like it blew up. be careful how long you keep the iron on the board while you solder as you can burn components out. one rule for soldering is less is more. make sure you only connect the points you want to connect and nothing extra.even a little sliver of solder can create an unwanted electrical connection. Otherwise know as a short.

P.S. dont call me Roger... lol
 
That makes sense. I guess I'm making a lot of rookie mistakes. To be honest, I surprised myself when the first two went so smoothly. I'll try to regroup and give it another go. Thanks!
 
That makes sense. I guess I'm making a lot of rookie mistakes. To be honest, I surprised myself when the first two went so smoothly. I'll try to regroup and give it another go. Thanks!

No Prob! It is a learning process. You might be able to save those if you can clean off the old solder plus wires and not remove or de-solder anything that was supposed to be their. Then again they could still turn out dead so don't hold your breath. If you want to try you can get a Solder Sucker (not sure if that is the technical name but it is what it is) at most Electronics supply places. Radio Shack for sure. It looks like a big syringe. You just cock it, heat the solder you want to remove, Put the tip over the solder while it is still liquid and press the button. It sucks it right up. Then you clear it and suck up some more. Quite fun!

Well Good Luck and let us know how it turns out.
 
Will do. I hadn't heard of that de-soldering device. I'll see if I can find one. Thanks, again. I'll be back in a few weeks to report on my results.
 
I'm working on an instructable, but here is my Mod:
2sadnhc.gif

And here are my youtube videos:
Tron Disc mod - front - YouTube
Tron Disc Mod - inside - YouTube
I do have everything inside the disc now - I'll hopefully upload new videos in a couple of days.
This video shows the earlier firmware, but it now supports the original button and power switch. I've also installed a magnetic switch which will be triggered by rare earth magnets in the costume. This puts the disc into a gentle glowing mode instead of the flashy "blade" mode. Taking the disc back off switches back into the blade mode.
 
Awesome thank you for the videos might have to try my hand at it.

I'm working on an instructable, but here is my Mod:
2sadnhc.gif

And here are my youtube videos:
Tron Disc mod - front - YouTube
Tron Disc Mod - inside - YouTube
I do have everything inside the disc now - I'll hopefully upload new videos in a couple of days.
This video shows the earlier firmware, but it now supports the original button and power switch. I've also installed a magnetic switch which will be triggered by rare earth magnets in the costume. This puts the disc into a gentle glowing mode instead of the flashy "blade" mode. Taking the disc back off switches back into the blade mode.
 
Yeah, what ever happened to the Sideshow disc and baton set? Does anyone know if they had a prototype on display at SDCC?


Got a new toy disc, and another SoulInertia Kit - but decided to slightly modify the SI kit.

Also I rethought about what power supply to use and how to illuminate it.
I decided to use two 12V flexible SMD LED strips. The whole thing is powered by three 10440 Li-Ions. Yes it's only 600 mAh but I think the A23 batteries that came with the kit are like rated for 33 mAh?? Plus the A23 battery holders are too "wide" and I couldn't figure out how to orient them so that the two plastic halves would be able to fit flush together. I'll have to try and see what the run time is like...

Anyway, I have two of the strips, both oriented so that they "fire" towards the outside of the ring. 11.1V recharge PCB for the Li-Ion and the recharge port located just underneath the toy battery cover. You can actually take out the port for recharging and then replace the cover so you don't lose it. Just gotta remember to set the recharger to the 11.1V setting.

The glue I used this time for the inner C-ring on the back is E6000. Great stuff. Much better than the gorilla glue I tried earlier.

I dremeled out the front half inner C-ring so it's split up into 16 segments, just like the movie, so you can see it with the naked eye. Doesn't translate so well into pictures.

Here are a few pics and a video
IMG_0280.jpg

Close up of electronics. I put reflective tape around the battery bodies and the inside of the plastic outer strip mount so as to help maximize the amount of light heading towards the C-rings and the 4 holographic projector holes.
IMG_0281.jpg

IMG_0282.jpg

IMG_0286.jpg

IMG_0287.jpg


and movie:


Enjoy!
-C
 
cannibal869 11.1 volts will light up 12 volt led strips? The strips don't mind the missing .9 volts? You didn't have to do any crazy geeky electronic modifications to make it work? Because if so, I am going to copy your idea for using the rechargeable batteries.
 
cannibal869 11.1 volts will light up 12 volt led strips? The strips don't mind the missing .9 volts? You didn't have to do any crazy geeky electronic modifications to make it work? Because if so, I am going to copy your idea for using the rechargeable batteries.

Short answer is yes it works.
In truth, the SMDs really only need like 3V to work, but because the strips application is intended for 12V sources (i.e. for use in cars and such), they are resistored to be able to take 12V. Also realize that a fully charged Li-Ion is actually above 11.1V, probably closer to 12V.
Again I need to do a run time test on them, but I think they should do just fine.

The other answer is you can see the number of batteries I used and the video shows it works :):lol

caveat: the rear C-ring is actually brighter than the front ring, due to placement of the inner C-ring strip. At night, both are quite bright. I wonder if the rear might be too bright for a costume though (i.e. might get some light bleeding around the edges of the costume). When I built it, I wanted to have all the electronics on one "half" of the disc (batteries, LED strip, switches), so that the front could be taken off later on and adjustment could be easily made without having to worry about accidentally ripping something off. That said, if you want the front ring to be brighter, just mount the inner C-ring LED strip on the front "half" of the disc.
 
cannibal869 question for you. Do you think you could set it up to recharge from USB instead of a wall plug? If so I was wondering what your source for the Recharge Circuit Board is as that would be great for the build/mod I was going to try. Hopefully their is enough room left to put in a small USB flash drive as well. Great job!
 
cannibal869 question for you. Do you think you could set it up to recharge from USB instead of a wall plug? If so I was wondering what your source for the Recharge Circuit Board is as that would be great for the build/mod I was going to try. Hopefully their is enough room left to put in a small USB flash drive as well. Great job!

Umm... never had to wire up a usb port, so I'm not sure. In theory, yes it's possible, although I'm not quite sure as to the specifics. The charger that I use has a slider switch that allows you to select the voltage of the system (in multiples of 3.7). USB AFAIK is a 5V system. Since the voltage of the disc is now 11.1V, I dunno if something special would need to be done. I'm sure someone with more electronics knowledge will chime in at some point with a better answer.
Sorry :confused
 
Hi all,

having good results and with the 3mm flat wide angle LEDs.
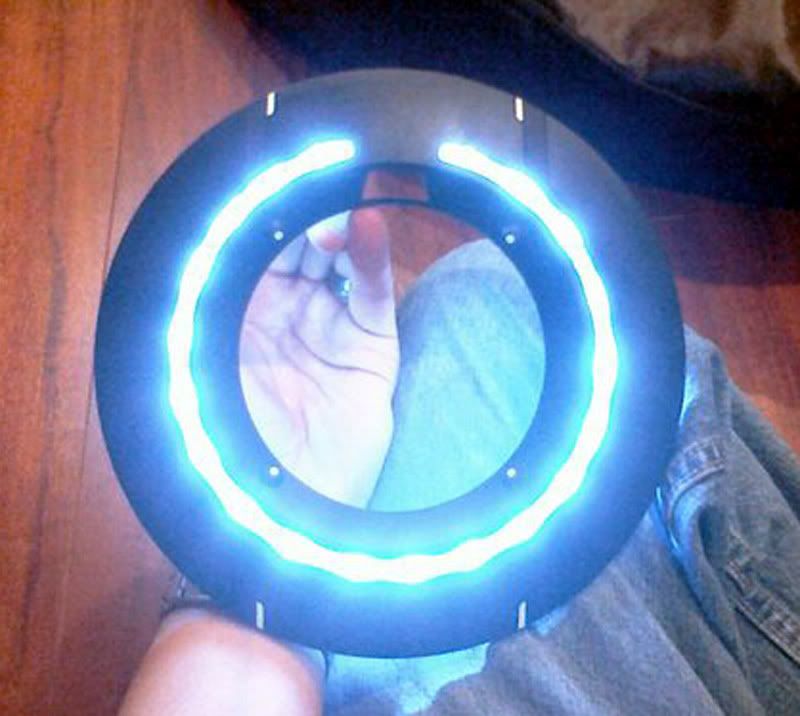
Here's a pic of the inner ring lit up (no flash, taken with my cell phone - sorry for the graininess)

TronDiscinnerring.jpg


And yes, it really is that bright! :cool I think there are 20 LEDs in the back there. I have them mounted perpendicular to the inside circumference of the inner ring, pointed outwards so that they're shining light towards the outer circumference.

I'm really pleased with the effect, cause you can also see some of the "wavy" difference in brightness like in the movie stills as posted above.
I've got most of the other stuff all set up and ready to go too... The ignition sequence of the outer ring is pretty cool actually. I'll post more pics once I get everything put together and closed up - don't worry I've taken pics of each step so you'll be able to see what I did inside too. THe outer ring will have 56 LEDs....

I've realized that I'll need smaller li-ion batteries so I'm going to go with the AAA size. Probably will end up putting 4 of them in there.

-C:)

Do you have any pictures of the inside? How did you get the inner ring to light up so brightly? Did you remove any part of the inside that surrounds the inner ring to expose more of the lights?

Thanks.
 
Back
Top