Torbjorn Cosplay - Overwatch

Incoming

New Member
Since the beta ended I had all this Overwatch hype and no outlet... so I had to occupy my time building a cosplay.
I'd say I'm about 60% done.

This is my first RPF thread.

First I had to pick a hero.
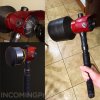
Last year at comicon I saw a guy cosplaying as Rocket Raccoon and he scaled the gun up to his height so it ended up being enormous. Pretty cool.
I wanted to replicate this effect plus I usually pick my cosplays based on facial hair, making Torbjorn an easy choice.

Torbjorn_Reference_1.jpg

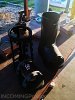
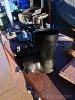
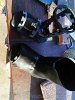
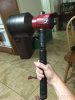
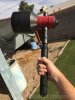
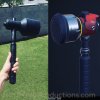
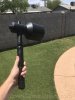
A lot of separate pieces to make.

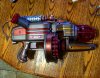
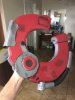
Accessories: Hammer, Gun, Backpack, Turret

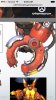
Armor: Pauldrons, Helmet, HUD, Robot Arm (Shoulder, Upper Arm, Elbow, Bracer), Claw, Chestpiece, Glove, Codpiece, Upper Leg Plates, Boots
 
Last edited:
First up was the hammer.

I wanted it to have some actual weight so foam was out. Plus it would be cool if I could actually hit stuff with it. Decided to go with 4" PVC couplings for the hammer head. I left the caps unglued so i could add a battery pack for the EL wire I will use to create the light ring.

Real happy with how it turned out. Hefty. Didn't like the "metallic silver" paint I used so I switched to a different color after this. Might go back and repaint that section.

LKGE0806.jpg

IMG_0745.jpgIMG_0748.jpgIMG_0774.jpgIMG_0766.jpg
 

Attachments

  • IMG_0777.jpg
    IMG_0777.jpg
    228.5 KB · Views: 341
  • IMG_0759.jpg
    IMG_0759.jpg
    159.3 KB · Views: 269
  • IMG_0755.jpg
    IMG_0755.jpg
    248 KB · Views: 339
  • IMG_0752.jpg
    IMG_0752.jpg
    269.4 KB · Views: 316
  • IMG_0750.jpg
    IMG_0750.jpg
    239.9 KB · Views: 335
  • IMG_0070.jpg
    IMG_0070.jpg
    318.4 KB · Views: 462
Last edited:
I made a gun about a month ago that isn't exact but is close enough to work for the cosplay so I can focus on other portions. I want to wear this to Phoenix Comic-con which is on June 2 so gotta cut some corners.

gun.jpgIMG_0070.jpg
 
Last edited:
Then there was the claw. I wanted the center ring to actually spin.

Sorry I didn't take more pics of the bracer and claw construction. The bracer is held on by the foam being snug on my forearm. The claw is layered FoamStyrofoamFoamStyrofoamFoam. Just the regular EVA foam was too floppy.

IMG_0779.jpgIMG_0784.jpgIMG_0798.jpgIMG_0793.jpgIMG_0788.jpg

IMG_0806.jpgIMG_0827.jpgIMG_0829.jpgIMG_0833.jpgIMG_0834.jpgIMG_0836.jpgIMG_0841.jpgLDHK6220.jpgIMG_0873.jpgIMG_0962.jpg
 

Attachments

  • IMG_0794.jpg
    IMG_0794.jpg
    147.2 KB · Views: 350
  • IMG_0830.jpg
    IMG_0830.jpg
    207.9 KB · Views: 273
  • IMG_0840.jpg
    IMG_0840.jpg
    157.7 KB · Views: 306
Last edited:
Sorry, trying to figure out my thumbnail issue. Overwatch is about to go live!!!

Here's some robot arm.

IMG_0920.jpgIMG_0926.jpgIMG_0929.jpg

- - - Updated - - -

And some pauldron action

SMOKESTAXXX

IMG_0874.jpgIMG_0882.jpgIMG_0889.jpgIMG_0919.jpg


I live in Phoenix. It is usually over 100 degrees at comicon. I refuse to wear a foam armor chestpiece so a simple vest with EL wire will have to do.

IMG_0895.jpgIMG_0879.jpgIMG_0906.jpgIMG_0912.jpg
 
Last edited:
So now we get to the part I could use some help on.

The boots.

The shoes are currently barge cemented onto the foam and I am worried that will break off after walking around awhile. Does anyone have suggestions for how to affix shoes to foam permanently? I have seen some options with straps and screws and such but I definitely don't want to have screw heads sticking up under my foot.

IMG_0931.jpgboots.jpg

Took a little Overwatch break to clomp around a bit. After about 15 minutes the hot glue/barge cement combination seems to be holding up quite well. I was thinking about gluing/pinning down the laces and filling the toe cavity with foam so if the glue breaks the shoe should still be fairly secure, leaving me able to walk still. Hopefully. Thoughts?

IMG_0965 copy.jpg
 
Last edited:
Thanks. The beard is one I already had. Just repurposing it for this :D ...need a lot more length for the proper cosplay though. It's pretty short when braided... one day...

Here's some updated WIP pics for official Overwatch day!

image3.jpgResized952016052395224903.jpgimage2.jpgimage1 (1).jpg

So the arm still need the hose connecting the upper/lower arm.
Hammer needs lighting.
Haven't decided how to go about the helmet. That is my actual welding helmet. It is very hot. May just clip it onto my belt or something.
Obviously I still need to finish the boots and do the leg armor.
Gotta do the eyepiece/HUD.
Would love to figure out how to do the ornamentation on the glove... I guess sew foam pieces into it?
I definitely want to build the turret and haven't even started the backpack. I want the backpack to auto spin, like in the game. I'm thinking these pieces aren't gonna be done by comicon.
One day I may try to build a muscle suit for the right arm.
 
Last edited:
Glad people are enjoying it.

It's funny, the game is out now... but I'm more excited about the cosplay.

Started the leg armor while I'm deciding how to proceed on the boots

leg armor copy.jpg
 
Looking really good already.

With your thoughts on the boots, I imagine what you have will hold pretty well. Depending on how much flex you have in the sole I wouldn't have thought you would need to fill the space. I've a set of iron man boots I've made that have done 4/5 outings now where I just hot glued the full length of the soles of the shoes onto some foam and they're still holding tightly. It may vary depending on the kind of shoe but I think with the addition of the contact cement it would be unlikely that they would come lose easily. Particularly with the reinforcement from the hot glue as well.

Just my thoughts on it but I hope that's of some use.
 
Thanks Ikras. That's like exactly what I wanted to hear. Now I can seal those shoes in and attempt to build these monster boots.

And thanks horus. The weathering was interesting. From the reference images, it looks more like he has oil stains as opposed to your usual dirt/grime weathering so I tried to stick to that plus the silver/black paint chips and scratches
 
I drastically underestimated the complexity of the boots.

It has taken me the better part of the day to get this far and I still have to do it all again. Dammit. What have I gotten myself into??

I ended up just gluing/pinning down the laces and moving on. Hopefully it all holds.

IMG_0989.jpgIMG_0990.jpgIMG_0991.jpgIMG_0992.jpgIMG_0993.jpgIMG_1006.jpgIMG_1004.jpgIMG_1003.jpgIMG_0998.jpgIMG_0997.jpgIMG_0996.jpgIMG_1007.jpg


I really wanted to see how this was gonna look so I kept working and... voila

image1 (2)copy copy.jpg
 

Attachments

  • IMG_1005.jpg
    IMG_1005.jpg
    261.1 KB · Views: 251
  • IMG_1002.jpg
    IMG_1002.jpg
    320.6 KB · Views: 256
  • IMG_1001.jpg
    IMG_1001.jpg
    319.9 KB · Views: 221
  • IMG_0999.jpg
    IMG_0999.jpg
    266.6 KB · Views: 204
Last edited:
Got a lot done today.

Finished a boot. Real happy with it. Still gotta do the other, though...

IMG_1015.jpgIMG_1017.jpgIMG_1018.jpgIMG_1019.jpgIMG_1021.jpg
IMG_1026.jpgIMG_1027.jpg


Started on the wheel for the back pack. Really hoping to get this spinning by comicon.

IMG_1028.jpgIMG_1029.jpgIMG_1030.jpg


Finished the leg armor too

IMG_1031.jpgIMG_1032.jpgIMG_1033.jpgIMG_1034.jpg


Overall, a lot further along.

IMG_1036.jpg
 
Been hard at work trying to get this done by Thursday for PCC.

We will see if it happens. I feel good about it but it does mean that memorial day weekend has/is going towards building the tor-pack-backmoblender

Also, here's the final legs stuff

IMG_1038.jpgIMG_1039.jpgIMG_1040.jpgIMG_1096.jpgIMG_1041.jpg


This baby's gonna spinnnnnn!!!
Also, I built the wheel too large. Oops. Now the backpack is kinda out of scale but oh well. Bigger is better I guess.

IMG_1086.jpgIMG_1088.jpgIMG_1091.jpgIMG_1092.jpgIMG_1093.jpgIMG_1097.jpgIMG_1098.jpgIMG_1099.jpg
 
90% COMPLETION UPDATE

So PCC starts today but since the forecast is 118 degrees all weekend I'm only wearing the full thing on Saturday. And I'll probably die of heat stroke. But we will see how the partial cosplay goes today and tomorrow.

Still gotta finish a boot and the helmet then just some final details. Enjoy!

IMG_1138.jpg

IMG_1146.jpg
IMG_1190.jpgIMG_1152.jpg
IMG_1157.jpgIMG_1159.jpgIMG_1161.jpgIMG_1165.jpg


IMG_1167.jpgIMG_1187.jpgIMG_1180.jpgIMG_1175.jpg

IMG_1173.jpgIMG_1169.jpgIMG_1200.jpg

IMG_1194.jpgIMG_1196.jpgIMG_1198.jpgIMG_1184.jpg


Attachments

  • IMG_1191.jpg
    IMG_1191.jpg
    356.4 KB · Views: 293
Looks great. I'm sure you'll get it done in time. Hope that you survive the heat too and get some great shots from it all.

Most importantly, enjoy!
 
This thread is more than 6 years old.

Your message may be considered spam for the following reasons:

  1. This thread hasn't been active in some time. A new post in this thread might not contribute constructively to this discussion after so long.
If you wish to reply despite these issues, check the box below before replying.
Be aware that malicious compliance may result in more severe penalties.
Back
Top