pzreich
New Member
For New York Comic Con 2018, I went as Thor from Thor: Ragnarok, specifically the gladiator scene where he fights the Hulk. Below are my progress pictures, as well as supplies, information and other important things!
SUPPLIES
-1 2mm EVA-38 Foam Sheet
-1 6mm EVA-38 Foam Sheet
-1 8mm EVA-38 Foam Sheet (TNT Cosplay Supply: https://tntcosplaysupply.com/product/eva-foam-sheets/)
-DAP Weldwood Contact Cement (Amazon: https://www.amazon.com/gp/product/B0006MXRWU/ref=oh_aui_detailpage_o00_s00?ie=UTF8&psc=1)
-1 1/2 yards 4-Way Stretch Red Spandex (Joanns)
-Velcro + Elastic straps (Joanns)
-Dark brown fabric square (Joanns)
-Black fabric, not stretchy (Joanns)
-1/2 yard Dark brown/black Pleather (Joanns)
-Stanley Retractable Utility Knife (Amazon: https://www.amazon.com/gp/product/B00002X204/ref=oh_aui_detailpage_o09_s00?ie=UTF8&psc=1)
-2 Dark Brown Leather Belts (Etsy: https://www.etsy.com/listing/578328...r-double-prong-belt-2?ref=shop_home_active_10)
-Cloak Disk and Belt Buckle (3D Printed) (Etsy: https://www.etsy.com/listing/524998571/thor-ragnarok-inspired-cloak-disc-and?ref=shop_home_active_96)
-Black muscle top and black relaxed fit jeans (Thrifted)
Finally:
-XiengProd foam armor template: (https://www.etsy.com/listing/565234...armor-templates?ref=shop_home_active_16&bes=1)
(Although sourced from here, all work done here is mine)
TOOLS:
-Sewing machine
-Hot glue gun
-Heat gun (You can find these pretty easily on Amazon or like, Walmart)
-Various shades of Acrylic paint +metallic
-Red Fabric Paint
-Brushes+Sponges
-Superglue
NOTE: Some pictures aren't working, so I made a separate pdf: https://documentcloud.adobe.com/link/track?uri=urn:aaid:scds:US:dd35fe0f-4a04-41f3-8bb3-c64c8f3a0a80
BUILDING
I first printed the template with it sized 95% and started making a cardboard template of the chest to check whether I had the right size. Luckily it did and I didn't spend an entire day wasted")
View attachment 850727View attachment 850728
With that done, I moved on to cutting and building the armor
View attachment 850699View attachment 850730
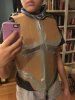
For the upper chest I used the 8mm foam and the torso/abs area I used 6mm foam. I glued them with the contact cement per instructions on the template. Make sure when gluing, do it in well ventilated area because the fumes are pretty toxic. If you can't do it outside, keep a fan on and the door open. Wear eye and mouth protection if possible. In the second picture, you can see the 2mm accents which I would soon heat seal and glue on. I marked it with silver sharpie and cut it with my utility knife on a cutting board (very important, either work on these or a carpet where the cut marks don't go through). I found I only needed two of the replacement blades throughout the build, and the knife comes with three.
View attachment 850702
This is the build with all parts glued together. All other components used 6mm foam.
Now that the build is done, I moved on to paint
PAINTING
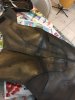
I was out of Mod Podge, or sealant, so for lack of a better method, I heat sealed the entire piece with my heat gun and prayed
View attachment 850733View attachment 850734View attachment 850735
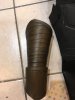
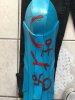
I started with the blue parts of his armor- the shoulder pad and leg brace. I used a mixture of different teals and blues and weathered it with dry brushing silver and bronze paint.
View attachment 850704
I painted the legs with a mixture of dark brown paints (mainly burnt umber, burnt sierra, oak) and metallic bronze. I shaded in the lines to get a better look with black. I also cut out the pleather sides he has with a rolling blade and hemmed the edged with glue. The crotch flap, for lack of a better word, had a visible hem around 1/2 away

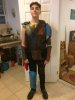
Painted the chest with the same method as the arm gauntlets and it turned out looking very cool and shiny


Here I added the red paint. The symbols really don't mean anything, nor do they have to be neat. I just doodled for a while, and also did the same for the pants in a similar shade of fabric paint. I also added a gold edge to his collar. (There was an actual collar, but it made the costume sit wrong on me so I cut it off)
I would recommend putting the straps/elastics on before painting if possible. Some of the placements that I ended up with turned out differently from the template, so make sure if you follow this guide to do it with your own body in mind. I used velcro mainly on the legs and shoulder pad, as well as the chest and back. I used elastics for the arm and bicep guards. The velcro and elastic don't glue well, so sew on some interfacing or cloth (I used cheap scraps of black fabric) to hot glue it to the arm. I used superglue as reinforcement when anything fell off, which thankfully was rare.
And now on to the accessories!
BELTS


I used two belts which were high quality enough I could barely cut through it, props to the seller. I eventually just made fake buttons out of hot glue and painted them silver. One I just used as a belt, but backwards, and the one spanning my chest was glued to the shoulder and the other side connected to a velcro square on the side panel that connected together in the back. I then superglued the pleather and square to their appropriate locations on the belt and everything was looking good!
FINISHING ADDITIONS


Sorry for all the sideways pictures! But here it is! I gathered the cape, cut a slit under the shoulder disk and tucked it in. Held fine for Comicon. I safely pinned a point that allowed the natural edge of the fabric to hang over on to the elastic strap on the side and stressed the edges. Basically hacked at 'em with a pair of scissors until they looked ripped. It ended up being around mid thigh, even though I would have liked it a little longer. I used almost all of the original 1 1/2 yards though. With the left over scraps of the brown fabric from the crotch flap, I made long strips, sewed them together, and tied it around the leg without a guard. With that I was mostly done!
FINAL LOOK


Image Cred: Huffington Post Image Cred: my mom Image Cred: (cropped) Joe Portletto, The Gadgeteer
Timothy A. Clary
Overall, this was a wonderful cosplay to build! I had so much fun! In order to get the head right, I cut my hair shorter and shaved in the triangles Thor has, even though my curl pattern interfered. I also did a full face of makeup and used liquid lipstick to do the stripes (got mistaken for God of War a few times lmao). The discs came in the day before Comicon, which was a little frightening, but still fine. For shoes, I used my black Doc Martens, though anything works. I cosplayed with my two best friends as Loki and Hela respectively. I love them to pieces and I am happy that we got to do a group cosplay.
I hope you enjoyed! I may post other work in the future, but this is it for now! Feel free to message with questions if you have any.
SUPPLIES
-1 2mm EVA-38 Foam Sheet
-1 6mm EVA-38 Foam Sheet
-1 8mm EVA-38 Foam Sheet (TNT Cosplay Supply: https://tntcosplaysupply.com/product/eva-foam-sheets/)
-DAP Weldwood Contact Cement (Amazon: https://www.amazon.com/gp/product/B0006MXRWU/ref=oh_aui_detailpage_o00_s00?ie=UTF8&psc=1)
-1 1/2 yards 4-Way Stretch Red Spandex (Joanns)
-Velcro + Elastic straps (Joanns)
-Dark brown fabric square (Joanns)
-Black fabric, not stretchy (Joanns)
-1/2 yard Dark brown/black Pleather (Joanns)
-Stanley Retractable Utility Knife (Amazon: https://www.amazon.com/gp/product/B00002X204/ref=oh_aui_detailpage_o09_s00?ie=UTF8&psc=1)
-2 Dark Brown Leather Belts (Etsy: https://www.etsy.com/listing/578328...r-double-prong-belt-2?ref=shop_home_active_10)
-Cloak Disk and Belt Buckle (3D Printed) (Etsy: https://www.etsy.com/listing/524998571/thor-ragnarok-inspired-cloak-disc-and?ref=shop_home_active_96)
-Black muscle top and black relaxed fit jeans (Thrifted)
Finally:
-XiengProd foam armor template: (https://www.etsy.com/listing/565234...armor-templates?ref=shop_home_active_16&bes=1)
(Although sourced from here, all work done here is mine)
TOOLS:
-Sewing machine
-Hot glue gun
-Heat gun (You can find these pretty easily on Amazon or like, Walmart)
-Various shades of Acrylic paint +metallic
-Red Fabric Paint
-Brushes+Sponges
-Superglue
NOTE: Some pictures aren't working, so I made a separate pdf: https://documentcloud.adobe.com/link/track?uri=urn:aaid:scds:US:dd35fe0f-4a04-41f3-8bb3-c64c8f3a0a80
BUILDING
I first printed the template with it sized 95% and started making a cardboard template of the chest to check whether I had the right size. Luckily it did and I didn't spend an entire day wasted
View attachment 850727View attachment 850728
With that done, I moved on to cutting and building the armor
View attachment 850699View attachment 850730
For the upper chest I used the 8mm foam and the torso/abs area I used 6mm foam. I glued them with the contact cement per instructions on the template. Make sure when gluing, do it in well ventilated area because the fumes are pretty toxic. If you can't do it outside, keep a fan on and the door open. Wear eye and mouth protection if possible. In the second picture, you can see the 2mm accents which I would soon heat seal and glue on. I marked it with silver sharpie and cut it with my utility knife on a cutting board (very important, either work on these or a carpet where the cut marks don't go through). I found I only needed two of the replacement blades throughout the build, and the knife comes with three.
View attachment 850702
This is the build with all parts glued together. All other components used 6mm foam.
Now that the build is done, I moved on to paint
PAINTING
I was out of Mod Podge, or sealant, so for lack of a better method, I heat sealed the entire piece with my heat gun and prayed
View attachment 850733View attachment 850734View attachment 850735
I started with the blue parts of his armor- the shoulder pad and leg brace. I used a mixture of different teals and blues and weathered it with dry brushing silver and bronze paint.
View attachment 850704
I painted the legs with a mixture of dark brown paints (mainly burnt umber, burnt sierra, oak) and metallic bronze. I shaded in the lines to get a better look with black. I also cut out the pleather sides he has with a rolling blade and hemmed the edged with glue. The crotch flap, for lack of a better word, had a visible hem around 1/2 away
Painted the chest with the same method as the arm gauntlets and it turned out looking very cool and shiny
Here I added the red paint. The symbols really don't mean anything, nor do they have to be neat. I just doodled for a while, and also did the same for the pants in a similar shade of fabric paint. I also added a gold edge to his collar. (There was an actual collar, but it made the costume sit wrong on me so I cut it off)
I would recommend putting the straps/elastics on before painting if possible. Some of the placements that I ended up with turned out differently from the template, so make sure if you follow this guide to do it with your own body in mind. I used velcro mainly on the legs and shoulder pad, as well as the chest and back. I used elastics for the arm and bicep guards. The velcro and elastic don't glue well, so sew on some interfacing or cloth (I used cheap scraps of black fabric) to hot glue it to the arm. I used superglue as reinforcement when anything fell off, which thankfully was rare.
And now on to the accessories!
BELTS
I used two belts which were high quality enough I could barely cut through it, props to the seller. I eventually just made fake buttons out of hot glue and painted them silver. One I just used as a belt, but backwards, and the one spanning my chest was glued to the shoulder and the other side connected to a velcro square on the side panel that connected together in the back. I then superglued the pleather and square to their appropriate locations on the belt and everything was looking good!
FINISHING ADDITIONS
Sorry for all the sideways pictures! But here it is! I gathered the cape, cut a slit under the shoulder disk and tucked it in. Held fine for Comicon. I safely pinned a point that allowed the natural edge of the fabric to hang over on to the elastic strap on the side and stressed the edges. Basically hacked at 'em with a pair of scissors until they looked ripped. It ended up being around mid thigh, even though I would have liked it a little longer. I used almost all of the original 1 1/2 yards though. With the left over scraps of the brown fabric from the crotch flap, I made long strips, sewed them together, and tied it around the leg without a guard. With that I was mostly done!
FINAL LOOK
Image Cred: Huffington Post Image Cred: my mom Image Cred: (cropped) Joe Portletto, The Gadgeteer
Timothy A. Clary
Overall, this was a wonderful cosplay to build! I had so much fun! In order to get the head right, I cut my hair shorter and shaved in the triangles Thor has, even though my curl pattern interfered. I also did a full face of makeup and used liquid lipstick to do the stripes (got mistaken for God of War a few times lmao). The discs came in the day before Comicon, which was a little frightening, but still fine. For shoes, I used my black Doc Martens, though anything works. I cosplayed with my two best friends as Loki and Hela respectively. I love them to pieces and I am happy that we got to do a group cosplay.
I hope you enjoyed! I may post other work in the future, but this is it for now! Feel free to message with questions if you have any.
Attachments
Last edited: