You are using an out of date browser. It may not display this or other websites correctly.
You should upgrade or use an alternative browser.
You should upgrade or use an alternative browser.
Tom's Kobold Saber and Mystery Saber
- Thread starter thd9791
- Start date
Luke the Belter
Well-Known Member
I would add 4 flat metal grips (TFU saber style) with rivets to the bottom tube and T-tracks in Mara Jade style around the hilt in the small recessed area above the clamp.
And reveal for sure. Everytime there is a chance to open up the saber hilt via a clamp it would be a waste not to think about a crystal chamber and maybe electronics
And reveal for sure. Everytime there is a chance to open up the saber hilt via a clamp it would be a waste not to think about a crystal chamber and maybe electronics
I've been really thinking about this piece. (The kobolds delivery estimate now says June, I think it really did go by sea...)
I cut the card down a mm or two so it's flush with the floor of the clamp. If I trim it flush with the rim, I'll see the bare clamp on the top and bottom, so I'm okay with part of the gold showing. I also filled that one screw hole with a heiland thumbscrew left over, and a beveled washer from an old electronic plug I got from physics lab junk. There's a washer and nut around the bare clamp rod, but I may change that...
I also bought a leica flash. I was going to use the clip as an ESB style d ring, and maybe take it apart for saber emitter parts or something. Mines in mint condition, and heavy enough that I'm surprised this wasn't used as a droid caller or something. Note, the clip does not have a flat bottom, the body has a ridge in it. This flash is beautiful, I'm tempted to find a crappy junk one and keep this one intact...
oh oh and I MAY have taken my bolsey, sanded off the endcap paint, replaced the button with a heiland bulb test and screwed a silver cardboard box metal loop disc to the top...grips to come
Attachments
I've done two things. First, I destroyed...okay unscrewed and pulled apart the Leica to find these parts...inside the large metal section was a plastic doughnut and silver sleeve that housed that spring. Very PT looking. I stuffed them in the spring bulb socket and they're not going anywhere. Good thing they look good!
i also installed the Leica clip with screws that I hand cut to be flat. Since it's weirdly shaped, I used some metal spacers I found in a 90s computer. They have slots in them like a flat head screw. theres a long springy part floating over a long rectangular cut out on one side of the clip. I can trim off the tip of that, and drill a second hole on the other side for a D ring!
i also installed the Leica clip with screws that I hand cut to be flat. Since it's weirdly shaped, I used some metal spacers I found in a 90s computer. They have slots in them like a flat head screw. theres a long springy part floating over a long rectangular cut out on one side of the clip. I can trim off the tip of that, and drill a second hole on the other side for a D ring!
Attachments
Last edited:
Thanks Andy. Well..I have a big update. First, I replaced the screws in the d ring with flat ones from an old 1960s amplifier from a psych lab. I also tried a different washer underneath that thumbscrew...didn't look right so I drilled out the original hole...and threw an indicator lamp with the same diamond knurling as the red button! (I got another box of physics equipment this weekend *grin* )
Attachments
I had bought that capacitor battery flash insert to go real thematic while trying to weigh this down..but that was too big. In that box of physics eq. There was a long HEAVYWEIGHT metal counter with thick cables coming off it. I took it apart and without the numbers..it looks like a crystal chamber! It fits too, with a half an inch length to spare. I epoxied a tube socket to the end to fill the gap, painted it black (maybe the brass will run through...I ripped off pieces of tape to make weathering at the edges...and i may even put a crystal in there...
oh and I ESBed the crap out of a set of Roy's grips. Clean and without problems, Cept for some epoxy slippage that I can't seem to clean off. (I made the mistake of trying to scratch it off the tube) they look fantastic. Now...do I paint anything near the emitter black? Wrinkle? Clamp? Let it be?
oh and I ESBed the crap out of a set of Roy's grips. Clean and without problems, Cept for some epoxy slippage that I can't seem to clean off. (I made the mistake of trying to scratch it off the tube) they look fantastic. Now...do I paint anything near the emitter black? Wrinkle? Clamp? Let it be?
Attachments
cayman shen
Master Member
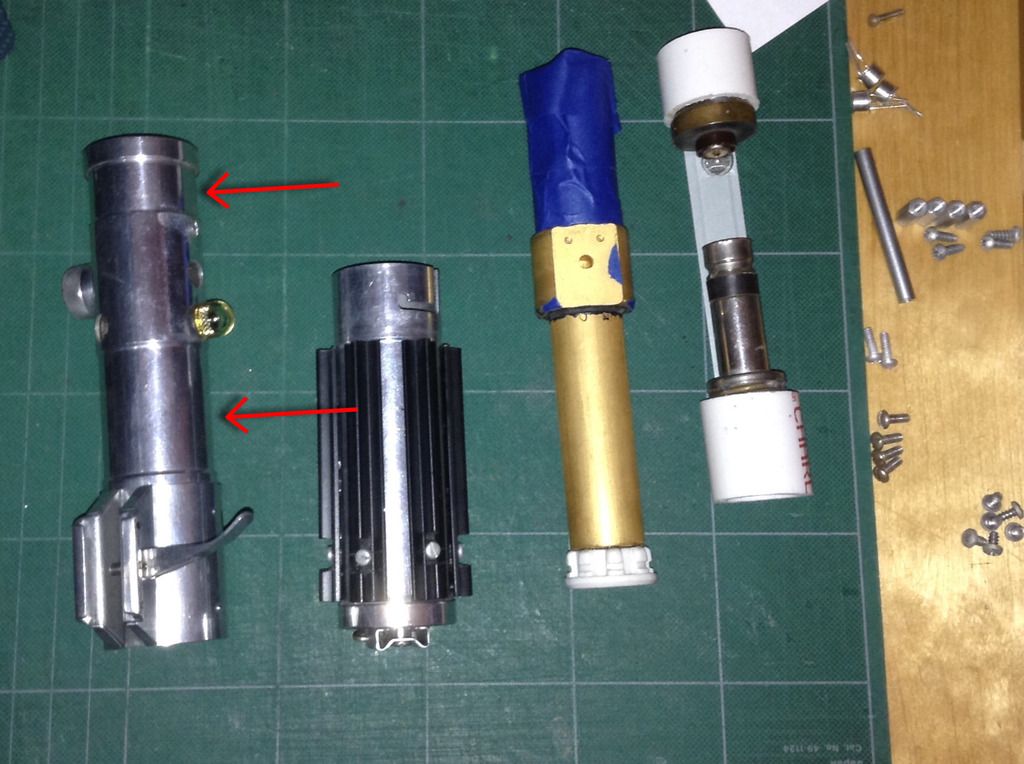
Perhaps you could add some heavily weather black paint or so, as seen on Luke's V2, where I put the red arrows?
http://i833.photobucket.com/albums/zz258/Sym-Cha/Toms saber_zpsjxymo3sm.jpg
Chaim
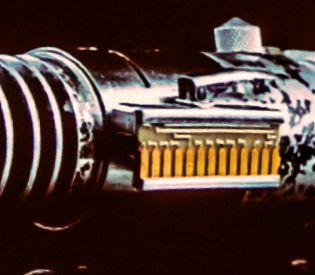
Speaking of Luke V2...that's not the Luke V2 clamp lever is it?!
Perhaps you could add some heavily weather black paint or so, as seen on Luke's V2, where I put the red arrows?
http://i833.photobucket.com/albums/zz258/Sym-Cha/Toms saber_zpsjxymo3sm.jpg
Chaim
OOH this is why I ask. Here I was picturing coloring the rim or the socket section...I DO like that. I'm weathering the guts, and I'd love to weather that too.
how do people mimick the v2s weathering? Most sanding I do looks nothing like that.
- - - Updated - - -
Alas, no. It bends the opposite way, I wish though.Speaking of Luke V2...that's not the Luke V2 clamp lever is it?!
cayman shen
Master Member
OOH this is why I ask. Here I was picturing coloring the rim or the socket section...I DO like that. I'm weathering the guts, and I'd love to weather that too.
how do people mimick the v2s weathering? Most sanding I do looks nothing like that.
- - - Updated - - -
Alas, no. It bends the opposite way, I wish though.
Yeah, but can it be made to bend the V2 way (does it bend backward? Or can the clamp be installed 180 degrees flipped?) I'm sure you're right, but I don't want to leave any V2 stone unturned!
Haha I know the feeling! Here, based on the shape I think this lever can only fold one way. It stops at 90* every time.Yeah, but can it be made to bend the V2 way (does it bend backward? Or can the clamp be installed 180 degrees flipped?) I'm sure you're right, but I don't want to leave any V2 stone unturned!
Attachments
cayman shen
Master Member
Haha I know the feeling! Here, based on the shape I think this lever can only fold one way. It stops at 90* every time.
But would it stop there on a Graflex clamp? Is the Graflex clamp shape different? Also the V2 is missing the second bar...does that affect the tension that might allow the lever to go farther? Sorry to keep bugging you just playing Sherlock here :lol
Lol questions are good!But would it stop there on a Graflex clamp? Is the Graflex clamp shape different? Also the V2 is missing the second bar...does that affect the tension that might allow the lever to go farther? Sorry to keep bugging you just playing Sherlock here :lol
let me explain it this way - this is very similar to a graflex set up. It's a lever, with a right angled back and a softer angle in front, against a flat sidebar. Graflex levers won't work backwards either for the same reason, the tension would snap it. Also, the underside of my lever has a recess like a graflex, which isn't seen on the top of the V2 lever!
cayman shen
Master Member
Lol questions are good!
let me explain it this way - this is very similar to a graflex set up. It's a lever, with a right angled back and a softer angle in front, against a flat sidebar. Graflex levers won't work backwards either for the same reason, the tension would snap it. Also, the underside of my lever has a recess like a graflex, which isn't seen on the top of the V2 lever!
Okay fine, crush my dreams :lol I appreciate the explanation though!
Similar threads
- Replies
- 12
- Views
- 2,261
- Replies
- 25
- Views
- 4,892
- Replies
- 19
- Views
- 2,971
- Replies
- 111
- Views
- 15,614
- Replies
- 302
- Views
- 38,276


