tennantlim
Well-Known Member
When DaveChaos announced his Hellboy Good Samaritan kit run, I was in like Flynn and instantly confirmed my interest. The fact that the kit was designed by none other than AndersEFP , whose PKD design is IMHO a masterpiece and one that I've built thrice, sealed the deal for me. Amazingly the kit reached me in no time at all and it is an exquisite one. It includes pressure casted resin and pewter parts, attachment hardware and electronics, and even the grip has faux wood textures!
Here are the main parts of my kit out of the box and dry-assembled. Isn't she purrty?

Going into this build, I made the following decisions;
- No electronics. For no other reason than keeping the build simple and not have to deal with changing batteries. Yeah I'm THAT lazy lol.
- I want this to be more personalized so it's not going to be accurate against the actual prop.
Ultimately, this build was going to be a soul soother in between my long, intensely stressful work days. Hence it will be slow going and I won't be documenting frequently.
One of the first things I did was polish up the pewter parts.

It's worth mentioning that the seams on this kit are extremely easy to clean up with a little sanding and filing. Having said that, I took my time (literally only about an hour each time every other day) and eventually completed the clean up over about two weeks. I also added dings and impact marks with a punch and mallet.
Moving on to the painting process.

It's pretty straight forward. Black primer, gloss clear, graphite powder, and silver Rub n Buff along the edges of the main gun parts. For the pewter components. I applied black oil paint and buffed the high points with steel wool. Easy peasy!
The grip was a fun one.

I thought the textures were a little...much. So I sanded the grip down to an almost smooth finish. It was then given a coat of primer, brown base paint, and streaks of acrylic in three shades of brown. Finally I sealed it with a coat of gloss clear to tie the whole varnished walnut aesthetics together.
I owe the next part of the build to wayouteast where he fixed the warping receiver lid whenever the trigger is pulled. Check out his epic build here.


I sawed and hand filed a 2mm aluminium sheet to shape and drilled two holes in their respective locations for attaching the trigger guard. For some strange reason, I'm inclined to leave it unpainted. For now.
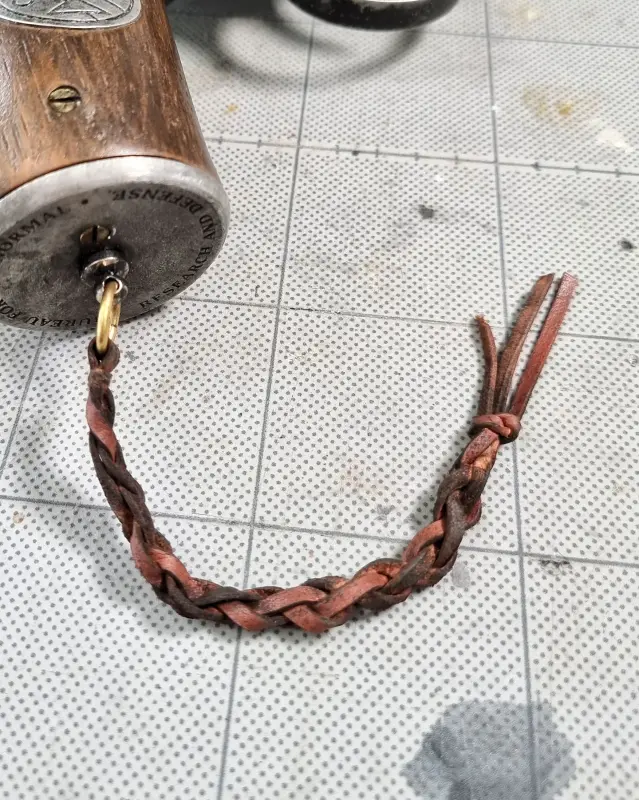
The silver lanyard ring was replaced with a slightly thicker brass/gold one to add visual contrast against the silver base.

Finally, I worked on the 4 ammo rounds.


The shells were sanded smooth, sprayed black and gloss clear, and applied with gold leaf Rub n Buff. The primers/buttons were coated with Molotow chrome and the translucent ammo tips were given a coat of gloss clear to enhance their clarity.
That's it for now. I'm waiting for Dave's upgrade bits and I'm trying to figure out how to braid the lanyard.
Here are the main parts of my kit out of the box and dry-assembled. Isn't she purrty?
Going into this build, I made the following decisions;
- No electronics. For no other reason than keeping the build simple and not have to deal with changing batteries. Yeah I'm THAT lazy lol.
- I want this to be more personalized so it's not going to be accurate against the actual prop.
Ultimately, this build was going to be a soul soother in between my long, intensely stressful work days. Hence it will be slow going and I won't be documenting frequently.
One of the first things I did was polish up the pewter parts.
It's worth mentioning that the seams on this kit are extremely easy to clean up with a little sanding and filing. Having said that, I took my time (literally only about an hour each time every other day) and eventually completed the clean up over about two weeks. I also added dings and impact marks with a punch and mallet.
Moving on to the painting process.
It's pretty straight forward. Black primer, gloss clear, graphite powder, and silver Rub n Buff along the edges of the main gun parts. For the pewter components. I applied black oil paint and buffed the high points with steel wool. Easy peasy!
The grip was a fun one.
I thought the textures were a little...much. So I sanded the grip down to an almost smooth finish. It was then given a coat of primer, brown base paint, and streaks of acrylic in three shades of brown. Finally I sealed it with a coat of gloss clear to tie the whole varnished walnut aesthetics together.
I owe the next part of the build to wayouteast where he fixed the warping receiver lid whenever the trigger is pulled. Check out his epic build here.
I sawed and hand filed a 2mm aluminium sheet to shape and drilled two holes in their respective locations for attaching the trigger guard. For some strange reason, I'm inclined to leave it unpainted. For now.
The silver lanyard ring was replaced with a slightly thicker brass/gold one to add visual contrast against the silver base.
Finally, I worked on the 4 ammo rounds.
The shells were sanded smooth, sprayed black and gloss clear, and applied with gold leaf Rub n Buff. The primers/buttons were coated with Molotow chrome and the translucent ammo tips were given a coat of gloss clear to enhance their clarity.
That's it for now. I'm waiting for Dave's upgrade bits and I'm trying to figure out how to braid the lanyard.
Last edited:
")