This makes me wanna circle back and finish mine, did all the external work but I need to finish the electronics install.
You are using an out of date browser. It may not display this or other websites correctly.
You should upgrade or use an alternative browser.
You should upgrade or use an alternative browser.
The Rise of Skywalker: Episode IX Graflex
- Thread starter SethS
- Start date
BENnotKENOBI
Active Member
I don't know if this has been discussed or not, but I was looking at some high res shots from the movie. I noticed that, due to how the light is hitting the edge of the brass, it looks like the welding might have been sculpted on top of the Graflex instead of etched or melted.


Has anyone tried to add on with anything instead of using the dremel tool?
I am hoping to order a full kit from KR as soon as he makes more available, and I'm looking at how to create the effect.
Has anyone tried to add on with anything instead of using the dremel tool?
I am hoping to order a full kit from KR as soon as he makes more available, and I'm looking at how to create the effect.
I had a cracked graflex top and it was in really bad shape, so I was going to throw it away after I salvage the bunny ears, etc. But then the movie came out and I decided to convert it ...I don't know if this has been discussed or not, but I was looking at some high res shots from the movie. I noticed that, due to how the light is hitting the edge of the brass, it looks like the welding might have been sculpted on top of the Graflex instead of etched or melted.
View attachment 1423800View attachment 1423801
Has anyone tried to add on with anything instead of using the dremel tool?
I am hoping to order a full kit from KR as soon as he makes more available, and I'm looking at how to create the effect.
I don't have any welding tools and ultimately I just used solder to cover the cracks where they were, so of course it is not screen accurate. But I guess it still counts as " add anything instead of dremel "
") - so here are a couple of pictures:
- so here are a couple of pictures:I agree that it looks like they may have applied something to give it a more raised surface, I think the reason everyone uses a Dremel is that since the prop looks to have the copper exposed it is simpler to grind into the flash gun until you reach copper. With a little creativity you can get it to look pretty close.I don't know if this has been discussed or not, but I was looking at some high res shots from the movie. I noticed that, due to how the light is hitting the edge of the brass, it looks like the welding might have been sculpted on top of the Graflex instead of etched or melted.
View attachment 1423800View attachment 1423801
Has anyone tried to add on with anything instead of using the dremel tool?
I am hoping to order a full kit from KR as soon as he makes more available, and I'm looking at how to create the effect.
However, I have no idea how they achieved that look on the prop. There are various things you could apply, like E6000 but it would be messy and you still need to figure out how to paint it.
I actually think that looks pretty awesome. I don’t know much about soldering. I wonder if there is a copper color your could solder with?I had a cracked graflex top and it was in really bad shape, so I was going to throw it away after I salvage the bunny ears, etc. But then the movie came out and I decided to convert it ...
I don't have any welding tools and ultimately I just used solder to cover the cracks where they were, so of course it is not screen accurate. But I guess it still counts as " add anything instead of dremel "
View attachment 1423855
View attachment 1423856
It's brass, not copper. There is a difference.copper
BENnotKENOBI
Active Member
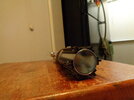
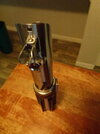
I had a cracked graflex top and it was in really bad shape, so I was going to throw it away after I salvage the bunny ears, etc. But then the movie came out and I decided to convert it ...
I don't have any welding tools and ultimately I just used solder to cover the cracks where they were, so of course it is not screen accurate. But I guess it still counts as " add anything instead of dremel "
View attachment 1423855
View attachment 1423856
Whoa! That's really cool looking! I might be tempted to do something along those lines. Maybe brush paint the brass...
Yes, you can get brass solder wire, but they generally require a torch to melt, simple soldering gun does not go hot enough to melt it.I actually think that looks pretty awesome. I don’t know much about soldering. I wonder if there is a copper color your could solder with?
I tried to paint the seams with some decent brass/gold paint and it probably was ok if you just see it on a picture, but when I had it in my hands it felt kind of too fake so I removed it. I'm not particularly skilled with these things, so I'm sure someone can do a more convincing job.Whoa! That's really cool looking! I might be tempted to do something along those lines. Maybe brush paint the brass...
You are absolutely right. It is brass. I misspoke. My point was it is easier to get the look of the marks by grinding into the brass instead of painting on top.It's brass, not copper. There is a difference.
I soon will be stocking Reyflex conversion kits. I have everything in hand except the leather. That should take a couple weeks. I'll post pictures when I have it.
Collectorchris
Well-Known Member
I dont think it is TIG welded. They may have heated up some brass braising rods and laid small puddles, the ground it down a bit. I guess with some time and patients, you could mix some brass cold cast powder in with epoxy and achieve a similar result perhaps???
ID10T
Sr Member
You may be correct, but to me, it looks like low power TIG- just enough to make a small pool with a fine electrode. "stacking dimes"
No filler wire.
I have done TIG like that on a thin sheetmetal box with very tight seams. Just melt the two pieces together (almost like gas welding). Replace the "crack" with a weld pool. It is not the strongest weld with TIG but it works for thin stuff like that.
No filler wire.
I have done TIG like that on a thin sheetmetal box with very tight seams. Just melt the two pieces together (almost like gas welding). Replace the "crack" with a weld pool. It is not the strongest weld with TIG but it works for thin stuff like that.
You may be correct, but to me, it looks like low power TIG- just enough to make a small pool with a fine electrode. "stacking dimes"
No filler wire.
I have done TIG like that on a thin sheetmetal box with very tight seams. Just melt the two pieces together (almost like gas welding). Replace the "crack" with a weld pool. It is not the strongest weld with TIG but it works for thin stuff like that.
Bingo
JBReplicas
Master Member
They were TIG welded in the workshop, which is also why there are variations in the 'repairs'.
I saw this TLJ concept art posted on Instagram a couple of days ago. The heavier discoloration and warped metal look awesome. It would be cool to see a Reyflex done up with this more extreme blast damage, with the factory-fresh new clamp.

https://www.instagram.com/mattsav.concept/Aidan Coleman
New Member
It was long overdue. But it's finally done.


Metaphysics
Member
Any updates on this?I soon will be stocking Reyflex conversion kits. I have everything in hand except the leather. That should take a couple weeks. I'll post pictures when I have it.
Here is mine. Made from a Roman's Gen2 Graflex and Khal's conversion kit. So about as accurate as you can get. Halliwax was kind enough to do the conversion and it looks outstanding! I will let him chime in if he wants on how he did it (I made some goofs he corrected). I am super happy with it. It is a static piece, not going to FX it.


Attachments
Similar threads
- Replies
- 14
- Views
- 700
- Replies
- 13
- Views
- 2,024
- Replies
- 114
- Views
- 14,137