You are using an out of date browser. It may not display this or other websites correctly.
You should upgrade or use an alternative browser.
You should upgrade or use an alternative browser.
The Rescuer--Luke's saber from Mandolorian Show off
- Thread starter Anakin Starkiller
- Start date
Thanks for the video. Never realised that the EFX came apart.EFX mando Luke vs The Rescuer
Starkiller really did do a great job with the Rescuer.
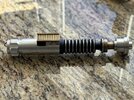
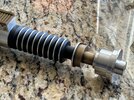
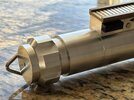
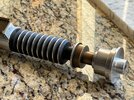
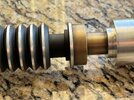
Halliwax and I were talking after Anakin Starkiller visited him. I took my eFX apart also. I removed the control box in case those screws were holding the steel plug in place (they were not on mine). I cleared away some of the caulk on the surface. I used a wooden dowel to give the steel plug a few taps. There were a few drops of superglue and the caulk holding it in place. Note that it should only come out through the grip end.
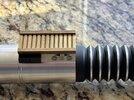
I cleaned up the caulk some more, but this is what it looks like when first removed. Now it sits a bit loose in the saber, but you can easily secure it again with glue and caulk, or I simply rolled up some bubble wrap in the pommel end as a temporary fix and it doesn’t slide now. I haven’t decided what, if anything, I was going to do with this, but it looks as if it is able to be converted to an FX with a few modifications.

How did you remove the grease residue from the grip section. Just a wet rag? HalliwaxI cleaned up the caulk some more, but this is what it looks like when first removed. Now it sits a bit loose in the saber, but you can easily secure it again with glue and caulk, or I simply rolled up some bubble wrap in the pommel end as a temporary fix and it doesn’t slide now. I haven’t decided what, if anything, I was going to do with this, but it looks as if it is able to be converted to an FX with a few modifications.
View attachment 1762563
View attachment 1762564
Mine didn’t have grease residue. I’d use a dry rag, damp if you have to. I don’t know how they applied their weathering, but I’d avoid anything that could potentially remove paint.
A wooden skewer/chopsticks/toothpick/tongue depressor work well for removing the bulk of the caulk.
A wooden skewer/chopsticks/toothpick/tongue depressor work well for removing the bulk of the caulk.
How did you remove the grease residue from the grip section. Just a wet rag? Halliwax
Q-tip with rubbing alcohol 70% not 91%Mine didn’t have grease residue. I’d use a dry rag, damp if you have to. I don’t know how they applied their weathering, but I’d avoid anything that could potentially remove paint.
A wooden skewer/chopsticks/toothpick/tongue depressor work well for removing the bulk of the caulk.
In my videos if the rubbing alcohol is green it’s the 70%
Teecrooz whacked that stinka with a dowel and popped right out! Alittle machine work of the emitter and you could fx this suckerHalliwax and I were talking after Anakin Starkiller visited him. I took my eFX apart also. I removed the control box in case those screws were holding the steel plug in place (they were not on mine). I cleared away some of the caulk on the surface. I used a wooden dowel to give the steel plug a few taps. There were a few drops of superglue and the caulk holding it in place. Note that it should only come out through the grip end.
CopperRevan
Master Member
What's the threading size on that grenade section? Thanks guys for the videos and pics of this.
Last edited:
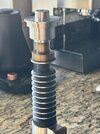
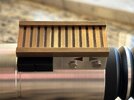
I was able to finish up my Rescuer hilt today. So I decided to use a very tiny bit of Tamiya weathering powder on the neck section mostly in the corners to give it that aged/dirty/dusty look. I then added a small touch to the control box rails to match the color. I also went over the entire hilt on my lathe with 00 steel wool and then 0000 steel wool and I love the finish it gave. Finally, I cut an aluminum rod to fit inside and add weight…it really gives it at authentic feel.
Overall I’m very happy with how this turned out.
Overall I’m very happy with how this turned out.
Attachments
CopperRevan
Master Member
Gorgeous Job!!! I mean Outstanding!!I was able to finish up my Rescuer hilt today. So I decided to use a very tiny bit of Tamiya weathering powder on the neck section mostly in the corners to give it that aged/dirty/dusty look. I then added a small touch to the control box rails to match the color. I also went over the entire hilt on my lathe with 00 steel wool and then 0000 steel wool and I love the finish it gave. Finally, I cut an aluminum rod to fit inside and add weight…it really gives it at authentic feel.
Overall I’m very happy with how this turned out.
Thanks so much, lol I’m surprised I didn’t mess it up. Was very hesitant on doing it myself.Gorgeous Job!!! I mean Outstanding!!
Looks gorgeous. Which weathering powder did you use?I was able to finish up my Rescuer hilt today. So I decided to use a very tiny bit of Tamiya weathering powder on the neck section mostly in the corners to give it that aged/dirty/dusty look. I then added a small touch to the control box rails to match the color. I also went over the entire hilt on my lathe with 00 steel wool and then 0000 steel wool and I love the finish it gave. Finally, I cut an aluminum rod to fit inside and add weight…it really gives it at authentic feel.
Overall I’m very happy with how this turned out.
Dude I love those videos. Great to see you guys talking about our favorite topic so casually and chill.EFX mando Luke vs The Rescuer
Any chance you might do a quick TXQ vs. Rescuer comparison video at some point?
Looks gorgeous. Which weathering powder did you use?
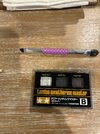
Thanks! I used Tamiya Weathering Master kit B, and really only used the “soot” color. I was using the stunt top to experiment and took several tries to get correct. I eventually used a makeup brush that my wife suggested. I used the tiny diagonal end. The reason is because the brush that comes with the weathering kit really is too fluffy and big to get directly in the corners where I actually want the powder.
Attachments
I can once I get mine back from the installer, i should have it back in a weekDude I love those videos. Great to see you guys talking about our favorite topic so casually and chill.
Any chance you might do a quick TXQ vs. Rescuer comparison video at some point?
Incredible job!I was able to finish up my Rescuer hilt today. So I decided to use a very tiny bit of Tamiya weathering powder on the neck section mostly in the corners to give it that aged/dirty/dusty look. I then added a small touch to the control box rails to match the color. I also went over the entire hilt on my lathe with 00 steel wool and then 0000 steel wool and I love the finish it gave. Finally, I cut an aluminum rod to fit inside and add weight…it really gives it at authentic feel.
Overall I’m very happy with how this turned out.
One of my favorite products, they are not cheap anymore!Thanks! I used Tamiya Weathering Master kit B, and really only used the “soot” color. I was using the stunt top to experiment and took several tries to get correct. I eventually used a makeup brush that my wife suggested. I used the tiny diagonal end. The reason is because the brush that comes with the weathering kit really is too fluffy and big to get directly in the corners where I actually want the powder.
One of my favorite products, they are not cheap anymore!
Yea it’s a great product but a bit of a learning curve to getting right. The advice from DaveP to fog it up before applying by breathing hot air onto the neck first and then applying the powder made it stick much better.
Similar threads
- Replies
- 62
- Views
- 5,838
- Replies
- 2
- Views
- 554
- Replies
- 32
- Views
- 3,445
- Replies
- 11
- Views
- 738
- Replies
- 7
- Views
- 1,148